skip to main |
skip to sidebar
Fellow film-nut Dan Domme posted a great article over on his blog outlining some of the advantages of film photography over digital. Since I didn't have a post ready for this week, I'm just going to link you to his. Thanks, Dan ;)
"In Which I Counter an Argument: 10 reasons film is superior to digital"
I'm not saying you shouldn't shoot digital (and neither is Dan), but there are a lot of good reasons to give film photography a try and see how you like it. A lot of what Dan says lines up with my motivations for shooting film, and while it's not the best medium for every type of photography (I don't think I could ever bring myself to shoot a wedding all on film), it certainly has a valid place in the photography universe still.
If you like what you read, you should give Dan a follow on twitter (@yeknom) and check out his work on flickr. And of course, his blog.
~S
[title of blog] on flickr

© 2010 Simon Hucko
I don't have anything fresh for the blog this week, so it's time for a few winter/holiday related links! (Sort of like the dreaded clip-show on TV, only hopefully a little more rewarding.)
- The thermometer is plunging, and you might be worried about taking your camera out in the cold. Don't be.
- Around here, cold weather means snow. Learn how to keep it from fooling your camera meter.
- Shh! Here's the secret to shooting Christmas lights.
- Getting together with friends and/or family? Here's a few tips for capturing the event.
- Finally, if you're lucky enough to be getting away on a vacation, I have some thoughts on managing your vacation photos.
Enjoy!
~S
[title of blog] on flickr
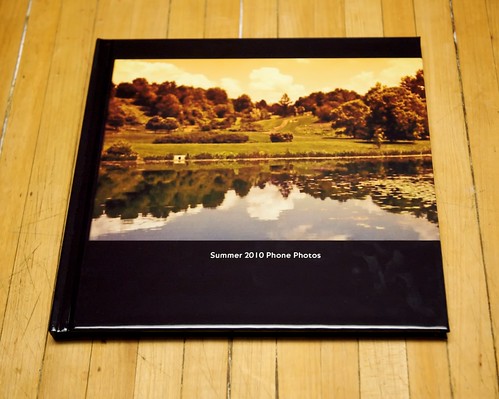
A quick plug for Shutterfly. If you're not a member, I encourage you to go sign up for an account. I believe you get something like 50 4x6" prints just for joining.
The reason that I'm mentioning it here is that they have sales on their photobooks every few months. Occasionally, they'll even give one away for free. They were running a free book promotion at the end of the summer, so I threw together a small collection of phone photos and had it printed up for less than $9 after tax and shipping. Their print quality isn't great by any means, but it's plenty good enough for personal stuff. My wife and I have replaced doing photo albums with ordering these books: every time a sale comes around we'll pull photos from recent events and order one. Sure, it's probably cheaper to keep albums of 4x6 prints, but the space saving and convenience is worth the extra cost (and in the long run I think that extra cost is very minimal once you consider album and print cost and the time it takes to put all the photos in the sleeves). It's nice to be able to design layouts and add text, too, although I went for full bleed with these photos to be artsy (or something like that).
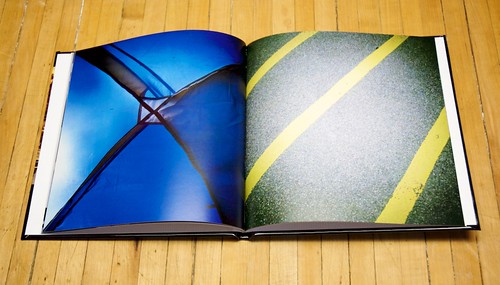
If you've never printed a photo book, I suggest giving it a try. It's pretty cool to get a hard copy of your work that you can pass around to friends and family.
Note: I'm not affiliated with Shutterfly in any way, other than being a customer. I'm certainly not making any money off of this post.
~S
[title of blog] on flickr
Huge thanks to Matt Beaty for picking me for the comment of the month contest he's running on his blog (Vault Photography Blog).
Matt is working his way through photo school at Northern Arizona University, and talks a lot on his blog about his experience as a photo student, along with his other photographic endeavors. He takes some excellent portraits, and shares his experiments on the blog (including what didn't work, which can be more worthwhile than what did sometimes). I enjoy his somewhat irreverent view on photo school and photography in general, and always like seeing a new post pop up in the reader. Please head over and give it a read, and consider adding it to your RSS reader too.
Matt also asked me to write a guest post for him some time, and I'm hoping he'll trade with me one week so that I can host him here.
You can find Matt in the following places:
Vault Photography Blog
Twitter (give him a follow)
Flickr
Vault Photography
~S [title of blog] on flickr
With the 4th of July coming up here in the States, I thought I'd link you to my favorite fireworks tutorial:
How to Photograph Fireworks (Digital Photography School)
Short version:
- Tripod (required)
- Remote Trigger (highly recommended)
- Manual Exposure (stop freaking out. Set it to your lowest ISO, f/8-ish and 5 seconds exposure to start. Adjust exposure time and aperture as necessary)
- Manual Focus (set it to infinity or focus on a street light far away and turn off auto-focus)
- Location/Composition (include something interesting in the foreground to give context and add interest to your shot)
Can't wait to see 'em!
~S
[title of blog] on flickr

As I get more comfortable with my DROID, I'm finally starting to use it to add another layer to my social networking. One of the main reasons I was so eager to get a smartphone (with a camera and processing app) was the ability to capture little moments and share them out on location. These are the little lomo snapshots that I would never likely create with a "serious" camera and "serious" post processing, but I love the ability to share a glimpse into how I see the world (and I enjoy seeing similar photos from other photographers, most notably Chase Jarvis with his Best Camera project).
I was trying to decide how best to share out these updates, and thought I would give tumblr a try. tumblr seems to be a nice middle ground between the brevity of twitter and this blog, giving me the opportunity to post photos with a caption or little story without worrying about character limits. I've also decided I'm going to post short tips/tricks/thoughts to the account from my phone every so often, things that don't really have enough substance to be a full blog post here but that I think you guys would benefit from. My favorite feature of tumblr is that it's extremely mobile device friendly with a nice clean quick-loading interface for mobile browsers.
Check out my tumblr blog here - you can follow me if you have a tumblr account, or I think you can set it up for an RSS reader as well. Most of what goes on there will also get linked to from twitter, so if you're already following me (@simonhucko) you're all set. Also, being new to tumblr, I'm not following very many people yet. If you know of a good tumblr blog (photo-related or otherwise), please let me know via comments below or twitter so I can check them out.
~S
[title of blog] on flickr

If you're a photographer and you're not on flickr by now, well, you should be. Flickr is a great photo hosting site with a lot of nice features, including the ability to edit when your photo was uploaded so you can sequence them properly. Unfortunately, flickr doesn't allow you to set a future date for your upload, so you can't schedule your photo posts ahead of time. I'm not sure why, but they don't. This feature is also absent from all of the flickr uploading software/plugins that people use.
Enter loadlater.com, a project my friend Matt Mendick has been working on that was just opened up for public beta. Loadlater is a simple web upload interface that allows you to fill out all the photo information (including which sets and groups you want it added to) and then schedule a time for it to post to flickr.
Why would you want to schedule your uploads for later? The best use in my mind is to space out your photos so that people don't get overwhelmed. Rather than uploading all 50 photos from your most recent vacation at once, you can set them to upload in smaller batches (1-5ish is most effective) every day. That way people are more likely to look at them all, rather than glancing at the first few and then giving up. This is also good if you upload daily (like me) and are going out of town, you can set your uploads for while you're gone. Or even if you're not going anywhere, you can schedule the whole set after you finish editing so that you don't forget to upload one day (which I tend to do from time to time).
If that sounds like something you might be interested in, give it a shot and send any questions/comments/feedback to Matt using the contact link on the site. If you like it, let him know - this is something he's working on in his free time.
~S
[title of blog] on flickr

No meaty post this week (still busy with the house), but I thought I'd throw up a link for you guys to play with. SuperLame.com hosts a web app that lets you add speech/thought bubbles to your images. It's fast and super easy to use, and lets you fully control the size and position of your bubble (even extending beyond the photo). I believe they have a facebook app, too, although I haven't played with it yet. I may have to set that up, because those are the types of photos that will get the SuperLame treatment most often. Earth shattering? No. Fun to play with? You bet. Happy Monday :)
Thanks to Aaron Mahler over at TWIP for the link.
edit: I did a little digging into the facebook app. Turns out that it's pretty lame (pun intended). As far as I can tell, you still have to upload a photo from your computer (rather than having it interface with your facebook photos). It will let you save your finished photo directly to facebook, which is good.
~S
[title of blog] on flickr
2009 in Photos:
part 1
part 2
part 3
I know I've mentioned this site before, but I really do enjoy their work. If you haven't subscribed to their RSS feed yet, you definitely should. They're also on twitter now (@big_picture) if you want to follow them that way.
Basically, The Big Picture puts together photos from various events into small photo essays that give you a feel for what's going on in the world. Whoever makes their selections does a wonderful job, and finds some absolutely amazing photography to share. I find it to be very inspirational, as well as educational (both from a photography standpoint and as a way to stay up on current affairs). So if you haven't been following them, get on it. The "2009 in photos" series is a great place to start.
_______________________________________________
I'm still working on getting images for my "how to shoot Christmas lights" article, but that's coming soon, I promise.
I'm also going to take a minute to announce the upcoming [title of blog] 52 weeks project over on flickr. Link here. I'll probably dedicate a post or two to this, but just a quick heads up on what's happening:
52 week projects are the slimmed down version of the 365 projects (photo-a-day) that people do. Essentially, I'm asking you to submit your favorite photo from the week before for everyone to see. I'll pick my favorite out of everyone's submissions and feature it in the group and here at the blog (with permission, of course). The point of this exercise is to motivate everyone to shoot at least once a week and take the time to edit and upload a photo that they like. I chose a weekly format rather than a daily one because I want this to be enjoyable and not a chore, and I feel like I'll get more participation if people have some flexibility in that regard. If you're feeling motivated, a 365 project is a great way to get yourself shooting every day and there are hundreds (possibly even thousands) of 365 groups on flickr that you can join. Now is the time to start thinking about it, as a lot of the 365/52 groups close soon after the year starts. Photo submissions are currently turned off for the [tob] 52 group, but discussion is open so feel free to say hello and invite some friends.
~S
[title of blog] on flickr

In case you haven't heard the news, flickr introduced a new feature today. Flickr Galleries allow you to "curate" your own gallery, compiling up to 18 images from other flickr users, displaying them in the order you want, and adding commentary to each image. Note that you cannot put your own photos into your galleries, they must come from other flickr users.
I think there are some interesting possibilities here, and am brainstorming ways to use this new feature. What are your thoughts/ideas?
edit: check out some examples here
~S
[title of blog] on flickr

© 2009 Simon Hucko. See the details here
Want to make some awesome panoramas without spending any money? Then you need hugin. Hugin is an open source photo stitching software that packs a lot of punch. Not only will it align images, it will correct for exposure and white balance differences between images and blend them together seamlessly. You can also use Hugin to correct perspective, align HDRs, and lots of other things I haven't explored or don't understand.
Panorama tips:
- A tripod is helpful, but not necessary. The panorama above was done handheld. Just try to rotate around the camera axis instead of turning your body. Also, avoid any details in the close foreground, as these can get pretty distorted and choppy.
- Make sure you overlap each image by about 1/3 on each side. The more overlap, the easier it will be to align images and preserve details. I ran into problems with my panorama because I didn't have enough overlap, and had to spend a lot of time fixing the alignment manually.
- For the most detail, shoot horizontal panoramas in a vertical (portrait) orientation, and vice versa.
- Shoot in full manual. Lock your exposure, white balance and focus before you shoot your series. This will make editing and stitching much easier and faster. Hugin can compensate for these differences, but it has to work harder and might not produce as good results.
- If you're shooting a lot in the same area, find a way to indicate to yourself that you're starting a pano. Shoot your hand (or some other marker) before and after your series of photos so that you don't have to spend time figuring it out on your computer. It may seem obvious at the time, but when you get back and find 400 pictures of the sunset and have to resort to exif data to figure out where to start and end your pano, you'll be kicking yourself.
That's all I got. As always, questions, comments, critiques, concerns, stories, observations, and whatever else are appreciated and encouraged.
~S
[title of blog] on flickr

© 2009 Simon Hucko - click to view larger
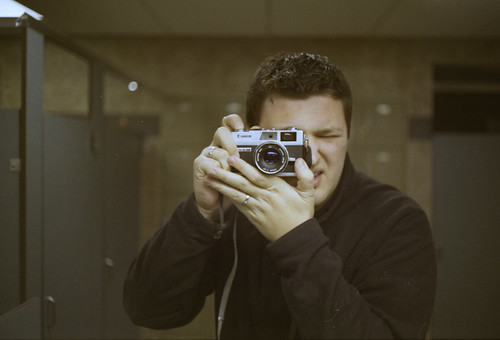
"The best camera is the one you have with you." Not sure who said that originally, but it's certainly one of the truisms of photography. When the plane landed in the Hudson river back in January, the iconic image that spread all over the internet and news media was captured with an iPhone by a passenger on one of the ferries. The quality isn't great, and it was shot through a dirty window, but it told the story perfectly from a unique perspective. There were thousands of other images from that event, but this one was the first and most personal to make it out.
My story is completely lame by comparison, but it reminded me of why I always make sure I have a camera with me. I was driving home last night through the valley and there was a weird inversion thing going on causing some misty clouds to be hanging onto the hilltops despite the blue sky above. In the year that I've been making this commute I've never seen anything like it. I found a suitable vantage point, grabbed my camera, and fired off a few frames. My favorite is posted above (click on the photo to see it larger). It's not newsworthy, and it may not even be a great photo, but it captured a unique event and I'm glad I had a camera with me. In fact, my camera bag usually goes most places with me (much to my wife's dismay). If I don't want to bring "the big camera" I might still grab my point n shoot and slip it into a pocket. If nothing else, I always have my camera phone with me.
Not only do I take pictures of interesting things that happen, but I use my cameras like a notepad, taking pictures of things I'll want to remember later - my parking space, a good bottle of wine, gift ideas, books, documents, notes on a whiteboard, restaurants I want to try, etc.
What about you - do you carry a camera with you? Do you use it for anything aside from taking pretty pictures? Have you ever wished you had one when you didn't? Comment and let me know your thoughts
~S
[title of blog] on flickr

© 2009 Simon Hucko
If you've spent any time on photography forums on the internet you're bound to have come across the word "bokeh" and all of the controversy surrounding it. Bokeh (don't ask me to pronounce it correctly, I have no idea) is a word created by Japanese photographers to describe the quality of the out of focus portions of an image. I came across a great article online the other day defining bokeh and giving examples of the different factors that go into the judgement of a lens' bokeh. Check it out:
Bokeh (toothwalker.org)
Hope that helps.
~S
[title of blog] on flickr
© 2009 Simon Hucko
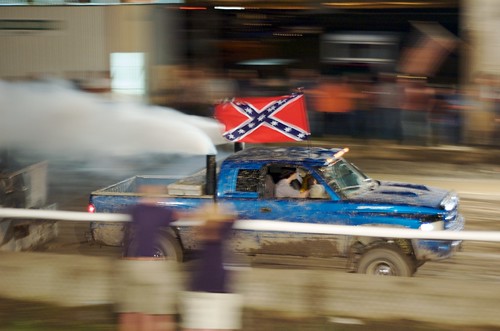
Today's post is about reducing camera shake to get sharper pictures. The easiest and best way to accomplish this is to use a sturdy tripod and head. However, you can't always carry a tripod with you (and it can be a real pain to lug around), and the good ones tend to be very pricey. Here's a few steps you can take to improve your hand-held photography:
- First and foremost, make sure that you are holding your camera correctly. Here's a short video on how to hold your camera from Chris Marquardt (Tips From the Top Floor). The key is to support your camera with both hands, and to keep your elbows in and as close to your body as possible. That will help you keep it stable while you shoot. This is especially hard when shooting vertically (portrait) - make sure you don't let your elbows go flying out everywhere when you turn the camera.
- Another very important step is to make sure your shutter speed is fast enough. Generally, you should avoid shooting slower than 1/(35mm effective focal length) - ie a 50mm lens on a crop sensor dslr is equivalent to a 75mm lens on a full frame camera, so you won't want to shoot slower than 1/80th or so. This can be pushed a little slower with good technique, but your rate of blurry shots will increase dramatically the slower you get. Open your aperture or increase your ISO if possible to get a faster shutter speed.
- If you're lucky enough to have some sort of image stabilization on your camera/lens (VR for you Nikonians, IS for the Canonites, sometimes OS for other brands), you can push the above rule by an extra 2-3 stops.
- Find additional support. Lean your body against a wall, rest your elbows on a table, or find some other way to add support from your environment. With solid holding technique, this added stabilization can buy you a stop or so of shutter speed.
- Make a "string tripod" (tutorial here). Not as good as the real thing, but it's lightweight and very portable - you could easily keep one in your camera bag.
- Pan your camera (only works for a moving subject). Today's photo (above) was taken with a 1/10s shutter speed. Normally that would result in a blurry mess, but since I was panning with the car my constant body motion helped prevent some jerking or shaking.
______________________________________________________________
Don't forget to check out [title of blog] on flickr!
~S

© Stuck in Customs, used under Creative Commons license
Today's link is to an excellent HDR tutorial from the Stuck in Customs travel photography blog. HDR, or High Dynamic Range imaging involves merging multiple photos of different exposures to increase the dynamic range of a photograph. A digital sensor captures between 4-6 stops, depending on the camera and the ISO setting. The human eye can perceive somewhere in the neighborhood of 11 stops. As a photographer, we often have to make the decision on what is the most important part of a scene, and resign ourselves to losing some detail outside of that range. With HDR, you can capture all of that detail in several different exposures. You can then merge that information into one photograph through a process known as tone-mapping.
There have been a lot of HDR images produced recently as the technique has gained popularity and ease of access (the necessary software is becoming better and cheaper). However, most people go crazy with it when they first start, resulting in overly saturated poorly tone mapped halo ridden surreal cartoonish images. (Go to flickr and search for HDR to see what I mean.) However, when done correctly, HDR can really bring a lot of detail into your photography, and the tutorial linked above does a good job of not overdoing it.
It's a fun technique, and with a lot of patience and practice can produce some beautiful images. I encourage you to give it a try!
~S

We all have been part of an awkward photo. Awkward Family Photos is a blog dedicated to bringing some of the most uncomfortable, creepy, and downright hilarious pictures to the public eye. Photos are submitted by people like you, and run the gamut from poorly staged professional portraits (like the one above) to candid photos capturing awkward moments to hilarious prom pictures, and much more. Definitely worth a read. Subscribe to the RSS feed here
Edited for grammar. Way to proofread...
~S
© 2009 Simon Hucko
Today's link is to PixSylated blog's "Lessons I Didn't Learn In Photo School" series. LIDLIPS is a weekly installment on the blog from photographer/blogger Syl Arena. As the name suggests, Syl shares lessons learned from personal experiences in the business, and offers nice insight into the mind of a working photographer. I suggest you check it out, and add his blog to your RSS reader (feed here)
~S
© 2009 Chris Marquardt
Today's photo link is to Chris Marquardt. Chris is a photographer form Germany, and does a lot of teaching (podcasts, blogging, leading workshops, etc). In fact, he just got back from leading a photo trek to Everest base camp (website here). I really enjoy his podcasts - they're less about gear and news and more dedicated to photographic technique. You can follow Chris in several ways:
ChrisMarquardt.com
Tips From the Top Floor (TFTTF) podcast
Daily Photo Tips with Chris podcast
On Twitter @chrismarquardt
I definitely recommend subscribing to his two podcasts. I also recommend going back through some of the Everest stuff - pretty cool to see all the work that goes into a trip like that. Photos from the participants are on flickr.
As Chris would say, happy shooting!
~S

Today's link is to Photographer's Math, a "blog" that runs more like a comic strip. Each entry is like the one above - expressing some aspect of the photography industry as an equation. They tend to be very tongue in cheek, and are worth a few chuckles. Unfortunately, they've been on hiatus since last Friday, with a promise that they'll "be back soon." So read through the archives, and add them to your RSS [feed]
__________________________
Super excited to set up our new iMac this weekend, and hopefully have a chance to flush out the Depth of Field article I've been working on. TGIF and have a good weekend, everyone.
~S
© 2009 Simon Hucko
If you're like me, photography is a hobby. As much as I'd like to rake in the big bucks selling my work, I don't make a living from photography and I can't justify spending money on studio gear. However, a little lighting can go a long way to improve your photography, and it's a lot of fun to do. DIYPhotography.net is an excellent resource for low budget DIY photo gear. Most of the materials can be sourced from Home Depot (or similar hardware store) and are much cheaper than paying outright for photography equipment. They are currently running a series about everything you need to set up your own DIY studio at home, which is a collection of tips, tricks, and gear that they've run over the past few years aimed at getting your cheap home studio up and running. Another good one for your RSS reader [feed]
~S
![[title of blog]](https://blogger.googleusercontent.com/img/b/R29vZ2xl/AVvXsEhJ8bvx_9_zOAREbXcrJRML7aVvJMbb90IYYYuyti384jeZHYQ9t8MK6_Kpt_1P4-pZw-QfF9kh4Sqci0vbopzLme862PPhuyPJcc7pRLUW1K1aNzts5YzuXIhgonq66MpjJCqfiWtfwUw/s1600-r/waterfall.png)


