skip to main |
skip to sidebar

© 2009 Simon Hucko
Today's tip relates to my post yesterday about re-setting your camera after a shoot. If you have a shoot planned where you know you're going to need a specific setup, pre-set your camera as close as you can before you go. This will help cut down on time spent changing lenses/dialing-in appropriate settings when you arrive.
For instance, if you're planning on getting up super early the next morning to shoot the sunrise, pull out your camera the night before and set everything to where you're going to want it (tripod plate on, low ISO, wide angle lens, narrow aperture, matrix metering, etc). That way, you won't have to try to set everything in the dark when you're tired.
This is also a good time to check to make sure all of your batteries are charged (including the ones for your flash or any other accessories you have), and that your camera bag is packed with everything you might need. Surprises in your images are good. Surprises in your gear, not so much.
The goal of pre- and re-setting your equipment before/after a shoot is to help prevent your gear from becoming an obstacle to your photography. Spend your time making images, not messing with your camera.
~S
© 2009 Simon Hucko
I'm sure we've all been in this situation before - you pull your camera out and fire off a few shots before realizing that the settings are where you left them from your last shoot, which happened to be something totally different (low light, macro, etc). You may still get some usable images, but they won't be ideal.
The best way I've found to combat that is to have a standard setup for your camera that you revert to every time. In the case of my DSLR, that means the standard zoom on camera, matrix metering selected, ISO 400, Aperture priority mode at f/8, and white balance set to daylight. Do I always shoot with these settings? Nope. In fact, it's pretty rare that I'll shoot with that exact setup. However, this way I always know what to expect and can quickly make the necessary adjustments.
If you get into the habit of resetting your camera after a shoot, you'll be much less likely to leave it in a strange configuration, and will have fewer "d'oh!" moments. This applies to point n shoots just as much, since even the ones without full manual control have a range of settings that you can change.
_____________________________________
In other news, I finally got all of my pictures uploaded from my weekend in Pittsburgh. Check them out here. Comments and feedback (both positive and negative) are always encouraged and appreciated.
~S
© 2009 Simon Hucko
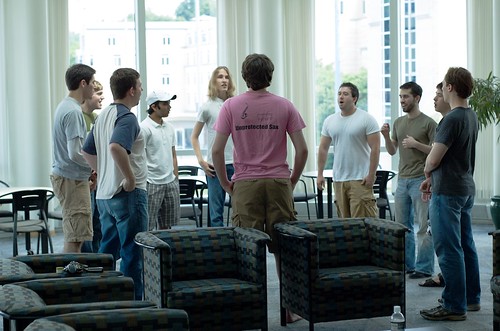
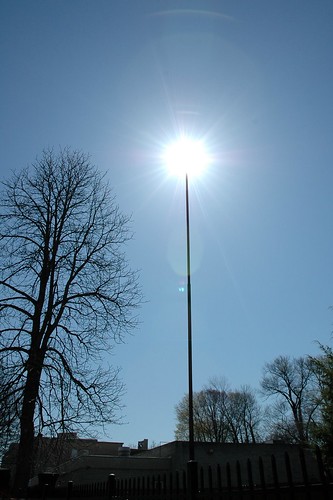
Today's tip is to learn how and when to shoot in manual mode. I usually do most of my shooting in aperture priority mode (A for the Nikonians or Av for you Canonites). This lets me set my aperture and ISO to get the depth of field and image quality that I want, and then let the camera choose an appropriate shutter speed for an accurate exposure. However, there are some situations in which the camera's meter can go haywire and give you bad results, or leave you playing with exposure compensation the entire time (and missing shots because of it).
For the image above, we were rehearsing in a room that was almost surrounded by windows. The light in the room remained fairly constant, but depending on how I framed my shot it could have more or less of the window in it. This would move the meter all over the place, and so even if I dialed in an exposure compensation I would have to be constantly adjusting it. By flipping over to manual and setting a constant exposure, I didn't have to worry about it. Even if the exposure on people fluctuated by 1/2 a stop or so, it wasn't a big deal to fix it in post (since I was shooting RAW).
Another good example is when I photograph school concerts. The stage lights are constant (more or less) through the concert, so I just flip it into manual and find an exposure that I like. In the two examples below, the meter would give very different exposure values for the first shot (sea of white) and the second (very dark). Since I was shooting in manual, I didn't have to worry about it, and the exposure on the skin was the same between the two.


I find myself shooting in manual more and more when I'm in a situation where the light is fairly constant. It actually requires less thinking than letting the camera meter for me, since I don't have to worry about compensating for large amounts of white/black in the frame. It also gives me a nice consistency for the shoot, and I can make batch adjustments for things like exposure and curves.
________________________________
Finally got around to editing some photos from last weekend: Flickr set here.I'm planning on editing the rest of the photos and getting them up tomorrow, so check back again :)
Happy Friday, and enjoy your weekend!
~S
© 2009 Simon Hucko
I've been shooting in RAW now for almost a month, and I thought I'd offer my observations on the differences between RAW and JPEG, and how it has affected my photography.
For those who don't know, some higher end point n shoot cameras and all DSLR cameras have the option of storing RAW files along with/instead of JPEG. A RAW file is a collection of unprocessed data from the camera's sensor. It is NOT an image file, and needs to be decoded in order to produce an image on the computer screen. In order to do this, you need some sort of RAW developer. There are a full range of these available - each camera company has their own, there are some free programs available (I recommend RawTherapee), and of course the two industry standards Lightroom (Adobe) and Aperture (Apple). My experience has largely been with Aperture, but any true RAW developer that gives you control over how the final image is generated will be similar.
The biggest change for me is in how I expose my images. When shooting .jpg, I would set my review mode to flash highlights that had clipped. I would often have to make a decision on what was more important - saving highlight detail or capturing enough detail in the shadows. I usually let the highlights go, since I only had so much dynamic range to work with and pulling up exposure on a .jpg immediately leads to noise issues. Now, however, my camera review mode is almost always set to display the histogram, and I try to push every image to just touch the right edge. If the dynamic range of the scene is very large, I can still pull up some shadow detail in post, which makes for a more realistic looking image, and I don't have the same noise issues as I would with .jpg.
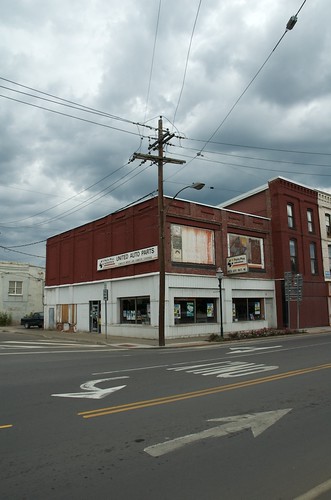
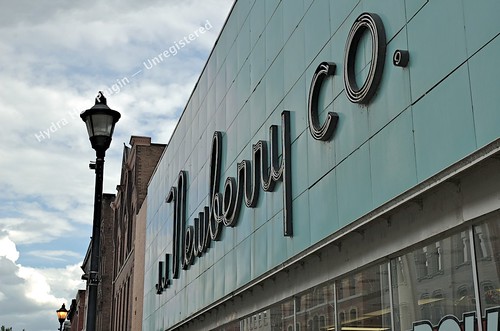
A good example of this was a shot I took while walking around Owego:
© 2009 Simon Hucko
The dynamic range of this scene was pretty high, but I wanted to hold the cloud detail if possible. I was able to push the shadows and get a better exposed store front while still keeping texture in the sky. I also shot a bracketed exposure (3 frames +/- 2 EV) and merged it using a trial copy of the Hydra HDR plugin for Aperture (hence the watermark):
© 2009 Simon Hucko
In comparing the two, there is definitely a better balance in the tone mapped HDR photo, but the single RAW exposure did a pretty good job. I don't have a .jpg capture to compare with, unfortunately, but I can guarantee the shadow detail would have been much noisier.
If you haven't ever shot RAW, give it a try. Try one of the free developers and play around with adjusting exposure, sharpening, noise reduction, color balance, highlight recovery, tone curves, etc. You'll be amazed at how much more you can get out of your images.
~S
© 2009 Simon Hucko
This past weekend I was in Pittsburgh, PA. I got invited to come and sing with my college a cappella group (the Carnegie Mellon Originals) for their performance during the Pittsburgh Symphony Orchestra's pops concert at Heinz Hall. Definitely an awesome, once in a lifetime experience.
While we were hanging out on Wednesday night, one of the biggest and baddest rain storms I've ever been a part of rolled through Pittsburgh. All of a sudden, someone looked out the window and said "Whoa, the road is flooded! It's like a river out there." Within a few minutes, someone else got the brilliant idea to grab an air mattress and go rafting in the street. The little alarm in my brain went off saying "Go get your camera, you're going to want to document this."
A quick look outside told me that the point n shoot just wasn't going to cut it. I needed the DSLR with my 50mm f1.8 (fastest lens I own) attached. I ran upstairs, pulled the camera out of the bag, swapped lenses, grabbed an umbrella and rain coat, and ran back down just as they were heading out:
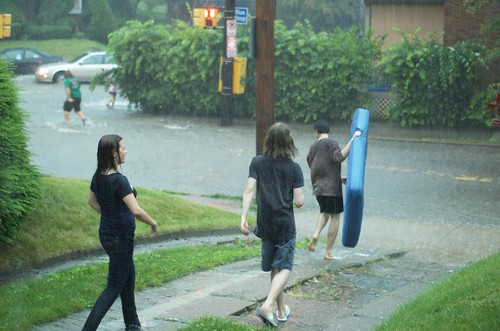
© 2009 Simon Hucko
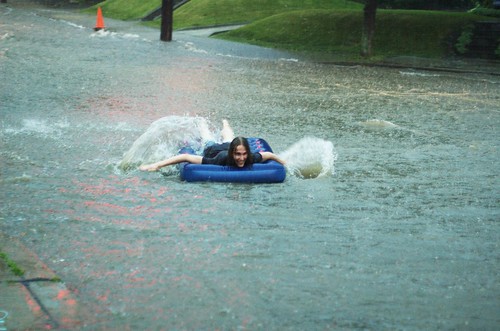
I went down to the sidewalk and spent a good 10-15 minutes shooting (and worrying about soaking my camera, but fortunately everything stayed dry). Most of the cars passing by were amused rather than annoyed, and a few even honked and waved, resulting in my favorite shot from the set:
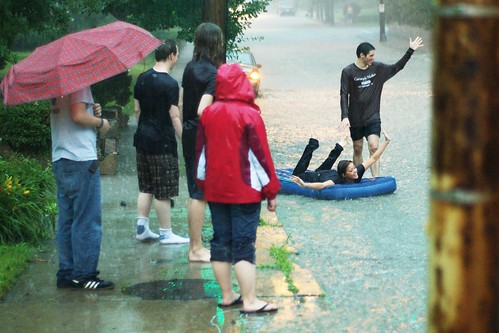
© 2009 Simon Hucko
Despite all of the environmental craziness and being forced to shoot one handed because of the umbrella, I was able to capture this incredible event. I credit my success to what I've talked about recently - practice with and without my camera. Operating the camera was effortless, even one handed, and I could focus on the action. I recognized moments developing (like the waving above) and timed my shots rather than just spraying away. I was in the zone, and it was a surprisingly organic experience - probably one of the first times that I truly felt like a photographer, and not just a guy with a nice camera.
Check out the full set here. As always, comments, questions and constructive criticism are encouraged.
~S
© 2009 Simon Hucko
Just a quick post to let you know I'll be out of town Wednesday through Sunday, so I won't be updating my blog the rest of the week. I'm feeling somewhat overwhelmed and uninspired today, too, so it's going to be a short and self-serving blog post.
My assignment to everyone was to shoot 100 frames this weekend. I don't think I quite made it to 100 (probably more like 75), but I did get some nice ones. Please visit my photostream and check them out - comments and feedback always welcomed and encouraged :)
Do I have any real winners in there? Maybe one or two. However, I did explore some new techniques (HDR, reversed lens macro), and got more comfortable editing RAW images in Aperture (both of which are new to me). All in all, a successful weekend. Look for pictures from my trip next week :)
~S
© 2009 Simon Hucko
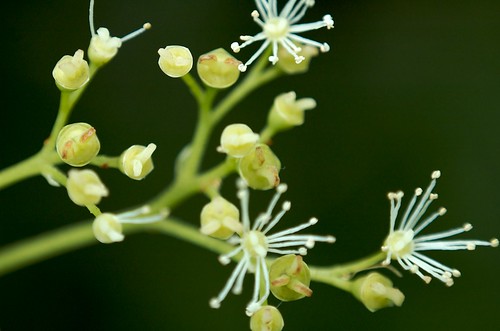
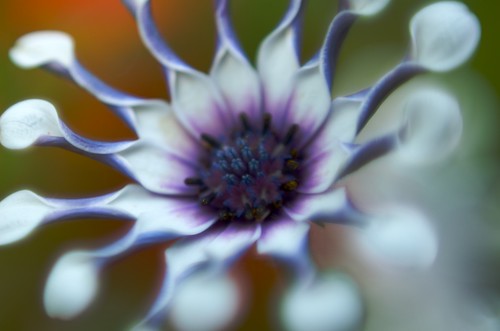
Want to shoot macro but don't want to drop the $$ on a dedicated macro lens? Try reversing your lens. I took the above shot using my 50mm f1.8 prime. Turn the camera off, remove the lens, flip it around, open the aperture all the way, and start shooting in manual. Most cameras won't meter in this configuration, but it's not too hard to dial in exposure using the histogram (more on that some other time). The result is an incredibly shallow depth of field and a close focusing distance, simulating the look of a macro lens.
A few caveats:
- As I already mentioned, your camera will not meter this way. Time to practice your manual exposure skills
- The back of your lens will be exposed. Scratching this can have more of a detrimental effect than scratching the front element, so be careful
- Your camera body will be open, and every mirror flip will suck any particulates (dust, pollen, etc) into the camera and onto your sensor. Do this in a relatively dust free area (your kitchen for example), or be prepared to clean your sensor
You can buy an adapter (called a reversing ring) that will screw into the filter thread on your lens and then mount to the camera. This keeps the camera a little cleaner and eliminates the possibility of dropping the lens, if you're squeamish about those sort of things.
Oh, and you all shot 100 frames over the weekend, right? Just checking ;)
~S
© 2009 Simon Hucko
After yesterday's advice to practice without a camera, today's tip is to practice with your camera! This seems obvious, but the real trick here is to get to know your camera in non-critical situations so that you don't have to think about it when you're shooting "for real." Learn where all of your buttons and dials are, and what they do - this can be critical if you're shooting in a darker environment and can't see them. Learn what kind of shutter delay your camera has - if you try to release the shutter right when the moment you want is happening, you're going to miss it. Learn how your meter behaves, and in what situations it's likely to be fooled - if you know this ahead of time you can make adjustments before you start shooting and it will cut down on the amount of tweaking necessary while you're trying to get the shot.
David Hobby (Strobist) wrote once about how he used to sit in front of his TV with his camera and shoot a football game to work on his timing. Simple things like this can really make a difference down the road, and operating your camera can become almost instinctive. It's the difference between a musician learning to play scales and improvising a solo - without the fundamentals, true creativity and spontaneity isn't really possible.
Pick up your camera this weekend and shoot 100 frames. Even if you don't produce any great photographs, you will be that much more prepared the next time.
~S
© 2009 Simon Hucko
Today's tip - practice, even when you don't have a camera. If you're like me, you don't walk around with a camera at hand ready to shoot every minute of the day. That doesn't mean you can't work on your photography skills. Much of what makes a great image is timing and perspective. Learn to look around you and notice images waiting to happen. Decide on where you would stand for the best image and look for the decisive moment when you would click the shutter. Some people even suggest a physical cue for this - snapping, or saying "click." I don't go that far, but I snap the image in my brain.
The more you do this, the better you will become at anticipating picture-worthy moments. When you do have a camera in hand, your brain will be ready to pull the trigger as something happens, rather than missing the moment and regretting it afterward. It will also help you to be more patient in creating a shot, and not just settling for what you see. Waiting for the right moment or lighting or finding a different perspective can make a world of difference in a photograph.
Try it. Look for images in the world around you, and think about how you would capture them if you had your camera in hand. You may be surprised at what you start noticing after a while.
~S
© 2009 Chris Marquardt
Today's photo link is to Chris Marquardt. Chris is a photographer form Germany, and does a lot of teaching (podcasts, blogging, leading workshops, etc). In fact, he just got back from leading a photo trek to Everest base camp (website here). I really enjoy his podcasts - they're less about gear and news and more dedicated to photographic technique. You can follow Chris in several ways:
ChrisMarquardt.com
Tips From the Top Floor (TFTTF) podcast
Daily Photo Tips with Chris podcast
On Twitter @chrismarquardt
I definitely recommend subscribing to his two podcasts. I also recommend going back through some of the Everest stuff - pretty cool to see all the work that goes into a trip like that. Photos from the participants are on flickr.
As Chris would say, happy shooting!
~S
© 2009 Simon Hucko
Today's advice - edit your photographs before sharing them! I mean this in two ways. First, always always always run your photos through some sort of image editor. Even for snapshots at a family event, spending about 30 seconds per shot to edit brightness/exposure, contrast, straighten the photos if needed, and crop if needed (more on that some other time) can dramatically improve your photos. If you're shooting RAW, you're going to want to add some mild sharpening and noise reduction to that list, since it's not being done in camera.
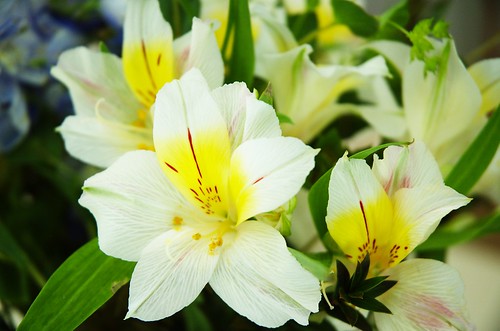
Second, even before you go and adjust your photos you should decide on what shots you want to share with the world. If you take 10 different shots of the same subject (a flower, for instance), don't edit and upload all 10. Pick the best one, and stick to that. People judge you as a photographer based on the output that they see. You can instantly become a better photographer by only sharing your best work.
Let me repeat that - you can instantly become a better photographer by only sharing your best work. And as you improve at your craft, your standards for what make the cut should increase as well. Most image editors have some sort of image rating system built in, so you can quickly flip through what you've captured and mark what gets edited and shared, and what gets archived and never viewed again (or even deleted, but you didn't hear that from me).
This isn't meant to discourage you from sharing your work. But a little judicious self-editing can go a long way.
~S

© 2009 Simon Hucko
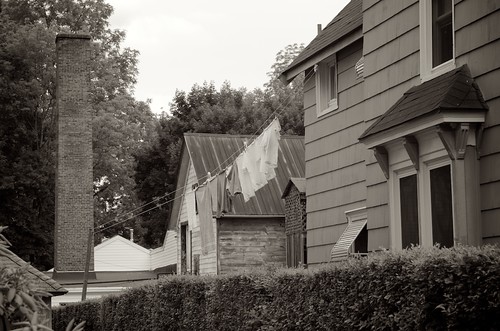
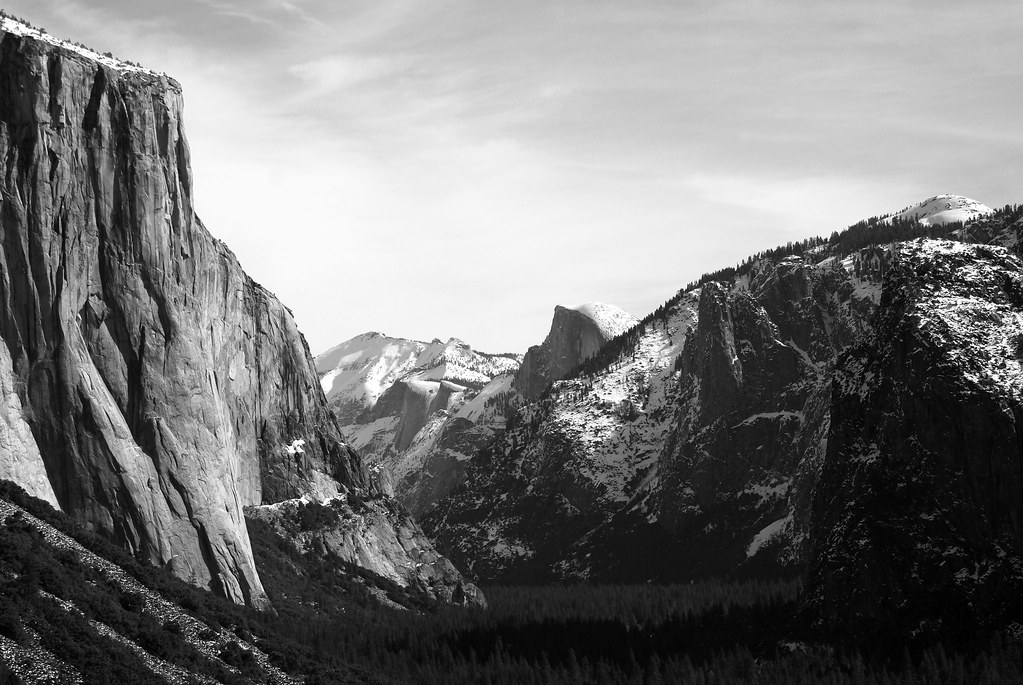
Today's post is about converting your color shots to black and white. You can just click the button to make the conversion, but to get the best black and white shots you're going to want to do some additional work.
Take the two images below:

© 2009 Simon Hucko

© 2009 Simon Hucko
The conversion to black and white really makes the texture of the trees stand out.
I did the conversion in Picasa, but the principles are the same no matter what editor you choose. The first step is deciding how you want the color channels (RGB) to be represented in black and white. You could just completely de-saturate the image, which will leave you with the luminance portion of each pixel. However, this will usually not give the best results. Using a channel mixer to decide how much of each channel gets used can help enhance the contrast of your image and generally produces a better result. Picasa doesn't have a channel mixer, but it does give you the option to do a "filtered black and white" conversion. The reference is to when photographers used to put different color filters over their lens before shooting on b/w film to enhance contrast or produce a specific look, but essentially it behaves like a channel mixer. See here for a good explanation on how this works.
After doing a filtered conversion, you're also going to want to tweak the levels in your photo. Colors appear more saturated at lower luminance levels, and while texture is important, color is usually the dominating source of contrast and interest in a picture. When converting to black and white, all you have is texture and tones to make an interesting image. Contrast and detail become very important. I boosted the highlights and the mid-tones of the above shot in order to bring up the texture on the bark. Generally, a boost in the highlights and mid-tones will be required. Things that look almost white in color can take on a gray cast when converted, and that will have to be corrected for.
I haven't really done much black and white up until now, but after playing with the Yosemite pictures and doing several conversions (see album here) I may have to do more.
~S

Today's link is to Photographer's Math, a "blog" that runs more like a comic strip. Each entry is like the one above - expressing some aspect of the photography industry as an equation. They tend to be very tongue in cheek, and are worth a few chuckles. Unfortunately, they've been on hiatus since last Friday, with a promise that they'll "be back soon." So read through the archives, and add them to your RSS [feed]
__________________________
Super excited to set up our new iMac this weekend, and hopefully have a chance to flush out the Depth of Field article I've been working on. TGIF and have a good weekend, everyone.
~S
© 2009 Simon Hucko
If you're like me, photography is a hobby. As much as I'd like to rake in the big bucks selling my work, I don't make a living from photography and I can't justify spending money on studio gear. However, a little lighting can go a long way to improve your photography, and it's a lot of fun to do. DIYPhotography.net is an excellent resource for low budget DIY photo gear. Most of the materials can be sourced from Home Depot (or similar hardware store) and are much cheaper than paying outright for photography equipment. They are currently running a series about everything you need to set up your own DIY studio at home, which is a collection of tips, tricks, and gear that they've run over the past few years aimed at getting your cheap home studio up and running. Another good one for your RSS reader [feed]
~S

Going off topic today. I just spent most of my day in a Red Cross CPR/AED class offered here at work, renewing my certification. Between Boy Scouts and lifeguarding, I have been trained in first aid and CPR for 10+ years. Fortunately (knock on wood), I've never had to use my knowledge beyond minor cuts and bumps. However, I feel good knowing that I could help out if something ever did happen.
If you've never taken a class, I strongly recommend that you take basic First Aid and Adult CPR/AED. Most community centers offer classes, and some offices (like mine) have started offering these classes to employees. If you work at a larger office, especially if you have an AED in your building, ask your employer about training. If you took CPR more than 1 or 2 years ago, the curriculum has changed and it's definitely worth a refresher.
Just having the confidence to take charge of a situation, call 911 and provide some basic level of care (especially CPR/AED) can mean the difference between life and death. You owe it to yourself, your coworkers, your children, your significant other, your friends, and even the complete strangers you pass on the street. After all, wouldn't you want someone to be able to help you if you ever needed it?
~S
You may have noticed the new header for my blog. Would you believe I created it with Microsoft Paint?
Yep, that's right. The crappy little sketchbook that every Windows user loves to doodle in - Paint. But, with minimal effort I managed to create a pretty classy looking header. I actually did the same thing for the first header, below:

© 2009 Simon Hucko
Here's the original image:

© 2009 Simon Hucko
After cropping down to the shoe, there still wasn't enough space to the right to get a true header feel. No problem, went to Image -> Attributes and changed the width of the image. I then used the eye dropper to pick part of the sky and filled the new space with that blue. I also used the paintbrush with the same color to touch up the noise in the image and get rid of some of the .jpg artifacts around the boot and wires. I then dropped in a text box using the same font as the blog (Trebuchet MS) and picked a darker blue for the text.
NOTE: make sure you save things like this as .png, not .jpg. Otherwise, you end up with compression artifacts, especially around the text. Very annoying
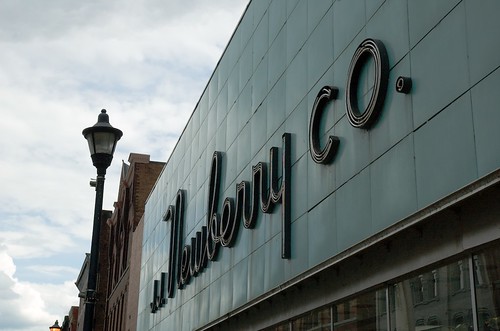
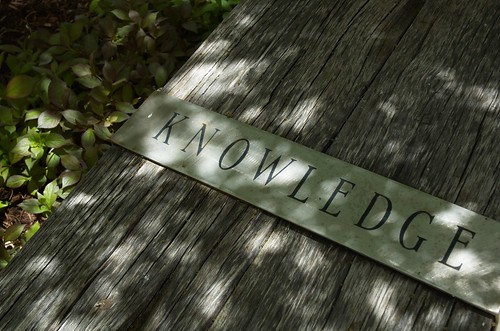
I did pretty much the same process for the current header. Here's the original picture:

© 2009 Simon Hucko
I picked a "white" spot off of the background using the eyedropper. I then evened out the background using the paintbrush to get rid of the falloff and color casts. Image -> Attributes to add width to the image, and a quick fill to even out the background. I used the eyedropper again to select the blue from the highlighter, and created the text. Save as .png. Less than 5 minutes of work, and I can do it from just about anywhere.
True, Photoshop would probably have been easier and certainly more powerful for this sort of thing. But I don't have Photoshop, and Paint worked well enough in a pinch. I'm sure there's an equivalent application for the Mac users, too (and I'll find out this weekend when we finally unbox and setup our new iMac!)
So don't be afraid/ashamed to use the basic tools available to you. It's like the saying goes for cameras: "The best camera is the one you have with you." My version - "The best pixel editor is the free one that came with your computer." Or something like that
~S

© 2009 Aaron Johnson
Today's link is to webcomic What The Duck?. Created by photographer Aaron Johnson, WTD chronicles moments in the life of a professional photographer. I find it very entertaining, and I'm sure it rings especially true if you are (or ever have been) a working pro. This is definitely a fun one to have in your RSS reader [feed].
________________________________
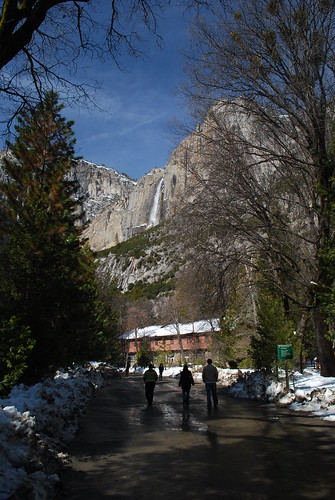
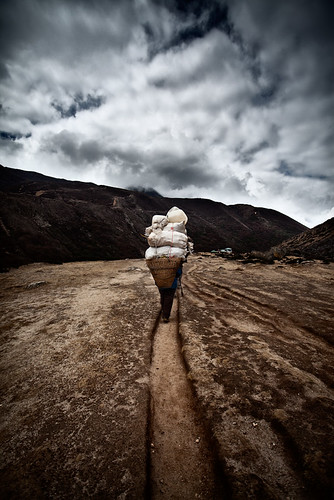
© 2009 Simon Hucko
Today's image (above) inspired me to write a rather lengthy article about depth of field. I want to get some example photographs ready to go with it, so it may take me a few days to get everything sorted out. Stay tuned
~S
![[title of blog]](https://blogger.googleusercontent.com/img/b/R29vZ2xl/AVvXsEhJ8bvx_9_zOAREbXcrJRML7aVvJMbb90IYYYuyti384jeZHYQ9t8MK6_Kpt_1P4-pZw-QfF9kh4Sqci0vbopzLme862PPhuyPJcc7pRLUW1K1aNzts5YzuXIhgonq66MpjJCqfiWtfwUw/s1600-r/waterfall.png)


