skip to main |
skip to sidebar
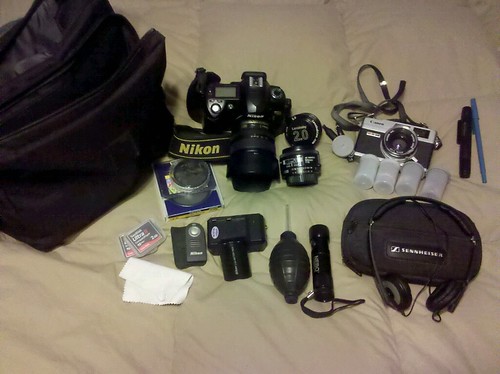
click through to see notes on what everything is
Since I just returned from a quick trip to Florida, I thought I'd talk a little bit about traveling with camera gear and what extra concerns shooting film adds to the situation.
First off, the goal for flying with camera equipment is to carry as much of it on with you as possible. I believe it was Chase Jarvis that said that if you're planning on checking any equipment, you should be 100% comfortable with throwing the bag down a flight of concrete stairs. Things like tripods, light stands and cables can probably be checked no problem, but the rest of it you're going to want to carry on. Camera bags count as your personal item, and you can also sling a camera around your neck and stuff a lens or two into your pockets if you're really crunched for space (anything on your person does not count as extra baggage.) Fortunately (or sadly, depending on your perspective) I don't own nearly enough camera equipment for that to be an issue.
In any case, you're going to want to whittle down your kit to only what you'll need on your trip. I shot a combination of digital and film on this trip, so that meant 2 camera bodies and the relevant accessories. Fortunately my film camera is pretty small and has a fixed lens, so the entire thing fits into one lens slot in my bag. My D70 with kit lens fits very nicely in the middle even with the lens hood on, so there's slot 2. The Lensbaby and my 50 stack on top of each other in the 3rd slot to round out the kit. I could probably have done without the Lensbaby, but it weighs essentially nothing and wasn't competing for space with anything, so it came along for the ride. As far as accessories go, I kept my pretty standard setup. I did ditch my ND filter because I knew I wouldn't need it. The remote stayed, but again it weighs practically nothing and takes up almost no space in the bag, so it didn't make much of a difference. A blower, microfiber cloth and lens pen should be staples in any photographer's bag - if you don't have them, you really should. They're not too expensive, and help you get the best image quality you can. I also brought along my LED flashlight, which is more the Boy Scout in me than anything else (always be prepared). The noise cancelling headphones got added for the flight, since this was my carry on. Any other miscellanea got removed and put into storage for the weekend. Some of it might not make its way back into the bag.
One thing you don't want to skimp on is storage/film and batteries. I had a total of 8 GB of flash cards (enough for 1400 raw files) and 4 rolls of film, two color and two black and white. That's way more than enough to carry me through a long weekend, but if something big happened I'd have extra frames to burn. Extra batteries and/or your charger are key, too. I bought a nice cheap charger off Amazon to replace my Nikon one that I lost in the shuffle of moving - it's super compact and doesn't need a cord, so it can live right in the bag.
A few words about film: There is a chance that film can be affected by the x-ray scanners when going through the airport. Never *ever* put film into your checked luggage, since the x-ray they use on checked baggage is way more powerful than the one used at security screening and will mess up your film. The general rule of thumb is that anything over 400 ISO could be fogged by the scanners at security, too. I brought relatively slow film with me (Kodak Gold 200 and Fuji Acros 100), so I wasn't concerned about the x-ray. If you're shooting faster film, or are going for a paid job or some once in a lifetime event, you can ask to have your film hand inspected. Typically they'll try to talk you into sending it through the scanner anyway, especially if you don't have anything faster than 400 ISO. A trick for that is to carry a roll of 3200 ISO film with you (Ilford makes one), even if you're not planning on shooting it. If you plan on asking for hand inspection, remove all the rolls from the boxes ahead of time and carry it in a separate plastic bag. Let them know as soon as possible that you want a hand check so that you don't have to wait around a long time for it. (If you're travelling with a lot of film, I suggest calling ahead to the airport and letting them know so they can set aside some time to check through it all.) The security agent will look at it all and swab it for explosives. Once the machine is satisfied, you get your film back and are on your way. Back in the day photographers used to put film in a lead bag to protect it from the x-ray and send it through the scanner, no hand inspection needed. You can still buy them, but I don't recommend using one. It's just going to raise red flags to the screener and you'll have to get the film hand inspected anyway (and probably receive closer scrutiny on everything else).
One final word of advice is to neatly roll up and tie off any cables you might have in your bag (USB, chargers, whatever). A big rats nest of wiring and electronic equipment will probably get your baggage (and possibly your person) hand inspected.
________________________________________________________________
I wrote the bulk of this before going on the trip, and now that I'm back I figured I would add a few comments. Did I use everything I packed? Nope. I didn't even shoot as much as I thought, spent most of the weekend living life instead ;) Would I have packed anything differently? No, probably not. There was the potential to need everything I brought with me, and given different weather and/or more shooting I would have used more of what I brought. The important thing is that I had everything I needed and didn't kill myself schlepping it all around. Great weekend.
~S
[title of blog] on flickr
© 2011 Simon Hucko
Went out for the night on Saturday. Grabbed my DSLR, slapped my 50 on it, threw it over my shoulder, and carried it around with me all night. Most of the time the lens was uncapped, with no filter or hood on it.
I bumped it into a few things, spilled a little beer on it, grabbed it with greasy chicken wing hands, and took a lot of photos that I wouldn't have gotten with my phone camera, or even my point n shoot. A quick wipe down with a microfiber cloth and the camera looks no worse for wear.
I'm not saying you should abuse your camera, but it's probably a lot tougher than you give it credit for. Don't be afraid to grab it and bring it along with you. You bought it to take photos with, not to sit in your bag looking pretty.
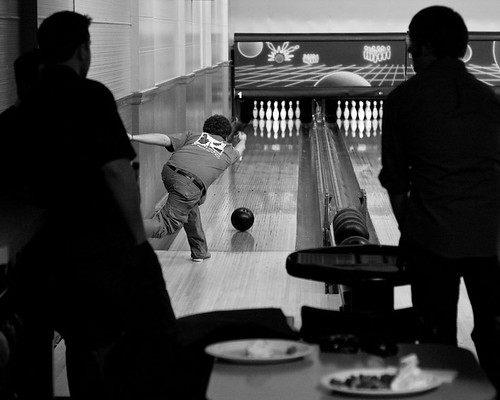
Oh, and the 50 was definitely the right choice. Plenty fast for me to get a nice motion stopping 1/100th shutter at the bowling alley, plus it was small enough that I didn't have to worry about what it was bumping into. At the bar after, I popped up the flash (gah) and set a nice slow shutter (1/10th) to let a little ambient burn in. That way things didn't look like they were shot in a cave.I did end up getting some weird ghosting on some of them, but for bar snaps they turned out just fine.
Next week: travelling with cameras (and film).
~S
[title of blog] on flickr

Hey everyone, just wanted to let you know that I wrote a review of my experience with Lens Rentals over at Shutter Photo. If you're interested, the review can be found here.
I've already plugged Shutter Photo here, but if you're still not a reader I suggest subscribing to their feed. Travis does a great job balancing out gear, technique and inspiration, and I always enjoy reading his latest posts.
Have a great weekend, everyone.
~S
[title of blog] on flickr
[No image with this, I don't have releases for the students and don't feel comfortable putting it up without permission. Sorry]
This past weekend I had my first experience as a "professional" photographer - I ran a "get your photo taken with Cinderella and the Prince" photo booth at the middle school show my wife directed. I say "professional" in quotes because I wasn't actually paid (I donated my time for the fundraiser), but people were purchasing my photos and expecting good results. And to be honest, part of me was terrified.
OK, as far as high-pressure photoshoots go, grip-and-grins at the local school play aren't really going to make or break my career, but my reputation (and my wife's and the school's) could definitely be affected by this. Worse, I went into it with no practical lighting experience and almost no portrait experience. You might argue that I should have said "no," but I knew I could at least meet the minimum expectations. For a $5 5x7, all I had to do was get the kid in focus next to Cinderella and the prince. Smiles, good lighting and quality prints are all icing on the cake. I've spent enough time over at Strobist to muddle my way through a 2 umbrella setup, and I think the results turned out pretty well - everyone is well-lit with a bit of directionality to it (anything more dramatic wouldn't be appropriate for this type of shoot, anyway). The monolights I rented from LensRentals.com had enough power for me to shoot at f/8 ISO 200 with a minimum amount of tweaking in post required. I ordered prints from Mpix, and while I haven't seen them yet I know the quality will be good, as always.
A few things I learned from the process:
- Having the right gear is key. Renting a lighting setup was the best decision I made, and something I knew I would have to do right from the beginning. I heard several comments about how "professional" things looked, which was important. None of those parents knew I'd never done anything like this before, and because I did my research and looked the part, they never will. (Unless they read my blog, of course.) I also made sure to dress nicely so that parents would take me seriously and not have any qualms about me photographing their children: it's always better to over-dress for a shoot than to under-dress.
- Some kids just don't want their picture taken. Parents who stand to the side and yell at the kid don't help, either. ("Look at the camera!" "Smile!" Meanwhile, the kid looks right at their parent who is yelling and gets nervous. Duh.) A crowded lobby is far from ideal for a portrait session, especially with stressed out little kids in costume. (Have you ever met royalty before? It's pretty nerve-wracking.) I did the best I could, but a few just wouldn't have it and ran away in tears. I'd like to think I had nothing to do with that.
- Watch the eyes, and always take multiple photos. This goes back to the parents on the sidelines: the nervous kids kept looking at them for assurance. Not a problem, just make sure you're aware of it so you don't get them looking the wrong way. I always pointed to the lens and said "look right here" before taking a picture, that seemed to work pretty well. I took at least 2 photos of every kid to make sure I got a good one (more if I knew there were issues), which was a good policy. More is better, obviously, but we had a lot of kids to get through. Watch out for people taking photos over your shoulder, as the kids won't know what camera to look at. I didn't mind them grabbing a shot (hey, they already paid for the print, a snapshot for Facebook is ok by me), but more than one and I'd ask them to stop so I could get the photo they paid for. Everyone was understanding about that. If I do something like this again I'll make sure to collect e-mail addresses so I can send a low-res jpeg with my signature on it for web use, that way we can enforce "no photography" and cut down on some of the distraction.
- Good help makes things go a lot more smoothly. Cinderella and the Prince were great with the kids, and spent a minute talking to them before each photo. This helped them relax, and I didn't even speak up until the kid looked more comfortable. Things were a little crazy on the paperwork end. We had kids run up to get a photo before their parent had even started filling out a form, which I didn't anticipate. Fortunately we got it all worked out in the end, but next time I will go in with a much more systematic approach where I look at each order form before taking a photo. Shame on me for not running things better, but this is how we learn.
So, in the end, I'm glad I took a little bit of a risk and stepped outside my comfort zone for this one. With my growing reputation as "the photographer" among family and friends (and now at my wife's school), I'm sure this won't be the last of these types of events that I'll be asked to do. Now that I've gotten one under my belt, I feel a lot more comfortable saying yes and taking more on. I'm not suggesting that you agree to do things you really aren't prepared for, but you can handle more than you think. (Start small, work your way up, and always do your research.) Even if things don't run 100% smoothly (they never do), you can learn from the experience and be that much better the next time. As long as you show up and act the part, people won't question your ability. You might feel like a duck (calm on the surface, paddling furiously under the water), but you'll make it through.
Any of you have a similar experience? Would love to hear about it in the comments.
~S
[title of blog] on flickr
© 2011 Simon Hucko
If you've been shooting for any length of time you've probably had the experience where you share an image that you're really proud of and are a bit miffed that it doesn't get more feedback and attention. Similarly, sometimes photos that you consider a "grab shot" get rave reviews from others. It's a bit of a humbling experience, but I think it teaches us a valuable lesson: just because you worked hard to make a photo doesn't mean that it's a great photo.
It's so easy to get attached to photos that we worked hard to make, but in the end the image has to stand on its own to the viewer. That's not to say that context isn't important sometimes, but in general I feel like if you have to explain why your photo is so "great" then you probably missed the mark.
This is mostly relevant when deciding what to present as a portfolio or some other representation of your work. Go through and select a pool of what you feel is your best work, then open it up to others to make your final selection. The most valuable feedback will probably come from other photographers who have a similar style to you - they know what you're trying to achieve with your images and can cut through the BS pretty quickly.
I'm not saying that you shouldn't work hard to make great images, just learn be honest with yourself about the quality of your work and let the bad or mediocre stuff go no matter how long or hard you worked to take it. On the flip side, always take a second for that "grab shot" when something catches your attention, it may be the easiest portfolio shot you've ever taken ;)
~S
[title of blog] on flickr

Travis over at Shutter Photo is holding a black and white photo competition to celebrate their third anniversary, with some pretty kick ass prizes for the winner. I highly encourage you to head over to the contest page and check it out. No rights grab, just a straight up contest. And, as an added bonus, I was asked to be a judge. (Sorry, no bonus points for being a [tob] reader.)
Submission deadline is March 18th. Go! Do!
~S
[title of blog] on flickr
![[title of blog]](https://blogger.googleusercontent.com/img/b/R29vZ2xl/AVvXsEhJ8bvx_9_zOAREbXcrJRML7aVvJMbb90IYYYuyti384jeZHYQ9t8MK6_Kpt_1P4-pZw-QfF9kh4Sqci0vbopzLme862PPhuyPJcc7pRLUW1K1aNzts5YzuXIhgonq66MpjJCqfiWtfwUw/s1600-r/waterfall.png)