skip to main |
skip to sidebar
As the year ends and we draft up our lists of resolutions for the new year (and the 52 weeks project is at the top of your list, right?), it's good to take a look back on what you've accomplished in the previous year. Or, in my case, to brag about some photos I've taken :) In no particular order, here's a few of my favorites:
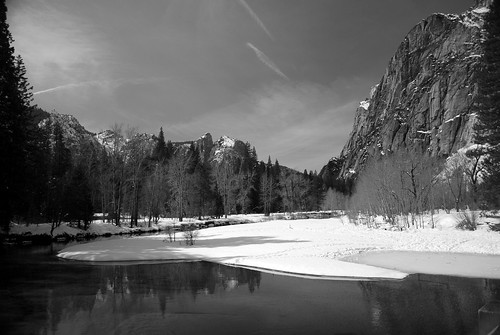
"Black and White and Redwood all over"
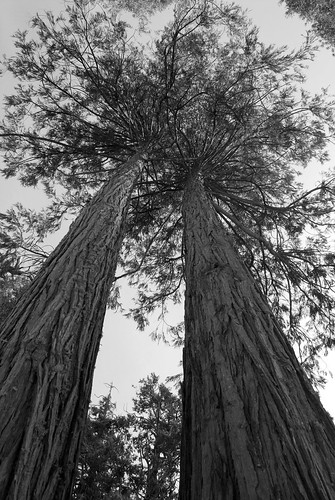
© 2009 Simon Hucko
This is one of my favorites from our trip to Yosemite in February. I like the strong leading lines of the trees and the texture on the bark. I also think it captures the feeling of standing and looking up at the towering redwoods.
"Dark Falls"
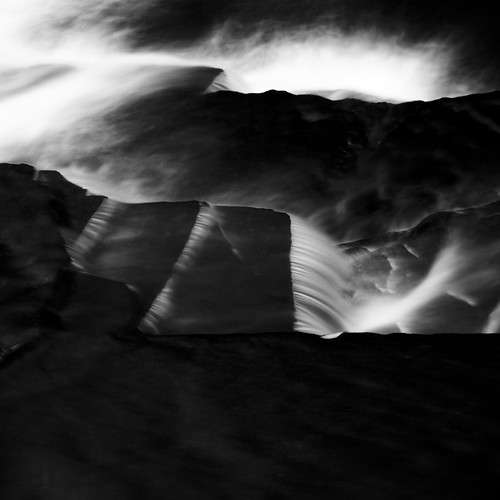
© 2009 Simon Hucko
Rather abstract for me, but I really like the effect of the polarizer and the long exposure here. A different take on the typical long exposure waterfall shot.
"Buttermilk Falls State Park"
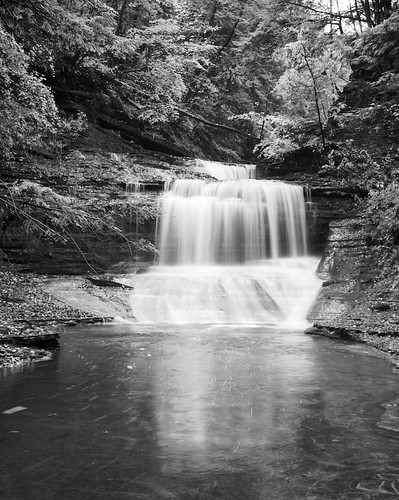
© 2009 Simon Hucko
This is my most popular photo on Flickr. A classic waterfall shot, and one of my first forays into long exposure work. I went in search of fall colors, and ended up liking this better in black and white, and apparently you all did too :)
"Washington Monument"
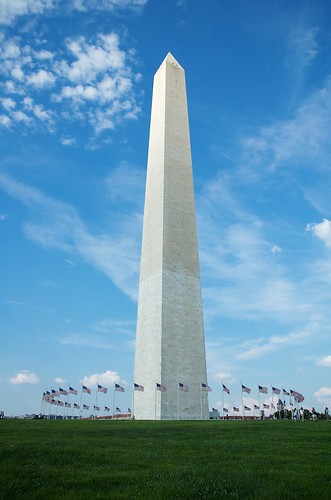
© 2009 Simon Hucko
My take on the Washington Monument. I like the strong symmetry set against the wispy clouds. I also like that it's not a typical view of the monument. It can be hard to get unique photos of a touristy place, especially as a tourist, so I'm very happy with how it turned out.
"Sunday Afternoon"
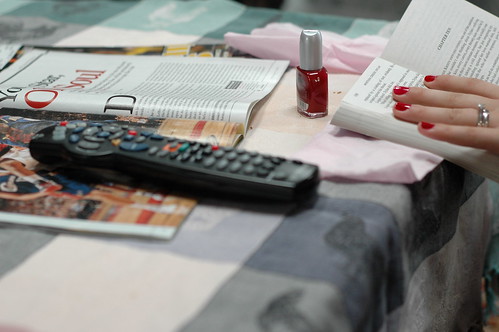
© 2009 Simon Hucko
Four fingers, a book, a remote, a magazine, and a bottle of nail polish = a lazy Sunday afternoon. Simple, but tells a great story.
"Rehearsal"

© 2009 Simon Hucko
I just love the candid laid back nature of this shot. The blown out background adds to the clean relaxed fun feeling.
"Rafting on the Street"
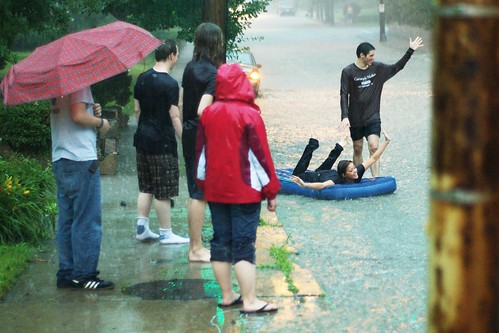
© 2009 Simon Hucko
I like this one for the sheer ridiculousness of the situation. It was raining so hard that the streets flooded and a bunch of students decided to go rafting in the street on an air mattress. Definitely a once-in-a-lifetime situation, and one that I'm really glad I was able to witness and capture.
"Going for a Spin"
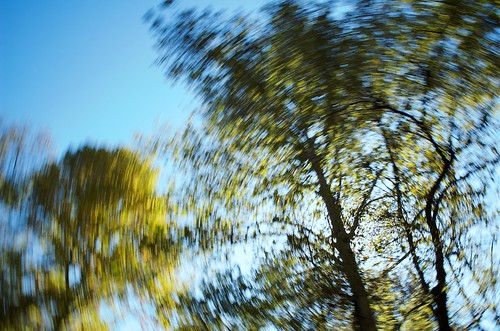
© 2009 Simon Hucko
This was the result of having some fun and not taking myself very seriously one fall afternoon. Not only do I like the photo, but I had a great time walking around and experimenting. A good reminder that it's important to have fun and try new things.
"The Time Traveler"

© 2009 Simon Hucko
This is probably my personal favorite from the year. The contrast of the old bike and clothing against the craziness of Times Square, the rain washed pavement, the feeling of isolation against the big city background and the little bit of motion make this one for me.
~S
[title of blog] on flickr
© 2009 Simon Hucko
The new year is rapidly approaching, so it's a good time to start thinking about your plans/goals/resolutions for 2010. This is often a time when photographers start long term projects, and 365 (photo-a-day) groups start popping up and filling up on flickr. I've been considering joining a 365 group, but in the end I think that shooting every day just isn't feasible for me. I wanted a motivating project, not something that would cause me stress and become a chore or force me to put out sub-par work ("Oh no, it's 11 and I haven't done my 365 yet!").
So, enter the [tob] 52 weeks project. Rather than taking a photo every day, participants are asked to upload their favorite photo from the previous week. This project was designed with several goals in mind:
- Encourage people to pick up their camera and shoot at least once a week.
- Create a forum where people can share these photos, allowing for feedback from other photographers and discussion about the project and photography in general.
- Recognize outstanding contributions by picking a favorite photo from everyone's submissions and posting it here on the blog every week.
- Foster the growth of a small community of like-minded photographers.
- Have some fun. Photography is fun, remember?
So please: join up, invite everyone you know, say hello on the discussion board, and get ready for the new year. The more people and participation we have, the more fun this will be for everyone. I'm excited to see all of your photography, and to get this project started!
~S
[title of blog] on flickr

Merry Christmas everyone! May you have a safe and happy holiday filled with joy and love and plenty of photographs of family and friends. Feel free to brag about any shiny new camera gear here :)
~S
[title of blog] on flickr
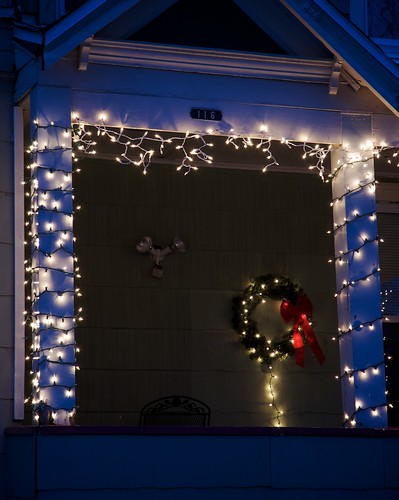
© 2009 Simon Hucko
With the holiday season upon us, homes, stores, and even entire towns/cities are getting dressed up with lights. However, if you've gone and tried to take pictures of the lights before, you've probably been disappointed with how they turned out - bright blown out lights on an almost black background, possibly with some snow in the foreground if your flash fired.
Well, I'll let you in on the secret to getting good photos of Christmas (or any other) lights - don't wait until it's dark! It seems a bit counter-intuitive, why would you want to photograph lights when it's still light out? The key here is balance. Unlike your eyes/brain, your camera can only make sense out of a relatively narrow range of light. In order to get the most out of a photo, you want to make sure that every detail in that image falls within that range. Otherwise you end up with something like this:
[[Ok, so I wasn't able to do this properly, and don't have a "bad example" shot for you. But I trust you know what I'm talking about...]]
Blown out lights, dark black everything else. Not very pretty. Here's what you need to know:
- Get there early. Scout out a location, and get there around sunset. Make sure the lights will be on this early (if you know the people who own them or if they're yours, it shouldn't be too hard getting them to flip the switch a little early one night).
- Plop down your tripod and frame your shot. Try to get some sky in you photo for maximal effect. See if you can include some sort of reflection (ice, shop window, whatever) or other point of interest (wintry goodness, cars rolling down the street, etc). Not required of course, but could be cool.
- Set your white balance to tungsten... probably. Christmas lights (the old kind) will balance out perfectly to this and it'll give you a nice rich blue sky. The new LED lights could be more blue, so be aware of that. You may want to keep your white balance at daylight in that situation.
- Shoot and chimp! I know, we usually don't encourage this sort of behavior around here, but this is really the only way to go. When you first start off it will probably be too light out, and the lights will look pretty dull compared with the sky. As the light fades, however, you'll come to that magic point where everything starts to balance and the lights really start to pop against their surroundings. This is when you want to start shooting seriously, especially if you have moving elements in your frame to worry about (cars, people, and whatnot). Pretty soon, you'll notice your sky fade away and your photos start returning to the ugly blackness of before. That's it, show's over, time to go home and have some whiskey hot chocolate.
That's all, folks. No fancy settings or gear required, just get out there at the right time of day and shoot away. So now not only will your Christmas decorations be better than your neighbor's, but your photos of them will be, too :)
~S
[title of blog] on flickr
© 2009 Simon Hucko
Winter officially begins on Monday, but it's already been pretty wintry around here for the past few weeks. So what do you do when the snow starts falling and the thermometer plummets below freezing? Why, take your camera out and keep shooting, of course! Snow and cold weather are actually very minor inconveniences for your camera, even if they may be less than minor inconveniences to you. Here's a few tips to get you through the winter weather:
- Slow temperature changes are better. Warm air contains a lot more moisture than cold air, so any sudden change will cause condensation. This is especially problematic when bringing cold gear back into a warm building. If you just carry your camera in, it'll probably fog up pretty quickly. This won't necessarily harm it, but it does make it useless for a while. There's also a chance of condensation on the sensor, which could require a sensor cleaning. The solution? Keep your camera closed up in the bag and allow it to come up to temperature slowly. If you're in a hurry or are more paranoid, you can also zip your camera and lens up into a large plastic bag before bringing it in. This way, any condensation will happen on the bag and not on your camera. Once your camera has come to room temp, it's good to go again.
- Batteries don't like the cold. The chemical reaction going on inside your battery slows way down when the temperature drops, which can have a very severe effect on battery life. The good news is that this effect is only temporary, and your batteries will "come back to life" if you warm them up again. The solution here is to carry at least one spare battery somewhere close to your body (inside pocket somewhere) and swap it out when the cold one in your camera starts calling it quits. By putting the cold battery in your pocket, it will be ready to go again when the fresher battery starts to fatigue. Swap out and repeat. You can keep going like this for a long time.
- Falling snow likes to hang onto your camera and lens. No trickery here, just keep a microfiber cloth with you and use it to gently wipe off your gear when it starts getting covered. Be careful when wiping off glass not to smear the water around or fog things up with your warm hands - a brush or blower might be best if you've given your camera time to cool down so that the snow doesn't melt, it just falls off like dust. Try to keep your lens pointing away from the falling snow if possible to minimize the problem. Make sure you do a final wipe-down before shoving your gear back in the bag and bringing it inside to keep the snow from melting all over everything. You might want to keep your lens caps off for a bit too until everything is nice and dry.
- Fingerless or thin cotton gloves might be a good investment. Your nice warm goretex gloves with the down insulation are going to give you zero control over your camera, and it gets pretty annoying having to pull them off every time you want to change a setting or even press the shutter. Thin or fingerless gloves aren't as warm, but can save you from having to remove them every time you take a photo. Mittens are definitely out, for obvious reasons ;) (edit: Unless they're the convertible fingerless kind. Thanks for the tip, Adam!)
That's it for this installment of winter shooting tips. I'll definitely do another one at some point about exposing for snow. I also have a post coming on shooting Christmas lights (I promise!) - that should be done for Monday.
_____________________________________________
If you haven't done so yet, go check out the [tob] 52 weeks group. The more people that join and participate, the more fun this will be for everyone! Remember, it's only one photo a week. You can do it!
~S
[title of blog] on flickr
2009 in Photos:
part 1
part 2
part 3
I know I've mentioned this site before, but I really do enjoy their work. If you haven't subscribed to their RSS feed yet, you definitely should. They're also on twitter now (@big_picture) if you want to follow them that way.
Basically, The Big Picture puts together photos from various events into small photo essays that give you a feel for what's going on in the world. Whoever makes their selections does a wonderful job, and finds some absolutely amazing photography to share. I find it to be very inspirational, as well as educational (both from a photography standpoint and as a way to stay up on current affairs). So if you haven't been following them, get on it. The "2009 in photos" series is a great place to start.
_______________________________________________
I'm still working on getting images for my "how to shoot Christmas lights" article, but that's coming soon, I promise.
I'm also going to take a minute to announce the upcoming [title of blog] 52 weeks project over on flickr. Link here. I'll probably dedicate a post or two to this, but just a quick heads up on what's happening:
52 week projects are the slimmed down version of the 365 projects (photo-a-day) that people do. Essentially, I'm asking you to submit your favorite photo from the week before for everyone to see. I'll pick my favorite out of everyone's submissions and feature it in the group and here at the blog (with permission, of course). The point of this exercise is to motivate everyone to shoot at least once a week and take the time to edit and upload a photo that they like. I chose a weekly format rather than a daily one because I want this to be enjoyable and not a chore, and I feel like I'll get more participation if people have some flexibility in that regard. If you're feeling motivated, a 365 project is a great way to get yourself shooting every day and there are hundreds (possibly even thousands) of 365 groups on flickr that you can join. Now is the time to start thinking about it, as a lot of the 365/52 groups close soon after the year starts. Photo submissions are currently turned off for the [tob] 52 group, but discussion is open so feel free to say hello and invite some friends.
~S
[title of blog] on flickr
© 2009 Simon Hucko
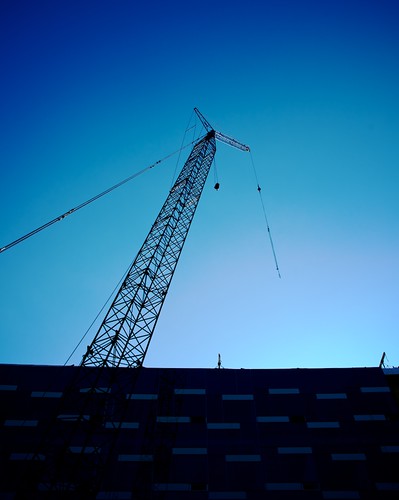
Well, that's it for blue week here. Hope you enjoyed it. Today's photo was shot looking through the crane from yesterday. I had originally cropped it tighter, then backed it off again. Looking at it now, I think I should have stuck with the tighter crop - it gets a little busy at the bottom of the frame. Ah well.
Have a good Friday and a great weekend - don't forget to get out there and shoot some! Next week's post is going to be about shooting Christmas lights, so stay tuned.
~S
[title of blog] on flickr
© 2009 Simon Hucko
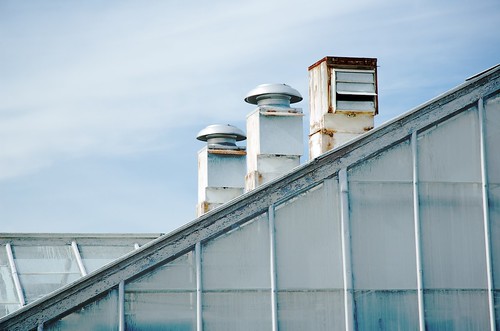
Almost finished with blue week here at the blog. It's been fun reading your comments on my photos, and I think I'll have to try this sort of thing more often (theme weeks).
Today's photo was grabbed at a construction site on campus. I liked the intersecting lines of the crane and building, and how can you go wrong with the blue reflection off the windows? Bumped up the saturation, boosted the black point to get good silhouetting, and added some heavy vignette to taste. Not my usual shtick, but I like the results. I kept the building in the frame to give it some context, and to exploit those great reflections.
~S
[title of blog] on flickr
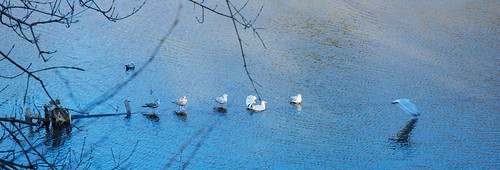
© 2009 Simon Hucko
Blue week continues! These birds were standing on a submerged log all in a row, making it look like they were taxiing out to the runway for takeoff. Sorry for all the branches and junk in the way, nothing I could do about it.
~S
[title of blog] on flickr
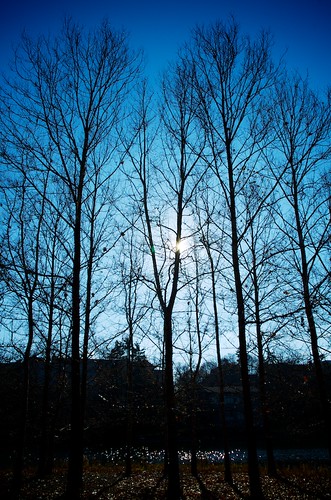
© 2009 Simon Hucko
Day 2 of blue week here. Today's image brings me back to some shots I took this summer. I like the silhouetted tree against blue sky effect. The best thing is, this is how the camera exposes for a scene like this, so there's no thinking involved. Colors and contrast boosted a little in post, and some heavy vignette added. My favorite part is probably the highlights coming off the water through the trees at the bottom of the frame.
~S
[title of blog] on flickr
© 2009 Simon Hucko
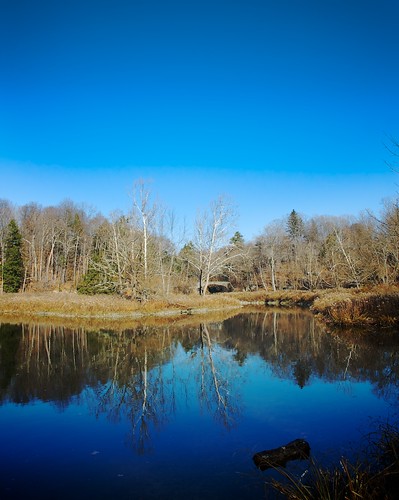
I went and walked around campus here at Cornell a week ago and took some photos. It was a beautiful sunny day, and when I imported the lot and started editing I realized that there was a lot of blue. So... it's time for blue week! I'll post a new one every day this week with a little quip about it and possibly a tip or two.
Today's photo was taken at the lake on campus, and makes use of the reflection of the trees in the water. You can see I have a "rule of thirds" thing going on with the water line to separate the picture, which is a typical composition for landscape photography. The log and grass in the lower right hand corner help to break up the reflection and add a little interest to the foreground.
However, you'll notice a giant line across the sky instead of a nice gradient. That wasn't there when I was editing on my computer, and is a result of converting from a RAW adobeRGB file to a sRGB jpeg. sRGB is a smaller color space than adobeRGB, meaning that it can't represent as wide a range of colors. Usually you won't notice anything after the conversion, but in this case there was a gap in the blues for the gradient in the sky, resulting in that ugly line. There also may be some compression artifacts going from the raw file to jpeg. If I were to have this printed I would save it as a 16 bit .tif file in adobeRGB and make sure the printer was aware of the issue and did what they could to prevent any banding. I could also go back to the original file and convert it to sRGB right away, so that after editing there wouldn't be any issues with conversion.
I'm not going to worry about it, as I'm not planning on having it printed, but it's a good example to make you aware of these things. Always check and double check your images in the right file type and color space before having them printed, or you could be surprised by some nasty results.
~S
[title of blog] on flickr
© 2009 Simon Hucko
It's getting to be that time of the year again. No matter what your holiday customs are, I'm sure at some point you're going to be hanging out with the family eating, drinking, and engaging in general merriment. And, being the crafty photographer that you are, you're going to want to exploit your family for practice document this event for everyone.
Holiday gatherings (at least here in the northeast) mean shooting inside with little to no natural light depending on the weather and time of day. Since I have yet to meet someone kind enough to light their house to ISO 200 f/8 1/100th, you're going to have to be resourceful to get those shots. These kind of events are great for pulling out the fast prime - not only do you get the shutter speed you need in low light, but it's easy to isolate people against noisy backgrounds by utilizing that nice shallow depth of field. It's also a much stealthier option than blasting a flash into someone's face, letting you capture more candid moments. The drawback to this is that you're generally limited to shooting one or two people at a time, and you may still not have a fast enough shutter speed to stop motion (especially if there are little kids running around).
The other option is to bust out the flash. If you have some sort of flash unit, you're golden. Set it up to bounce off the ceiling for a nice soft fill light (don't forget the bounce card for a little catch light in people's eyes). If you don't have a flash unit, you're stuck with the pop-up. Dial it down a little, and set it to rear curtain sync to try to bring in some of the ambient. That will help make it more natural looking. You can even tape a white paper napkin or tissue over the flash to help diffuse it so you avoid blown out hot spots on people's skin. The downside to flash is that it's much more obtrusive - people instantly know you're taking a picture, and if there's a pre-flash they may have time to blink and screw up your shot. It also takes a little bit for the flash to recycle, so you might miss shots while you're waiting for the ready light to come on.
No matter what you choose, get your camera out right away and start shooting. People will be a little camera shy at first or start posing for you, but after half an hour of your shutter banging away they will stop caring and you can get those great candids that you're after. Watch people in conversation for characteristic expressions. Wait for the punchline of a joke or the funny twist in a story and be ready to capture people's reactions. Get some detail shots of the food and the people preparing it. Have everyone crowd around after the meal and get a group shot (a tripod and remote release make this quick and painless - get everything set up before hand with a stand in and then bring them all in, fire off a few frames, and let them get back to the festivities). See if you can get the oldest members of the family away for a quick portrait at some point - it will give you a chance to talk to them a bit about themselves and you'll be glad to have the photos down the line. Most importantly, don't get too caught up in taking photos to actually spend time with and talk to your family and friends.
Have a great holiday season, and feel free to share your photos with us here on the blog or in our flickr group!
~S
[title of blog] on flickr
© 2009 Simon Hucko
I am a whole-hearted believer in digital photography. It is a wonderful learning tool, and the flexibility and control you have over your images is stunning.
So why on earth have I started shooting film? There are a couple of factors that have motivated me to cross over to the analog side. One of the main ones is simply the fact that I've never really shot film before, aside from the occasional snap on the family point n shoot. I was curious, and wanted to see what it was all about. Another big factor is that my dad used to shoot professionally, and still has all of his darkroom gear (and a bathroom in the basement that could serve nicely as a darkroom). This made it very easy for me to consider developing my own film, since the costs would be limited to film and chemicals.
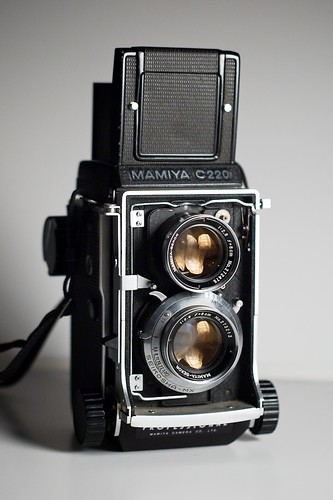
Finally, along came the Mamiya C220 TLR (pictured above) that pushed me over the edge. Cornell University has a photo society, and they have a small repository of gear that you can borrow on a weekly basis. When I saw the TLR on the list, I couldn't help myself, and arranged to borrow it. Luckily for me, there isn't a very high demand for it (since no one here knows how to use it, apparently) so I was told I could hang onto it as long as I wanted, or until someone else put in a request. When I picked up the camera, the guy in charge of the lending said "I have no idea how to use that. Good luck. Just don't break it."
So far it's been quite an experience. The camera is all manual, all mechanical, all the time. No built in meter, no automatic exposure, no batteries, you even have to manually cock the shutter before every photo. I've been metering with my DSLR (either as a spot meter or digital polaroid), and spending plenty of time setting up each photo. The camera uses 120 (medium format) film, and gets 12 shots per roll, so there's no room for sloppy shooting. Each frame costs somewhere in the neighborhood of 50 cents for film and chemicals, not to mention the time involved. To add to the fun, the viewfinder is a mirror image of what's in front of the lens, so it takes some getting used to. There are also parallax and bellows effects that come into play when focusing on anything closer than 15 feet or so, so you have to adjust your framing and exposure to counteract these. And of course, there's no display on the back that pops up the image review and histogram each time you press the shutter. You get to find out after you finish the roll and develop it whether or not you got the shot.
All of that adds up to being much more deliberate about taking a photo. I find a subject. I scout out the angles and lighting to find the framing I want. I meter the scene. I set the exposure on the camera. I spend time framing the shot, fighting with the reversed viewfinder and the lack of zoom. Finally, I take a deep breath and press the shutter. *Click* I say a silent prayer that it turns out ok, and move on to my next subject. Rinse. Repeat.
I find this process to be very satisfying. A lot more thinking goes into each frame than when shooting digital, and pressing the shutter has a feeling of finality to it (like an emphatic period at the end of a long sentence). Then the excitement and anticipation begins wondering how the roll will turn out.
Which is where I will end this article. I developed two rolls this past weekend, but more on that later along with some sample images (still working out how I'm going to get those). In the mean time, turn off your image review and shoot on manual for a day or two, see how it turns out :)
~S
[title of blog] on flickr
© 2009 Simon Hucko
If you're starting to get serious about photography, it's very easy to become discouraged by looking at other people's work. You start comparing your shots to the beautiful contrasty perfectly-composed richly-colored photos that you see on someone's website and think that you'll never be good enough.
Here's the secret: everyone started in the same place, and had to work to get where they are now. By putting your efforts into learning a few valuable skills, you can greatly improve your photography in less time than you might think.
First and foremost, shoot a lot. I mean, a lot a lot. And don't just fire off 5 of the same shots in a row, spend some time covering your subject from different angles, with different framing, at different focal lengths, using a different aperture/shutter combination, at different times of the day. Digital is invaluable for this type of learning - you can spend an afternoon shooting, go home, download all of your photos, and immediately get feedback on what works. More importantly, you'll get feedback on what doesn't work, or (best of all) what is almost right but needs some tweaking. Those are the ones that give you the little "ah ha!" moment, and inspire you to go and improve a concept or technique.
Second, delete all the crap. Just get rid of it. You don't need 500 mediocre photos of a flower sitting on your hard drive. Pick the 5 or so that speak to you in some way and delete the rest. Not only will this clear up space on your hard drive, but will keep you from digging through the dregs of your photography to get to the gems. Instant ego boost. And ego is important as an artist. If you don't believe in your work, who else will?
Third, learn how to process your images. Even with the best equipment, no one's photos look stunning straight out of camera. So you may not have the most expensive lens in the world, but it's easy to add contrast and color via software. You can even cheat and add some blur to your backgrounds in photoshop. Fix your exposure if necessary, and note any trends in your shots (hint: usually they'll be underexposed) so that you can start to fix them in camera. Pay attention to how photos that you like are processed, and learn to emulate the look. Once you really understand how all of the sliders and numbers and filters work, you can apply them to an image to express your artistic vision. Crop your photos to get the desired composition and aspect ratio, and to remove elements that take away from your image. You'll start to know just by looking at a photo what direction you want to take it, and how to get it there. Run noise reduction on your photos, and make sure they're sharpened (preferably by you at the end of your workflow, not by the camera shooting jpeg).
Finally, only share your best work with the world. I've said this before, but it bears repeating. Remember those 500 flower photos? Pick the best one, and share only that one. No one out there has to know you took 499 other photos that aren't as good. They see your one excellent shot and think "wow, what a great photographer!" It's sort of like the "chain is only as strong as its weakest link" philosophy - your skills as a photographer are judged by every image you show, so stack the deck in your favor and only show off your best stuff. One mediocre image can drag your entire portfolio down. Don't waffle and show 4 of the same images (vertical, horizontal, color, black and white...), pick one and stick to it. (I've been guilty of this lately, so this is as much a reminder to me as it is to all of you.) And continue raising your standards as you improve. Something that would have been a hero shot a few months ago might just be average for you now. Don't be afraid to go back and replace older photos with your newer, better work.
Don't get discouraged. Photography is an art, but it's also a skill. Things like exposure, post processing and even composition can be learned through trial and error. Review and critique every photo you take, and you'll learn very quickly what you like and don't like. Play around with different processing techniques and software and you'll learn what works best for you, and how you can get the look you want. Keep learning and improving, and shoot often. Eventually, you'll be the one with the website that everyone oo's and ah's over.
~S
[title of blog] on flickr
© 2009 Simon Hucko
One of my favorite features of Flickr (and one that I think gets overlooked by most people) is the Flickr world map. Type in a place in the search box and hit go, and soon your screen will start filling up with photos. Why should you care? It's great if you're visiting somewhere new and are trying to scout out locations to shoot. Just look for areas with a lot of dots and see what people are photographing there. You can restrict your search even more with keywords, or zoom in on a smaller location and re-search (you have to do this in order to get updated results). It's a nice way to see what people have discovered, and to find inspiration for your own work.
How does it work? Photos can get geo-tagged one of two ways - via GPS or manually. There are several different flavors of GPS tagging. Some cameras have a GPS receiver built right in and pictures are automatically tagged. Some cameras can accept an external unit that feeds the camera GPS information every time the shutter is clicked. Or you can separate the two, using a GPS logger and special software to match the time stamp on your photo to the location recorded by the logger. Flickr will use this information to place your photos on the map automatically.
Tagging manually is another option. You probably don't want to manually tag every photo you take, but it's very easy to do it with a chosen few (click the "add to your map" link next to your image). I've been using this method and it works very well for me. I try to be selective about what I tag, avoiding photos that have no relevance to the location (happy snaps, tight portraits, indoor shots, party pics, etc.)
Check out the maps. Look at your neighborhood, by your office, in the nearby park. I bet you'll discover something you didn't know was there.
___________________________________________________
On a completely unrelated note, I've had the awesome opportunity of borrowing a Mamiya C220 TLR this past week. It's been a very cool experience, shooting film on a completely manual all mechanical camera. Look for a post or two about my experience once I get the film developed and scanned.
~S
[title of blog] on flickr
Yes, I've touched on detail shots before. But I like them, so I'm going to devote another post to them with a slightly different twist.
My last post about detail shots suggested adding them to your coverage of an event to add to the story. This post is about covering an entire story with detail shots. I'm not saying you should shoot a wedding this way (please please don't), but small every day events can be covered very nicely with just a few close-ups. The following few frames tell the story of making pasta, but focused entirely on the food and the hands making it. I took some wider shots, but I think that these have the most impact and are perfectly capable of telling the story on their own.
Measuring out flour:

Adding the eggs:

Mixing it together:

Forming the dough:

Kneading the dough:

(Image credit: Rachel Hucko)
The finished product:
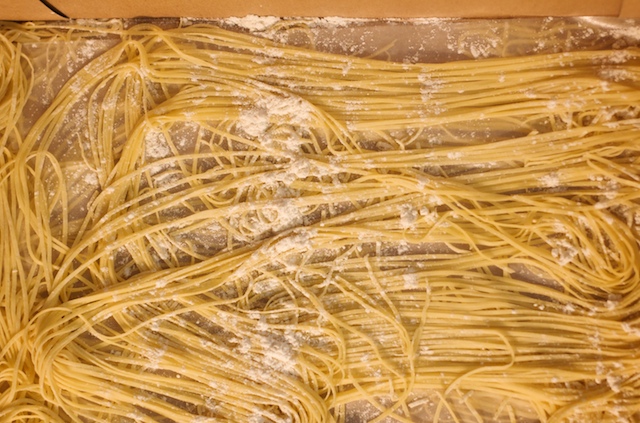
(Image credit: Rachel Hucko) All images © 2009 Simon Hucko
(Note: I don't have any shots of rolling out the pasta, unfortunately, but that's a two person job and we didn't have anyone to take pictures. Maybe next time.)
See? Nothing but hands and food, but it makes a fun little photo essay capturing the experience. I have some wider shots with our faces that I added in to the mix, but they're certainly not necessary to tell the story. Give it a shot: pick an every day activity and document it entirely with little details. You can turn your boring afternoon at the laundromat into a great photo essay, or capture your kitchen in a whole new way. Throw in a few different shots (wide shot of the location, a few portraits of people at work, etc) and you could even print it out as a coffee table book and give it to people as a gift. Nothing like a little artsy fun to get your creative juices flowing.
~S
[title of blog] on flickr
© 2009 Simon Hucko
No, it's not radial blur in photoshop. I did this in-camera on a photowalk I took recently. This walk was just for fun - a quickie over my lunch break to enjoy the nice weather and play around with a few new things. I'm not sure why I decided to start spinning my camera as I took photos, but I'm glad I did. I must have taken about 50 of these in various places. Some had way too much spin, some had the center of the spin at the edge or out of the frame, and some just looked blurry, but the one above turned out just right.
The lesson here? Don't be afraid to play around with new things. It's a lot of fun, and might even produce a few unique photos. Also, never underestimate the power of volume when you're experimenting with something like this. The more photos you take, the more likely you'll walk away with one that you like.
~S
_____________________________________________________________
edit: Way to talk about a technique and not tell you how to do it. Sorry all (and thanks Kristan for the reminder). This is how I arrived at the photo above. Your mileage may vary.
I was shooting around 1/100th of a second. The motion I used was sort of a flip of the wrist, trying to keep the rotation around the axis of the lens and not my hand. This was made much easier by my new hand strap, since I didn't have to worry about throwing my camera in the process...
The motion was about a 120 degree rotation (started around vertical and ended a bit past horizontal). I pre-focused and locked exposure on where I wanted to shoot, started the rotation, then pressed the shutter and followed through after I heard the mirror flip back. The timing of all of this is probably harder with a point n shoot, but not impossible, especially if you pre-focus. You'll just have to press the shutter a little earlier.
And, most importantly, I did it a lot. It's going to take some practice and some luck to get this to work out right. Out of the 100 or so frames I've taken with a spin, I've really only liked 3 or 4.
Hope that helps...
[title of blog] on flickr
© 2009 Simon Hucko
Ever wonder why your waterfall photos don't have that same dreamy, smooth look that you see in professional photographs? The trick is time. Long exposures work wonders with moving water, making soft cottony clouds out of the foam and spray. The good news? This effect is very easy to get with a minimal amount of special equipment.
You will need:
- Moving water of some sort
- Camera with aperture control
- Tripod
- Cable release or remote for your camera (optional, but it helps)
- Neutral Density (ND) filter for your lens (may be optional, depending on conditions, but highly recommended)
Set up your camera on your tripod. Frame your shot. Drop your ISO to its lowest setting. Close down your aperture to the f/11-f/22 range. Check your exposure time, aiming for a second or more. If it's too bright for you to get a long exposure, time to start thinking about neutral density filters (more below). Because it was pretty dark in the gorge, I was able to get a 1 second exposure at f/22 at ISO 200 (my camera's lowest ISO) without an ND filter, but it only could have helped the image. A cable release or remote will help to reduce camera shake, resulting in a sharper image.
A neutral density filter essentially acts as sunglasses for your camera, reducing the amount of light that enters the lens. (Neutral density means that it blocks all wavelengths of light equally and won't introduce a color cast to your photo.) They come in many strengths, from 1 or 2 stops up to 8 or so. There are two primary uses for a neutral density filter - the first is to be able to use a larger aperture in bright conditions (important when shooting with a flash and worrying about sync speed or shooting video), and the second is to extend exposure time for waterfalls, clouds, etc.
If you're using a point n shoot, you can actually use your sunglasses as a makeshift filter. Bonus points if they're polarized. This doesn't work with SLR lenses, so you're going to have to purchase one. I recommend shelling out for a good quality multi-coated glass filter, as anything else will just degrade your image quality and you won't be happy with the results.
Next time you go hiking around, bring your tripod along and impress everyone with your silky smooth waterfalls. It's worth the hassle.
~S
[title of blog] on flickr
© 2009 Simon Hucko
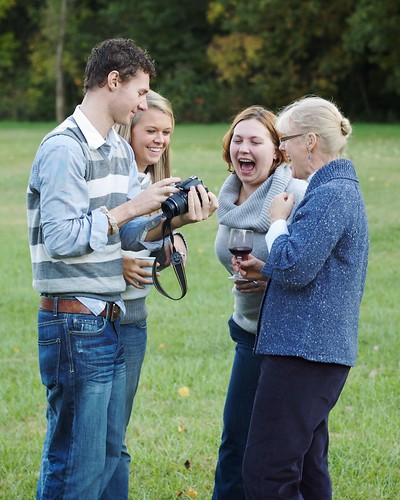
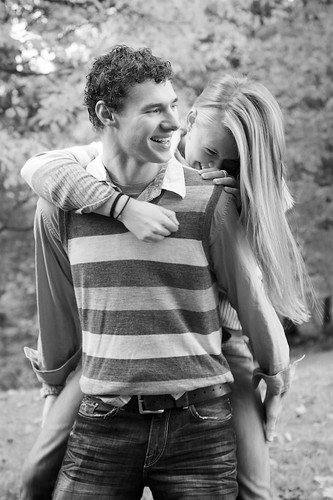
My family had a gathering over the weekend, so naturally I spent the whole day with a camera near at hand. The great thing about hanging out with your family and friends is that they (usually) don't object to having their picture taken.
My brother asked me to take some photos of him and his girlfriend, which I jumped right on. I usually shoot in a more journalistic style, and so it was a new experience for me to "direct" a session - scouting a location, choosing poses, etc. It wound up being a pretty natural shoot, my wife and parents were hanging out around me and we were all laughing and having a good time. I did a little bit of prodding for poses ("stand here, face this way, try jumping on his back"), but because it was so relaxed their personality really came through and I just had to capture that. It was a great experience for me, and I got to do it without the pressure of having a client or a paid model to worry about.
Photographing friends and family can be a great way to practice and to build your portfolio. Don't be afraid to step outside of your comfort zone a little - you learn the most by doing and making mistakes. Just remember - keep the mistakes to yourself and only share the keepers with everyone else. ;)
~S
[title of blog] on flickr
© 2009 Simon Hucko. See it larger here
You have a great weekend shooting, come home, and unload hundreds of photos onto your computer. Now what? How do you wade through everything without it becoming overwhelming?
The process that you go through from pressing the shutter to putting out a finished product is known as "workflow." Different people have different preferred workflows, and it doesn't matter so much exactly what you do. What matters is that you have a well organized, well defined process for handling images. I'm going to outline the workflow that I use and why I do it that way, but there is no right/wrong answer: the important thing is that you have an answer.
- Even before pressing the shutter, you need to decide what file type and color space (wikipedia) you want to work with. I shoot RAW files in adobeRGB, because that way I get the most data possible for editing my photos. (JPEG leads to faster processing down the line, but limits the amount of data collected)
- The next step is deciding how to import and organize your photos. I've settled on Apple's Aperture, which acts as both a photo organizer and RAW converter/editor. I use a card reader to import files into my Aperture library, where I have a folder for each month. Inside that folder I create a "Project" for each shoot, along with a few projects to cover random photos or special projects. Upon import, I generally rename the files to something meaningful and add my copyright info to the EXIF data.
- Once the photos have been imported, you should back them all up. This is an area that I'm lacking in at the moment, but something that I desperately need to start. (Yeah, go ahead, yell at me. I know it's bad. I just haven't gotten around to doing anything about it.) Once you have them backed up you can re-format your memory card and use it again.
- Time to sort. I flip through my images and delete the obviously bad ones (out of focus, blurry, severely under/over exposed, obviously boring and useless, etc). On the same pass, I'll mark photos I want to keep and edit with three stars. Photos that I want to hang onto but don't want to bother editing I'll give two stars. If I have a series of photos of the same subject, I'll generally choose the best one or two to edit and ignore the rest. Anything that doesn't make the cut to be edited I leave alone for the moment.
- I've reached the first possible stopping point here. Every time I import photos onto the computer, I try to force myself to flip through and sort them immediately. This generally cuts the numbers by 1/2 to 1/3, and makes the rest of the process less daunting. If I don't do this, it's easy to get out and shoot more photos and import them, creating a large backlog. Not good.
- OK, so things are sorted and waiting to be edited. I generally don't edit everything in one sitting, just chip away at it when I have time. Most of my edits happen entirely inside Aperture, as I usually don't step outside the realm of general darkroom type editing. I edit in the suggested order, working my way through the bricks from top to bottom (don't worry if that didn't make sense, bricks are Aperture speak for adjustment box). If I decide to do something more drastic, I edit as much as possible with Aperture before round-tripping it to the GIMP (Aperture is non-destructive, but if you have to round-trip a photo or use a plugin it will create a copy and then apply your external edits to that, which are destructive). After editing a photo, I upgrade it to 4 stars. If I really like a photo, I'll bump it to 5 stars. These are the ones I want to show off.
- After editing everything I usually make a pass back through the unrated photos from before. If I see something I want to hang on to, I'll give it 2 or 3 stars (depending on if I want to edit it). Everything else gets deleted. Yep, deleted. I'm sure I'll get some flak for that, too. At this point, you should make sure all of your changes are backed up. *slaps self on wrist*
- Time to show off! Usually, I set the filter for the project to 4 stars or greater, and upload all of these to a Facebook album (at a lower resolution, usually 640p on the long side). These are the photos I want to share with friends and family, and they're less about the art and more about the people. I then bump the filter up to 5 stars and export those to flickr (at 1024p on the long side), which I use as more of a portfolio/gallery. I've taken to uploading things to flickr at a slower pace (one or two a day) to prevent going over the 5 picture limit of people's "Your Contacts" feed. Plus, I find things get more attention when you spread them out and give people a chance to look and comment.
- How about prints? If I really like an image and want to print it, I'll export a full-res highest-quality sRGB jpeg out of Aperture and upload it to a printing site. For more casual printing and photobooks from vacations, etc I use shutterfly.com. Their print quality is pretty decent, they have great prices, and they're always running sales and specials. For more professional/archival type work I go to mpix.com. Their print quality is excellent, and they have some nice options other than traditional prints. In both cases, I don't resize my images or apply extra sharpening before sending them. These printing services have big expensive printers with excellent drivers that will resize and sharpen your images the appropriate amount, and will usually do a better job than general photo editing software.
- You'll notice that I didn't mention anything about color management. Reason being, I don't worry about it. I'm not making professional prints for paid jobs, so if the color is a little off somewhere it's not a big deal. I've never noticed an issue with prints, and most web viewers don't have calibrated monitors and color managed browsers so there's not much point in worrying about it. Color management is a whole other can of worms, and I may go into it at some point if there's any interest out there (comment and let me know).
- I also didn't mention keywording or tagging photos. Again, something I don't do. I've considered starting, but am a little daunted by having to go through all of my old shots. Some day, perhaps. My advice - before you start keywording things, take some time to decide on a system and stick with it. You'll be glad you did later.
Sorry for the long post, but I thought this might be helpful. Do you have a workflow? How does it differ? What are the challenges you have with organizing and processing your photos? Any tips or tricks, or things I missed? I'd be interested to hear.
~S
[title of blog] on flickr
© 2009 Simon Hucko
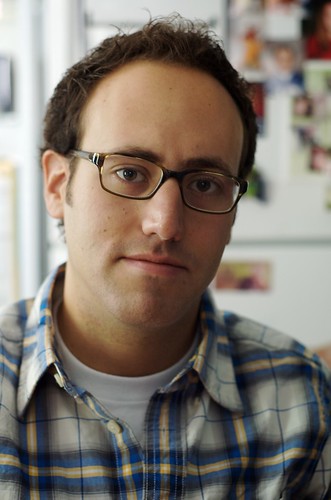
This weekend my friend Matt (pictured above) came down to visit. He just picked up a brand new Nikon 35mm f/1.8 prime lens last week, and has been shooting with it ever since (I expect there will be plenty of new shots with it on his photostream soon). Inspired by his new purchase, I decided to shoot with my 50mm all weekend.
There are plenty of advantages to shooting with a prime lens. They're generally faster (larger maximum aperture), smaller, lighter, and sharper than a zoom lens in the equivalent price range. They also lock you into one focal length, which forces you to "zoom with your feet" to get the composition you want. While this may sound like a bad thing, it is a great learning tool and really makes you think about composition and perspective when you're shooting. There were times this weekend when I thought about switching back to my zoom, but I stuck with the 50 and forced myself to get creative to get the images that I wanted (or to find new shots that were more practical).
A fast prime will change the way you think about photography, and add a lot of creative possibilities to your kit. To anyone with a DSLR, I highly recommend picking up a 50mm f/1.8 (available for any system, usually around $100) or the new Nikon 35mm f/1.8 (around $200 retail). I don't usually talk gear here, but a fast prime really is a worthy investment, and lets you take shots that you just can't get with a kit zoom (nice blurred backgrounds, low light no flash photos, etc).
_________________________________________________________
Note to Nikon DSLR users: If you shoot with an entry level Nikon DSLR (D40/60/3000/5000), the Nikon 50mm f/1.8 will not auto-focus on your camera. I strongly recommend spending the extra for the 35mm f/1.8, both for the auto-focus and for the wider field of view (better for shooting indoors).
~S
[title of blog] on flickr

In case you haven't heard the news, flickr introduced a new feature today. Flickr Galleries allow you to "curate" your own gallery, compiling up to 18 images from other flickr users, displaying them in the order you want, and adding commentary to each image. Note that you cannot put your own photos into your galleries, they must come from other flickr users.
I think there are some interesting possibilities here, and am brainstorming ways to use this new feature. What are your thoughts/ideas?
edit: check out some examples here
~S
[title of blog] on flickr
© 2009 Simon Hucko
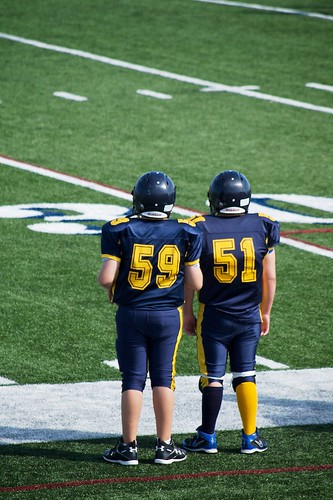
Today we're going to talk about breaking another "rule" of composition. Generally, the best photographs are the ones in which the subject fills the frame. Sometimes, however, you can make a stronger impact by isolating your subject in part of the frame. In the picture above, taken at a modified football game, the subject (the two boys) only fills about 1/4 of the frame. Even still, I think there's something very moving about this image.
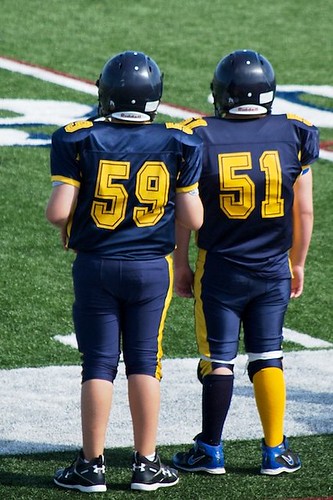
Here's the same image with a much tighter crop. While this is a more rule-friendly framing, I think that the photo loses a lot of its impact.
Which do you like better? Why? (Or do you dislike them both?)
_____________________________________
Format change: You've probably noticed I haven't been publishing nearly as often as I used to. For several reasons, I am backing off to one post a week. This is partially because I don't have as much time anymore to write posts, but it's also to give people an opportunity to read and comment on my blog posts, and hopefully to improve the quality of each post. I may still post links and other things during the week, but the meat of this blog will now be published on Monday mornings.
~S
[title of blog] on flickr
© 2009 Simon Hucko
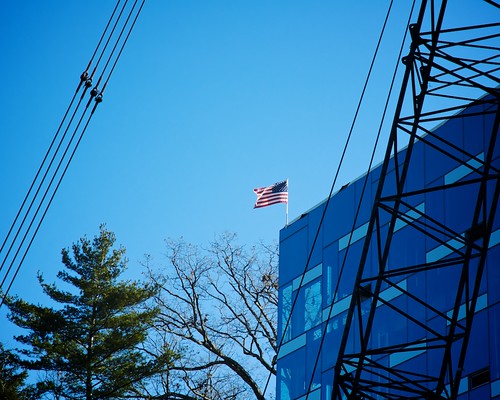
Ever take a shot, looked at the LCD review, and thought "good enough, I'll fix it in post." Sure you have. We all have. It's so easy to tweak an image to where you want it, why not fix everything in Photoshop?
Photographers who learned to shoot on film complain that digital has made people lazy. While I'm all about the power and flexibility of shooting digital, I do think that they have a point. If you're constantly having to adjust your exposure or composition (either by extensive cropping or by cloning out distracting backgrounds), it's time to slow down, get back to basics, and pay more attention while you're shooting. Sure, these are easy fixes, but they also degrade the quality of your image, and often the time you spend tweaking each image is much longer than the time it would have taken to get it right in the first place.
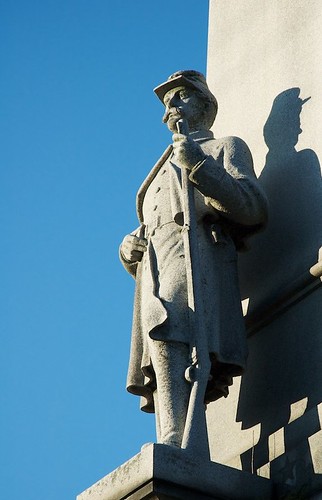
That having been said, sometimes you have no choice. Take today's image. See the original below:

There was no physical way I could frame this shot without that distracting flagpole sneaking into the frame. Rather than give up and not take the shot, I thought "I'll fix it in post" and fired away. A little bit of cloning and I got a very nice shot of a statue against the clear blue sky. I also cropped it in a bit to remove some distracting parts of the statue. This should have been done in camera, but lens wasn't long enough.
What are your thoughts? When (if ever) is counting on fixing things in post ok?
~S
[title of blog] on flickr

© 2009 Simon Hucko. See the details here
Want to make some awesome panoramas without spending any money? Then you need hugin. Hugin is an open source photo stitching software that packs a lot of punch. Not only will it align images, it will correct for exposure and white balance differences between images and blend them together seamlessly. You can also use Hugin to correct perspective, align HDRs, and lots of other things I haven't explored or don't understand.
Panorama tips:
- A tripod is helpful, but not necessary. The panorama above was done handheld. Just try to rotate around the camera axis instead of turning your body. Also, avoid any details in the close foreground, as these can get pretty distorted and choppy.
- Make sure you overlap each image by about 1/3 on each side. The more overlap, the easier it will be to align images and preserve details. I ran into problems with my panorama because I didn't have enough overlap, and had to spend a lot of time fixing the alignment manually.
- For the most detail, shoot horizontal panoramas in a vertical (portrait) orientation, and vice versa.
- Shoot in full manual. Lock your exposure, white balance and focus before you shoot your series. This will make editing and stitching much easier and faster. Hugin can compensate for these differences, but it has to work harder and might not produce as good results.
- If you're shooting a lot in the same area, find a way to indicate to yourself that you're starting a pano. Shoot your hand (or some other marker) before and after your series of photos so that you don't have to spend time figuring it out on your computer. It may seem obvious at the time, but when you get back and find 400 pictures of the sunset and have to resort to exif data to figure out where to start and end your pano, you'll be kicking yourself.
That's all I got. As always, questions, comments, critiques, concerns, stories, observations, and whatever else are appreciated and encouraged.
~S
[title of blog] on flickr
© 2009 Simon Hucko
We've all been there - you see a moment you want to capture, grab your camera, jam your finger down on the shutter button, and then wait an eternity for the picture to actually be taken. By that time you've missed the decisive moment (wikipedia), and are left cursing your camera. This is especially common with digital point n shoots, which are notoriously slow to focus, but even fancy DSLR's have some amount of focus and shutter lag.
How do you overcome this? Learn to anticipate and pre-focus.
Anticipating a great photograph is not always easy (or possible), but there are plenty of circumstances where you know what's coming. The kiss at a wedding. Your 5 year old niece blowing out candles on her birthday cake. A batter swinging at a pitch. By knowing what's coming, you can have your camera out and ready to go.
That brings us to the next step: pre-focus. Focus on your subject by half-pressing the shutter and make sure you frame the shot how you want it (keeping in mind that there may be some subject movement or additional elements added before the decisive moment).
Now when the moment happens you'll be all set to capture it, and don't have to wait for the camera to figure everything out. All cameras will still have some small amount of shutter lag, so you will still have to compensate by shooting a little bit earlier than the moment you want to capture. This requires some timing and practice, but the nice thing is that it's consistent so once you've got it down you'll be able to get it right just about every time.
~S
[title of blog] on flickr
© 2009 Simon Hucko
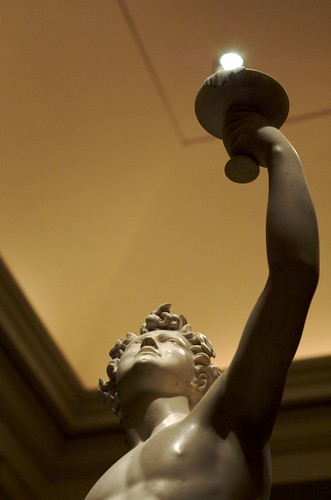
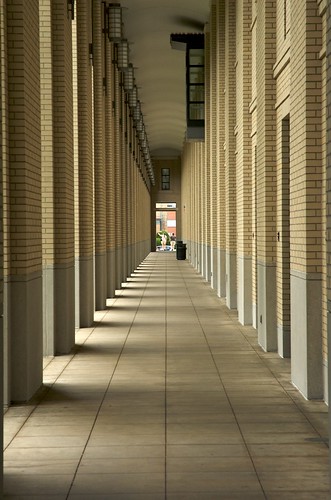
One of the unique (and sometimes frustrating) things about photography is that it forces the viewer to adopt a static perspective on a scene. Since photographs are two-dimensional, you can use this to your advantage when looking for creative photographs. I'm sure you've all seen photos where people in the foreground seem to be interacting with the background - holding up the leaning tower of Pisa, for instance. This technique is known as "forced perspective."
Aside from creating comic mementos of your vacation, forcing perspective can add interesting elements to your photographs. Take today's photo. I saw the sculpture, and noticed the recessed ceiling lights above it. Immediately I thought of trying to "light" his torch, and started squatting down and finding a perspective that would allow me to get that shot. I'm sure I looked pretty silly doing it, but you can't argue with the results. As an added bonus, the perspective matches the statue (looking up at the torch), so it lends itself well to this subject.
Remember that perspective is a very powerful part of composition. Try viewing your subject from several different angles (low, high, straight on, from an angle, sideways, from behind) and see which offers the most interesting image. That makes an interesting exercise, as well - take a picture of a subject from every angle you can imagine and compare them all afterward. How does your perception of a subject change based on perspective?
~S
[title of blog] on flickr
© 2009 Simon Hucko
Basic "rules" of composition stipulate that you should not place your subject at the center of the frame. The oft-touted rule of thirds (wikipedia.org) is commonly used by photographers to frame/crop their images, and a lot of cameras even include an optional rule of thirds guide in the viewfinder/preview window. Generally the idea is to keep the main subject out of the center of the frame, which results in a more natural, dynamic image.
However, there are times when a centered composition can be used very effectively. This is especially true when the subject displays a lot of symmetry, showcased by today's photo of the Washington Monument. The monument, the ring of flags, and the expanse of grass in front all create a very centered and symmetrical feeling. The wisps of clouds in the sky help add a little interest and drama, but the photo would have been fine without them.
© 2009 Simon Hucko
Another example showing a lot of symmetry and a centered "subject." Note that this technique works very well with architecture, since most buildings are designed to be symmetrical, but you can use it with other subjects as well.
Thoughts? Feelings? Comments? Questions? Critiques? Stories? Other symmetry pictures? Please share!
~S
[title of blog] on flickr
© 2009 Simon Hucko
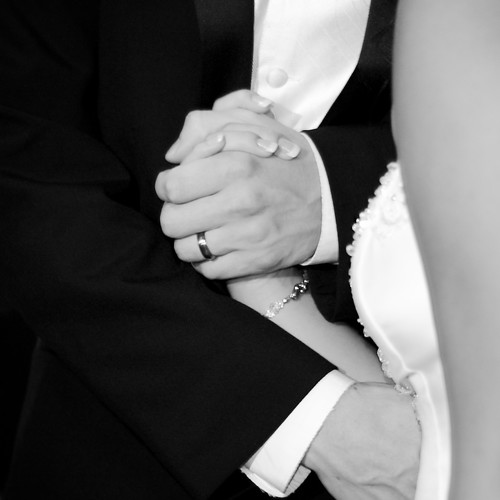
Quick tip today - always look for a detail shot, something that helps tell the story of the event you're shooting. This is especially great if you're planning on doing some sort of book or other multiple photo layout from the event.
Take today's photo - the connection between bride and groom. Not something you'd get a large framed print of, but it was a great addition to the photo book my wife made of the wedding.
Here's another example from when I was taking photos before a school play:

© 2009 Simon Hucko
Again, not something you would probably print on its own, but it was a nice addition to the set of people getting ready and added to the overall story.
Keep an eye out for the detail shots. You'll be glad you did
~S
[title of blog] on flickr
© 2009 Simon Hucko - view it large here
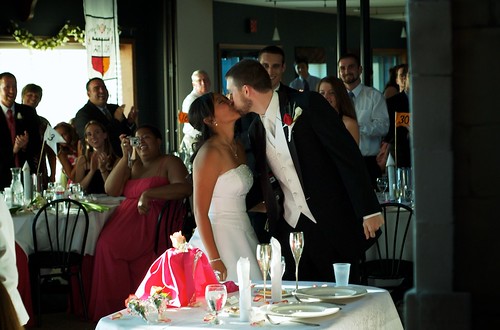
Internet photo-sharing sites have made people's photography incredibly accessible. You upload a photo, and anyone in the world with an internet connection has the chance to view and comment on it. While this is great for getting exposure and sharing photos with friends and family, it does come with a few downsides.
One of the biggest downsides (in my mind) is that the sites force your photos into small sizes. The normal view for a photo on flickr is 500p on the long edge (which is the same size I use here on the blog). And that's if someone has clicked through to your photo page. In other parts of the site your photos are relegated to even smaller sizes, and at times arbitrarily cropped into a tiny square thumbnail. The problem? Not all photos read well that small.
Take today's photo. Even at 500p, the background looks cluttered and busy. I had someone suggest that I add some blur to the background to help take away the distraction from the couple. I don't disagree with that, and a shallower depth of field or some photoshop would help isolate the main subject.
But, do me a favor and view that photo larger. Take a minute to look at the background, and everything that's going on there. What looks like a random bunch of heads at 500p suddenly becomes a wealth of expression and celebration of the couple's kiss. It's even better at the original image size, which I don't have posted. All of the action in the background adds to the story of the photo, and gives it more depth than just a nice picture of a bride and groom kissing.
The moral of this story is, find a way to view your photos larger. Find sites that will let you display your work at a larger resolution. Alert people to the fact that your image will probably look better larger and ask them to click through. Also, larger format prints are an awesome (albeit slightly expensive) way to look at your work, and I highly recommend taking a few of your hero shots and getting them printed up at 8x10 or larger. There is something truly satisfying about holding a print of your work in your hands and taking in every detail.
__________________________________
NOTE: I'm not trying to call out the person who made that comment, or say that they were wrong. You can definitely make the point that the background is too busy. It's all subjective, and there is no right or wrong. I love getting comments and criticism (yes, criticism) on my work, and being able to discuss it with people beyond "great shot!" "thanks." So thank you for the inspiration.
Feel free to write your thoughts/feelings on it as a comment here or on the flickr page
~S
[title of blog] on flickr
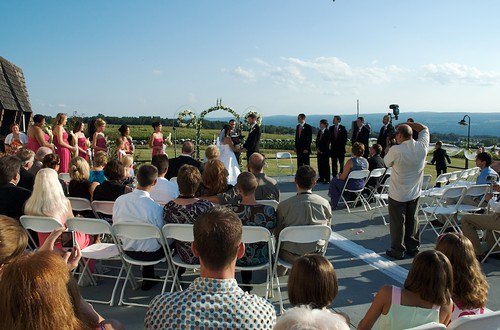
© 2009 Simon Hucko - view large on black here
Shooting through a crowd of people is hard, and usually doesn't produce very good results. I find I do a lot of cropping in situations like that, and the subject is typically framed by the back of two heads which can be distracting.
The solution? Start shooting without looking through the viewfinder. If you're using a point n shoot or one of the fancy new DSLRs, you've got it made - just make sure the preview is on and raise your camera up. Those of us without live preview have it a little harder - you have to shoot blind and hope you get something usable.
I've been working on this technique lately for a few reasons. The main one is to get above a crowd of people and get a shot of what I want. Today's picture is a perfect example. Everyone was sitting at the ceremony (including me) and I reached up and fired off a few frames. The resulting image looks like I was standing in the middle of the crowd, but this way I didn't make anyone mad (I hope). The key to this is to shoot pretty wide so you can straighten/crop later. A fast shutter speed helps too, since you won't be able to support your camera as well with one arm straight up in the air.
Another reason to work on no-look shooting is to avoid the "camera reaction" from people. Candids are very hard to get, and there are really only two ways to capture a candid moment. The way I usually do it is to have my camera out and up to my face long enough that people stop caring and go about what they were doing. But if you want to grab a quick moment that may not return, you're going to have to shoot people without them knowing. Aiming from your chest and firing off a few shots can return great results. I recommend sharing your pictures with the people afterward, but that's a moral issue and I won't go into that here.
You can also use this technique to get a unique perspective on your photos. Yesterday's post is an example of this - I held the camera low to get a shot from the dog's level. Sure, I could have sprawled out on the dock, but it's faster and easier to be able to do it without looking.
A little practice with no-look shooting can pay dividends down the line. Give it a try next time you're out shooting - it's a great way to add new a perspective to your images.
~S
[title of blog] on flickr

© 2009 Simon Hucko
Today's photo breaks a few photography "rules" - the horizon is crooked, I chopped off half of the person, the subjects of the photo are way underexposed, and the white balance is very cool (blue) compared to what it should be. Personally, I love it. It was an interesting combination of artistic intent and chance.
I was shooting mid-morning into the sun at the end of a dock, so I knew the subjects would be back-lit. I even took it a little farther by bumping up the black point in post. I wanted blue sky and silhouettes - sometimes detail on the subjects can be distracting and take away from the story of the photo (in this case, the interaction between dog and owner). I also cooled down the white balance a little to bring out the blue in the lake and sky. All of this I had more or less decided on before hand.
The crazy tilt and framing was basically an accident. Mea (the dog) came running by and I held my camera low and wide and fired away. I thought about straightening it up in post, but a. it would have cropped part of the dog and even more of the person and b. I liked the dynamic feel imparted by the lines leading up and right into the frame (which was the same way Mea was running).
It was an interesting weekend of photography - I did a lot of no-look shooting (something I've been working on), shot with the pop-up flash on my camera (horror of horrors, but I had no choice), played with different crop ratios when editing, grabbed a bunch of shots for a pano that I still have to stitch together, and even took some video with my point n shoot which I'm going to play around with editing this week (more to come on that later).
How was your weekend? Any interesting stories or photos? Feel free to share here or in our flickr group
~S
[title of blog] on flickr

© 2009 Simon Hucko - click to view larger
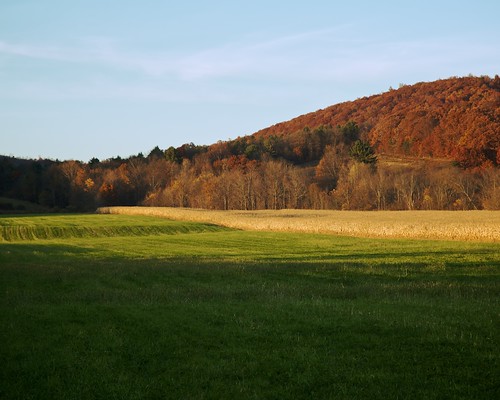
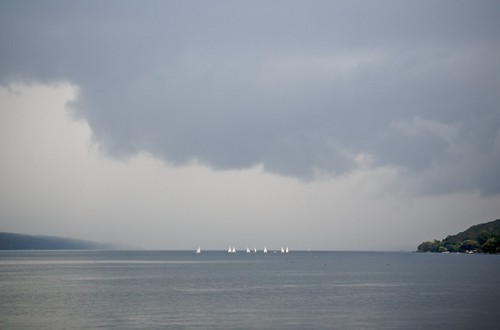
"The best camera is the one you have with you." Not sure who said that originally, but it's certainly one of the truisms of photography. When the plane landed in the Hudson river back in January, the iconic image that spread all over the internet and news media was captured with an iPhone by a passenger on one of the ferries. The quality isn't great, and it was shot through a dirty window, but it told the story perfectly from a unique perspective. There were thousands of other images from that event, but this one was the first and most personal to make it out.
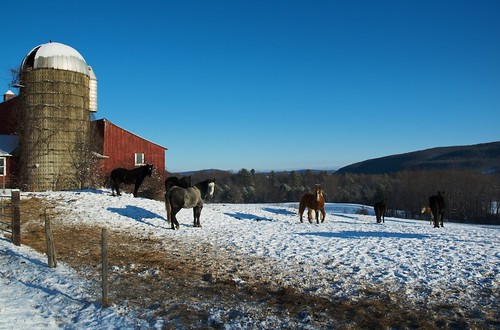
My story is completely lame by comparison, but it reminded me of why I always make sure I have a camera with me. I was driving home last night through the valley and there was a weird inversion thing going on causing some misty clouds to be hanging onto the hilltops despite the blue sky above. In the year that I've been making this commute I've never seen anything like it. I found a suitable vantage point, grabbed my camera, and fired off a few frames. My favorite is posted above (click on the photo to see it larger). It's not newsworthy, and it may not even be a great photo, but it captured a unique event and I'm glad I had a camera with me. In fact, my camera bag usually goes most places with me (much to my wife's dismay). If I don't want to bring "the big camera" I might still grab my point n shoot and slip it into a pocket. If nothing else, I always have my camera phone with me.
Not only do I take pictures of interesting things that happen, but I use my cameras like a notepad, taking pictures of things I'll want to remember later - my parking space, a good bottle of wine, gift ideas, books, documents, notes on a whiteboard, restaurants I want to try, etc.
What about you - do you carry a camera with you? Do you use it for anything aside from taking pretty pictures? Have you ever wished you had one when you didn't? Comment and let me know your thoughts
~S
[title of blog] on flickr

© 2009 Simon Hucko
If you've spent any time on photography forums on the internet you're bound to have come across the word "bokeh" and all of the controversy surrounding it. Bokeh (don't ask me to pronounce it correctly, I have no idea) is a word created by Japanese photographers to describe the quality of the out of focus portions of an image. I came across a great article online the other day defining bokeh and giving examples of the different factors that go into the judgement of a lens' bokeh. Check it out:
Bokeh (toothwalker.org)
Hope that helps.
~S
[title of blog] on flickr
![[title of blog]](https://blogger.googleusercontent.com/img/b/R29vZ2xl/AVvXsEhJ8bvx_9_zOAREbXcrJRML7aVvJMbb90IYYYuyti384jeZHYQ9t8MK6_Kpt_1P4-pZw-QfF9kh4Sqci0vbopzLme862PPhuyPJcc7pRLUW1K1aNzts5YzuXIhgonq66MpjJCqfiWtfwUw/s1600-r/waterfall.png)


