skip to main |
skip to sidebar
© 2010 Simon Hucko
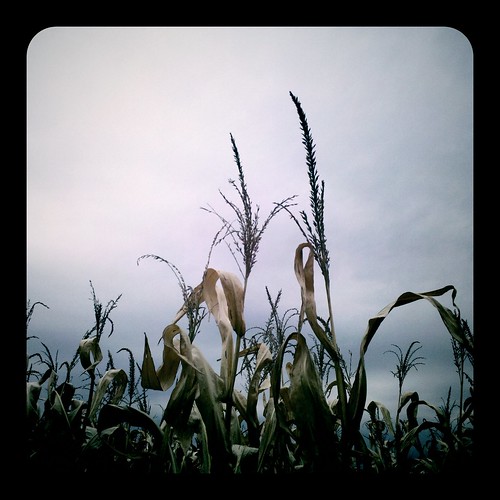
This week was a pretty blah week for me photographically. The weather was blah, the leaves are mostly gone in the places I usually shoot, I was busy with life and didn't have much time for photography, etc. So, the best I could do this week was a cell phone shot of some dead corn against a slate gray sky. Enjoy ;) I'm going to make every effort to take some photos that I'm proud of this week. Hopefully that'll pan out.
My pick this week is "Splash" by irv_b:
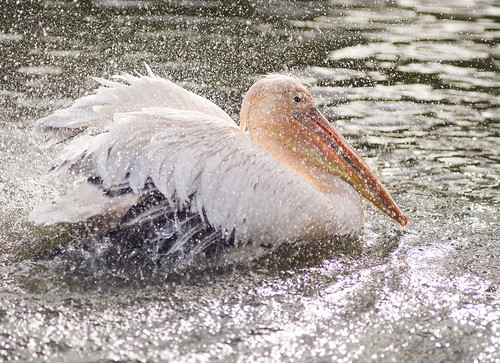
For best effect, click here to see it larger. Really digging how the droplets were frozen by a fast shutter speed. The exposure is spot on, too - plenty of detail in the white feathers of the bird. And, for the icing on the cake, the bird is looking directly at the lens. Excellent capture, Irv.
The theme this week is "Halloween." Plenty of options here. 10 weeks left, folks, hop back in and finish strong!
~S
[title of blog] on flickr
© 2010 Simon Hucko
You may have noticed the little signature that has started showing up on all of my photos. Notice I call it a signature and not a watermark. What's the difference? Glad you asked.
Traditionally, a watermark is a security measure designed to authenticate a particular document. In the case of photography, a watermark is generally used by a photographer to prevent image theft. This can be a real concern - if you make your money selling images, what's to prevent anyone from scraping an image off your website and using it for their own means without paying you for it? The honest answer is: nothing. Even embedding images into a flash slideshow doesn't prevent someone from doing a screen capture and having a perfectly good web-res image to use. So by watermarking an image, at least you'll get credit for it when it gets scraped and you can use that as ammo to get paid (or at least get the image taken down), right?
Not necessarily. Turns out anyone with a copy of photoshop can pretty effectively scrub your little watermark right out of the image (even more so with the new content-aware fill in CS5, which is truly an amazing thing to behold). Some photographers counter this by placing a rather large watermark right in an important part of the image, making it extremely difficult to crop or clone out. (Remember, nothing is impossible...) The net result to the viewer is something like this:

image courtesy of Matt Beaty
This sort of big watermark, even if it's mostly transparent, is an immediate deal-breaker to me. Why would you share your image if you're going to throw something huge and distracting right in the middle of it? Makes no sense.
"OK Simon, so if your little signature isn't protecting your photos, why is it there?" Branding. Most of my photos are up on flickr with a Creative Commons license, which basically says that people are welcome to use my images for non-commercial purposes as long as I get credit for them. My images do make it onto people's blogs from time to time, so having my signature on the image helps to identify it as mine. (It would probably be better if you could actually read my signature, but that's not how I roll.) Because it's not distracting from the image, people are much more likely to leave it there rather than trying to crop or clone it away. It also means that people who are familiar with my work will recognize the signature when they see it, helping to build the brand that is Simon Hucko. It's not a very big deal at the moment, but it's laying the groundwork for future growth (ie if I have images in a gallery, send a bill, sign a book, print a calendar, hand out business cards, etc).
What are your thoughts on the situation? Should photographers watermark their images? Is my signature still too distracting and/or pointless? Should I be doing more to prevent image theft? Comment and let me know.
~S
[title of blog] on flickr
© 2010 Simon Hucko
Well, we managed a few more photos this week, so I guess I'll continue. I know there are some lurkers out there who haven't been posting lately, and I encourage you guys to jump back on. 11 weeks left - you can do it! Plus, with fall here and the holidays coming, there are plenty of photo opportunities, so it shouldn't be hard to shoot something every week. Even a quick photo with a cell phone is better than no photo as long as it speaks to you in some way.
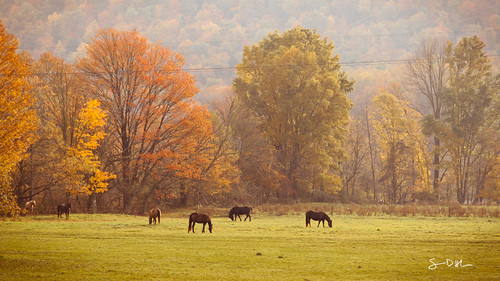
My photo this week is of a scene that I pass every day on the way to work. I love this field with the horses in it, and so often it screams out to me "take a photo!" I don't usually stop (mostly because I don't have a long enough lens to do it justice), but the other day the horses were closer to the road and right up against the changing trees. The power lines are a bit of a bummer (and another reason that I don't photograph this field much), but I can live with it.
My pick this week is "norwich cathedral" by irv_b:
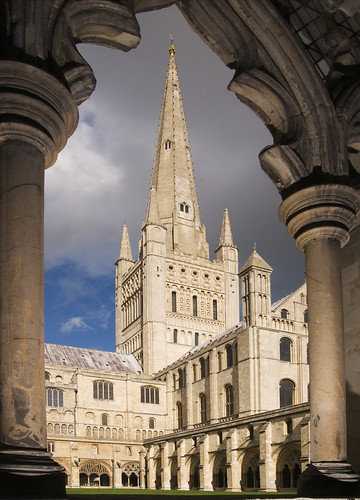
There are so many great things going on with this photo, starting with the great use of framing. From the description: "...I added a bit of flash to lift the details from inside the arches." Great idea, I like the extra bit of detail that you get in the foreground this way. I also like the lighting on the building - sunlight on the subject with moody clouds in the background is one of my favorite things. Great photo of a lovely spot.
This week's theme is "Fall." For the seasonally challenged, you can always tackle a different meaning of the word ;) And, as always, the theme is just a suggestion to get your creative juices flowing. Feel free to post any photo that you want. I hope we'll get a few more of you to come back into the fold this week.
~S
[title of blog] on flickr
I had the opportunity to make a few photo-related purchases for my birthday recently. Something that I've had my eye on for a while is a Lensbaby. Rather than drop $200+ on one of the new ones that I may end up not liking and never using, I opted for a used copy of the last generation of Lensbaby (Lensbaby 2.0). It's basically a Lensbaby Muse with a double glass optic built in, which I figured was a good (and inexpensive) way to get started with the whole Lensbaby thing.
First off, I will say there is a bit of a learning curve. From a technical standpoint, all Lensbabies are manual exposure only, so if you're not comfortable with that you may want to steer clear (the point is to be inspired, not frustrated). Focusing accurately can also be a little tough, and I wound up shooting multiples of most subjects until I got what I was after (image review is helpful for this). From a creative standpoint, there are certain shots and effects that work better than others with this lens, so it takes a bit to get a handle on how to best use it. Of course, there's no *wrong* way to use it (that's kinda the point), but certain looks were more appealing to me than others.
Rather than give a technical review, I'm going to go through a series of shots I took showing the different looks I was able to get from the lens, and you can draw your own conclusions from that. I think that's more meaningful, anyway.
The classic Lensbaby look:
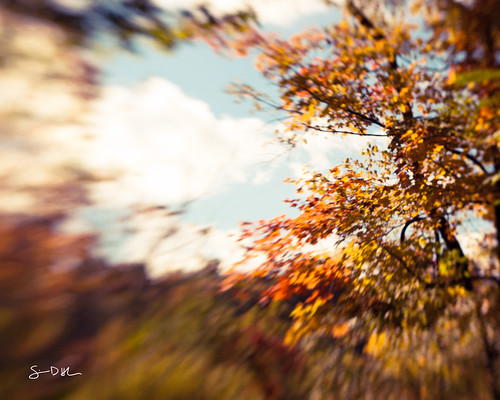
Focus in one part of the frame, everything else is blurring away from it. Because the blur is directional it takes on more of a zoom quality than an out of focus quality. This can be very effective in putting the emphasis on your subject. It also gets pretty old, pretty quickly (in my opinion, anyway), so I started looking for other ways to use the lens.
Tilt-Shift:
A Lensbaby is a pseudo-tilt/shift lens, but the field curvature of the optics messes with that and gives you a round sweet spot instead of a plane of focus. However, judicious framing and cropping can give you that tilt-shift look at the expense of some pixels. This is something I have to explore more.
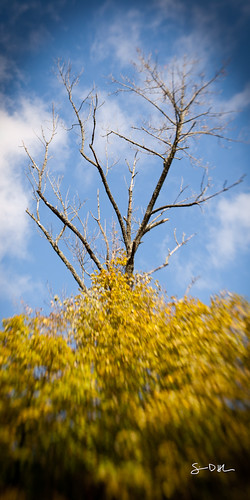
Shallow Depth of Field:
Just glancing at this photo, it looks like a standard shallow depth of field image. Closer inspection of what is and isn't in focus reveals that there is indeed some Lensbaberie going on, but it's a different feel from the standard Lensbaby look. This is entirely composition and subject dependent - you need to find the right situation to make this work.
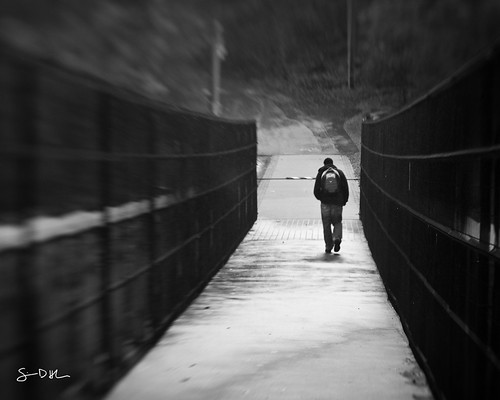
Lomo:
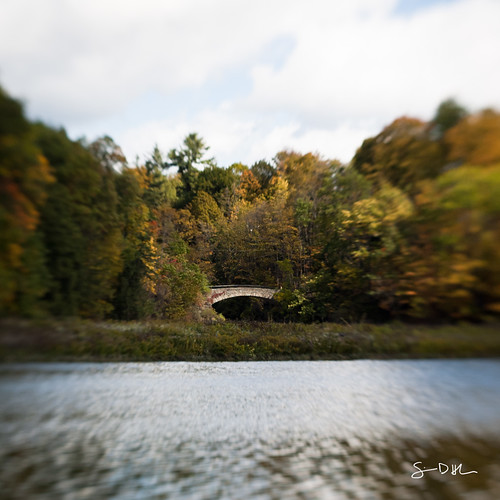
This is the look I see myself using most often - a reasonably sharp center blurring away at the edges. The square crop and vignette complete the illusion, and bingo bango - digital Holga. Seems to work best with mostly flat subjects at far distances.
Portrait:
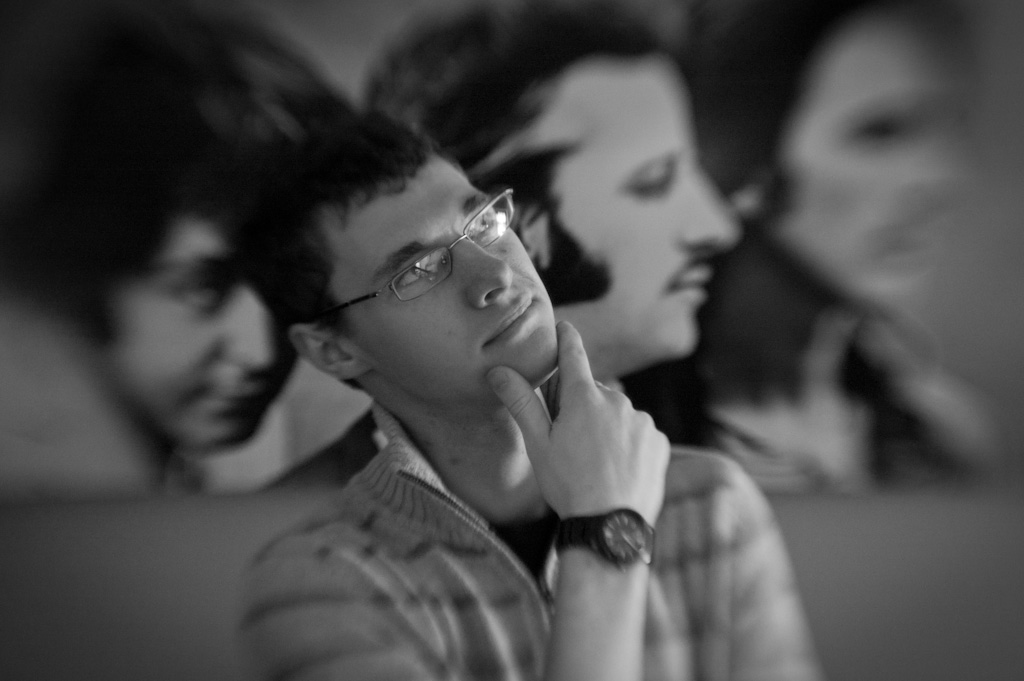
This lens has some good potential as a portrait lens. It certainly puts the focus on your subject's face, and leads to a nice blur in the rest of the photo. I don't do a lot of portrait shots, but I'll have to play with this more. Maybe I'll do a family portrait series over the holidays with it. (Maybe.)
Overall I'm pretty happy with my purchase. Like any specialty lens, it's not something I'll use every day, but it's small and light enough to have earned a permanent spot in my bag. I think it will be a great cure for the blahs that settle in from time to time, and just might save my sanity this winter when the world gets gray and ugly. It also will be fun to pull out for some "different" shots at things like weddings, or on vacation at those touresty areas. And if nothing else, it's a good talking piece with other photographers.
~S
[title of blog] on flickr

Since I'm reading through it for the second time, I figured I would write a little review about "Examples: The making of 40 photographs" by Ansel Adams. (Amazon). Ansel Adams is probably the most well-known American photographer, and is most famous for his stunning black and white images of Yosemite (and black and white landscapes in general). If you aren't aware of his work, I highly recommend checking him out (wikipedia, Ansel Adams gallery).
The reason that I love "Examples" so much is that it's almost like having a conversation with Adams while flipping through his portfolio. Each photo is printed and then followed by 2-3 pages of discussion by Adams about the image. He includes as much as the technical information as he can remember (camera, lens, filter, film, exposure, etc), but also goes beyond the "how" into the "why" - why he was motivated to take this image, what the circumstances surrounding it were, how his feelings about the image have changed over time. He also randomly includes his thoughts about the art and craft of photography (at one point he even mentions how he is excited for the development of digital image capture). While the technical information is interesting to me, it's these little nuggets that really make the book a must-read.
Best of all, it's not that expensive to buy (currently $26.39 on Amazon). It would cost you more to buy postcards of the 40 photos in the book. If nothing else, this would be a good one to add to your holiday wishlist.
~S
[title of blog] on flickr
© 2010 Simon Hucko
I finally bit the bullet and used some of my birthday money to get a Lensbaby. I have a review coming soon, so I won't talk too much about it here. Suffice to say, those things are super fun to play with. I went exploring with it the day it arrived, and came up with some good stuff. This shot really takes advantage of the Lensbaby blur to focus in on the subject. The black and white should come as no surprise to anyone. Keep an eye on my photostream this week for some more shots, and on the blog here for the review.
My pick this week is "angles" by irv_b:

Great abstract image here. I like the curve set against all the hard lines and angles, it makes for an interesting composition and keeps my eye bouncing around the frame. Nice find, and well captured.
No theme this week. I may be discontinuing these wrap up posts here and on the flickr group unless people start submitting more, as it makes no sense for me to make a "pick" out of the one or two submissions for the week. If you want to see this continue, submit an image. If not, we can part ways on this project. It's in your hands, guys.
~S
[title of blog] on flickr
© 2010 Simon Hucko
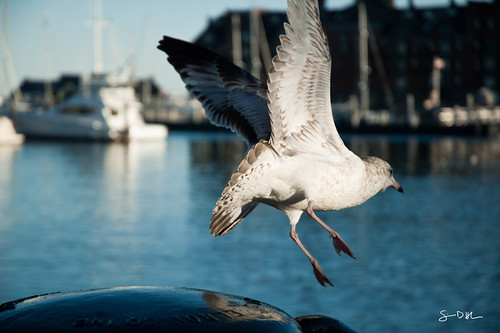
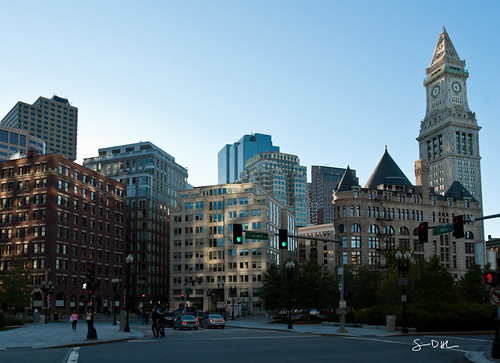
I realize that's a pretty strange title for a post on a photography blog, but sometimes it's good to just put your camera away. I took a trip to Boston with my wife last weekend to visit her sister and see the sites (and most importantly, eat the seafood). I of course brought my camera, and it came with me everywhere we went, but it spent most of the time safely tucked away in my camera bag. That's not to say that I couldn't access it quickly if I wanted to - it takes a matter of seconds for me to get the camera out and ready to shoot - but by not having it hanging around my shoulder or in my hands I didn't feel the compulsive need to take a photo of every semi-interesting thing that passed by. The net result was a great in-the-moment weekend and a high keeper ratio (I don't remember the exact numbers, but I think I shot around 75 frames, 29 of which will make their way to facebook). Most of the deleted shots were part of the short bursts I was shooting in the science museum to battle camera shake and subject movement ('twas dark in there).
The moral of the story is that you don't need to spend every minute of a vacation or event with a camera glued to your face. I'm not saying that you shouldn't bring a camera, but consider keeping it put away and only pulling it out for photo-worthy moments. Sure, you might miss a few quick grab shots, but the payoff is not having to go through your photos after the fact to find out if you had a good time or not.
~S
[title of blog] on flickr
© 2010 Simon Hucko
It's the most wonderful time of year if you're a nature photographer. Everyone loves fall foliage, and with plenty of overcast rainy days I've been chomping at the bit to get out and shoot some waterfalls. We're still a little off-peak here, but it's coming on fast and strong, and the next couple weeks are going to be amazing. I'm also hoping for a few clear fall days so that I can capture some leafy landscapes at golden hour. Nothing says autumn like a crisp blue sky. A polarizer is super helpful for knocking down the sky a bit and cutting reflections on the leaves, leaving you with a nicely saturated scene.
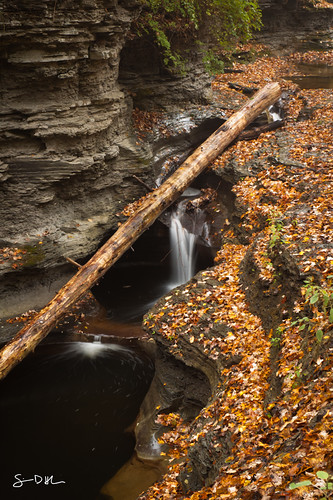
My photo this week was the product of a rainy expedition last Monday. This was the only photo I ended up keeping in color, the rest were better served in black and white (mostly due to the green leaves farther down the creek). The giant log is smack in the middle of the best series of falls on the stream and has been cursed many times over by local photographers. I decided to use it as part of my composition, and from this angle it makes a nice leading line up the stream.
This week's pick is "Autumn Trickle" by [Adam_Baker]:
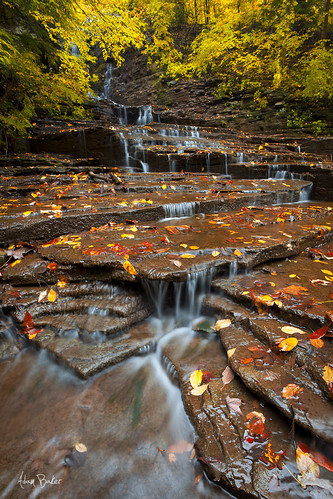
© Adam Baker
Adam wound up shooting the same stream this week, but he headed up the other way and captured a part I haven't seen yet. I really like the series of little cascades, so this is on my list of places to check out and photograph before winter. The title says it all - the water was pretty low last week, so a lot of the falls on this stream were at the trickle stage. Given the hurricane and other rain we've had since, I'm guessing things are back to normal, so this particular shot no longer exists. Waterfalls can change daily, so it's fun to go back to a spot several times a year and see the changes. Nice shot, Adam.
(Adam is currently out on an epic fall photo trip through the Adirondacks and parts of New Hampshire, so now would be a good time to start following him on flickr so that you can enjoy all the autumny goodness when he gets back.)
This week's theme is "exploration." Show me what you got!
~S
[title of blog] on flickr
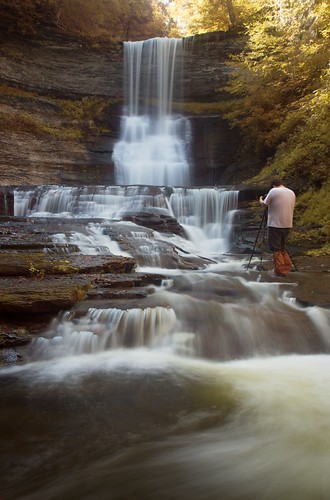
© 2010 Simon Hucko
It looks like waterfalls are becoming my favorite subject to shoot. Photographing waterfalls is a very zen-like "back to nature" experience for me, and it touches on a lot of the reasons I enjoy photography. True, long exposure waterfall shots are nothing super new or creative, but when done right there's still a bit of magic to the cottony plumes of spray. (For what it's worth, my only photo ever to make explore on flickr is a waterfall shot.) My goal this fall is to capture the falls and foliage around here, so I thought I'd talk a bit about the process.
The first task is finding the falls to shoot. There are literally hundreds of waterfalls in upstate NY, so that's not too difficult here, but you may not be so lucky. This is where the flickr map can come in handy - you can search by keyword or tag in a specific location. Find your home town, zoom out to an acceptable driving radius, and search for waterfall. If nothing comes up, you still might be in luck (not everyone geotags their photos). Try google or ask some local photographers (especially landscape shooters) if they know of any.
The next consideration is flow. Different times of the year mean different flow rates over the falls. Creeks are usually at their highest after the spring thaw, and at their lowest around late summer/early fall (especially after a long dry spell). Waterfalls can look very different under these different flow conditions, from a roaring cascade to a quiet trickle. The ideal time for photos is usually somewhere in the middle, but the best practice is probably to visit the falls several times through the year. The same waterfall may take on a completely different character but still be highly photogenic, so there's no hard and fast rule here, just something to be aware of. Don't forget about winter - iced over falls and snow can make for some stunning shots.
Weather is also an important factor to good waterfall photos. Heavily overcast or even slightly rainy days are the best times to go shoot. Waterfalls are typically found in a gorge in shadow, but the trees and sky above the falls are often lit by the sun. If you go shoot on a sunny day, you'll have a lot of dynamic range to contend with, and you'll have to do some wizardry (ND grad or HDR) to even things out. Dark cloudy days also help to extend your exposure times, making it easier to get the silky smooth shots you're after. And, as a bonus, cloudy rainy days tend to discourage hikers so you won't have to contend with people walking into your shots. (Although that's not always a bad thing, right Adam?) Your camera is more weatherproof than you might imagine, just keep wiping it dry as water collects on it with a towel or microfiber cloth. Try to avoid getting water on your lens or filters, though, as it's very hard to get them dry again in the field and image quality will suffer because of it. I find that a lens hood is an excellent rain blocker, just make sure your lens is horizontal or pointing downward at all times.
Now for the actual photography part. The one absolutely essential piece of kit is a sturdy tripod. For a nice blur of the water you're looking at exposures in the seconds range, so you're going to need something rock solid to keep the rest of the scene sharp. If you can swing it, a nice carbon fiber tripod is probably the best for hiking in and out, but it's better to buy an old heavy monstrosity than a cheap aluminum tripod from a big box store. (It's not ideal for hiking, but a sore shoulder is better than soft photos.) E-bay and craigslist are good resources for this sort of thing. Consider putting a "want to buy" ad on your local craigslist, you never know what photographers have lying around that they'd be willing to part with on the cheap. Make sure whatever you buy is durable enough to get banged around a bit, and sturdy enough to be set up in moving water without worry of it washing away down the stream. More on that in a bit.
Another essential bit of gear is a polarizing filter. Water and wet leaves are very reflective, and it's nice to be able to cut those reflections to boost colors in your photo. This also produces an interesting effect where the falls drop into the stream and quickly disappear. A polarizer also serves as a roughly 2 stop ND filter, which can be enough on a cloudy day to get the exposures you're after without stacking filters.
An ND filter is probably a good thing to have as well, especially if you're caught out shooting on a less than ideal (ie sunny) day. I have a 3 stop ND that I stack on my polarizer. This leads to a bit of vignetting at wide angles, so I prefer not to use the ND filter if I don't have to, but it's better than nothing.
I generally find a wide to normal zoom lens to be the best for this sort of work. Access to the falls varies based on where you go, so while an ultra-wide can produce some interesting photos you can't always get that close. Filter vignetting is also an issue the wider you get, so that can be a bit of a limiting factor. I aim for exposures in the several seconds range (2-8ish), so the lowest ISO setting and a stopped down aperture (f/11-f/22, depending on conditions) are a must. Use your histogram or blinkies so that you're not blowing out the falls, you'll be sorry later if you do. With these multi-second exposures I haven't noticed a difference between using a remote release and just pressing the shutter, so I've given to working without a remote (it's just easier). This will vary based on how stable your tripod is and your shutter squeezing technique, so you may opt for a remote if you're not getting the sharpness you think you should be.
Waterfalls tend to lend themselves to vertical compositions, so that's how I shoot most of the time. Keep an eye out for horizontal shots, though, they're certainly out there. Often the best vantage point is in the middle of the creek, so don't be afraid to get wet. (I've been seriously considering purchasing a pair of hip waders for this type of work.) I recommend planting your tripod without the camera on it first to test depth/stability. Look for interesting foreground elements like rocks or leaves or smaller cascades to add depth to your shot. This is where that wide angle lens will shine. Also be on the look out for motion in the stream - over several seconds the bubbles or leaves may travel in an interesting pattern that you can use to add interest to your shot. Watch out for spray from the falls: like I said before, it's very difficult to get a lens properly dry and clean again when you're standing in the middle of a creek. If it does get wet, the best thing to do is walk away for a bit, wipe it with a microfiber cloth, let it dry, then clean it with some lens tissue or a lenspen to get any stream gunk off. If you really want the shot, keep your lens covered with a cloth until right before you make your exposure to help minimize spray.
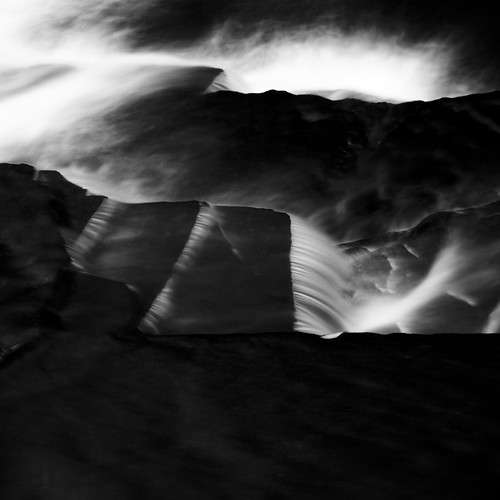
Cloudy conditions are great for getting the exposures you want, but they tend to lead to somewhat flat photographs. My main edits are locking in white balance (you want the falls to be neutral or slightly cool) and boosting contrast. I find that I prefer converting to black and white for most shots, in which case I use color filtering to darken the stream even more (a blue/green filter removes the yellow/red/brown of the rock, making it darker - see below). Note: go easy on this effect in the fall, as the leaves will also get darkened down and it can look flat and unnatural.
That's about all I got, I guess. Questions/Comments? I'd love to hear 'em.
~S
© 2009 Simon Hucko
[title of blog] on flickr
![[title of blog]](https://blogger.googleusercontent.com/img/b/R29vZ2xl/AVvXsEhJ8bvx_9_zOAREbXcrJRML7aVvJMbb90IYYYuyti384jeZHYQ9t8MK6_Kpt_1P4-pZw-QfF9kh4Sqci0vbopzLme862PPhuyPJcc7pRLUW1K1aNzts5YzuXIhgonq66MpjJCqfiWtfwUw/s1600-r/waterfall.png)


