![[title of blog]](https://blogger.googleusercontent.com/img/b/R29vZ2xl/AVvXsEhJ8bvx_9_zOAREbXcrJRML7aVvJMbb90IYYYuyti384jeZHYQ9t8MK6_Kpt_1P4-pZw-QfF9kh4Sqci0vbopzLme862PPhuyPJcc7pRLUW1K1aNzts5YzuXIhgonq66MpjJCqfiWtfwUw/s1600-r/waterfall.png)
© 2010 Simon Hucko
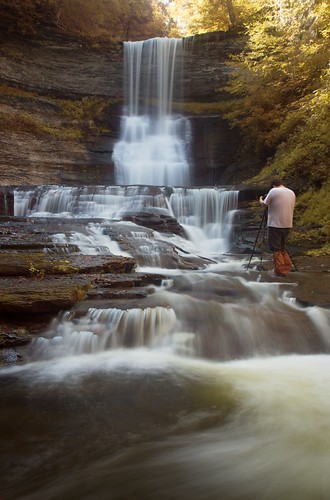
It looks like waterfalls are becoming my favorite subject to shoot. Photographing waterfalls is a very zen-like "back to nature" experience for me, and it touches on a lot of the reasons I enjoy photography. True, long exposure waterfall shots are nothing super new or creative, but when done right there's still a bit of magic to the cottony plumes of spray. (For what it's worth, my only photo ever to make explore on flickr is a waterfall shot.) My goal this fall is to capture the falls and foliage around here, so I thought I'd talk a bit about the process.
The first task is finding the falls to shoot. There are literally hundreds of waterfalls in upstate NY, so that's not too difficult here, but you may not be so lucky. This is where the flickr map can come in handy - you can search by keyword or tag in a specific location. Find your home town, zoom out to an acceptable driving radius, and search for waterfall. If nothing comes up, you still might be in luck (not everyone geotags their photos). Try google or ask some local photographers (especially landscape shooters) if they know of any.
The next consideration is flow. Different times of the year mean different flow rates over the falls. Creeks are usually at their highest after the spring thaw, and at their lowest around late summer/early fall (especially after a long dry spell). Waterfalls can look very different under these different flow conditions, from a roaring cascade to a quiet trickle. The ideal time for photos is usually somewhere in the middle, but the best practice is probably to visit the falls several times through the year. The same waterfall may take on a completely different character but still be highly photogenic, so there's no hard and fast rule here, just something to be aware of. Don't forget about winter - iced over falls and snow can make for some stunning shots.
Weather is also an important factor to good waterfall photos. Heavily overcast or even slightly rainy days are the best times to go shoot. Waterfalls are typically found in a gorge in shadow, but the trees and sky above the falls are often lit by the sun. If you go shoot on a sunny day, you'll have a lot of dynamic range to contend with, and you'll have to do some wizardry (ND grad or HDR) to even things out. Dark cloudy days also help to extend your exposure times, making it easier to get the silky smooth shots you're after. And, as a bonus, cloudy rainy days tend to discourage hikers so you won't have to contend with people walking into your shots. (Although that's not always a bad thing, right Adam?) Your camera is more weatherproof than you might imagine, just keep wiping it dry as water collects on it with a towel or microfiber cloth. Try to avoid getting water on your lens or filters, though, as it's very hard to get them dry again in the field and image quality will suffer because of it. I find that a lens hood is an excellent rain blocker, just make sure your lens is horizontal or pointing downward at all times.
Now for the actual photography part. The one absolutely essential piece of kit is a sturdy tripod. For a nice blur of the water you're looking at exposures in the seconds range, so you're going to need something rock solid to keep the rest of the scene sharp. If you can swing it, a nice carbon fiber tripod is probably the best for hiking in and out, but it's better to buy an old heavy monstrosity than a cheap aluminum tripod from a big box store. (It's not ideal for hiking, but a sore shoulder is better than soft photos.) E-bay and craigslist are good resources for this sort of thing. Consider putting a "want to buy" ad on your local craigslist, you never know what photographers have lying around that they'd be willing to part with on the cheap. Make sure whatever you buy is durable enough to get banged around a bit, and sturdy enough to be set up in moving water without worry of it washing away down the stream. More on that in a bit.
Another essential bit of gear is a polarizing filter. Water and wet leaves are very reflective, and it's nice to be able to cut those reflections to boost colors in your photo. This also produces an interesting effect where the falls drop into the stream and quickly disappear. A polarizer also serves as a roughly 2 stop ND filter, which can be enough on a cloudy day to get the exposures you're after without stacking filters.
An ND filter is probably a good thing to have as well, especially if you're caught out shooting on a less than ideal (ie sunny) day. I have a 3 stop ND that I stack on my polarizer. This leads to a bit of vignetting at wide angles, so I prefer not to use the ND filter if I don't have to, but it's better than nothing.
I generally find a wide to normal zoom lens to be the best for this sort of work. Access to the falls varies based on where you go, so while an ultra-wide can produce some interesting photos you can't always get that close. Filter vignetting is also an issue the wider you get, so that can be a bit of a limiting factor. I aim for exposures in the several seconds range (2-8ish), so the lowest ISO setting and a stopped down aperture (f/11-f/22, depending on conditions) are a must. Use your histogram or blinkies so that you're not blowing out the falls, you'll be sorry later if you do. With these multi-second exposures I haven't noticed a difference between using a remote release and just pressing the shutter, so I've given to working without a remote (it's just easier). This will vary based on how stable your tripod is and your shutter squeezing technique, so you may opt for a remote if you're not getting the sharpness you think you should be.
Waterfalls tend to lend themselves to vertical compositions, so that's how I shoot most of the time. Keep an eye out for horizontal shots, though, they're certainly out there. Often the best vantage point is in the middle of the creek, so don't be afraid to get wet. (I've been seriously considering purchasing a pair of hip waders for this type of work.) I recommend planting your tripod without the camera on it first to test depth/stability. Look for interesting foreground elements like rocks or leaves or smaller cascades to add depth to your shot. This is where that wide angle lens will shine. Also be on the look out for motion in the stream - over several seconds the bubbles or leaves may travel in an interesting pattern that you can use to add interest to your shot. Watch out for spray from the falls: like I said before, it's very difficult to get a lens properly dry and clean again when you're standing in the middle of a creek. If it does get wet, the best thing to do is walk away for a bit, wipe it with a microfiber cloth, let it dry, then clean it with some lens tissue or a lenspen to get any stream gunk off. If you really want the shot, keep your lens covered with a cloth until right before you make your exposure to help minimize spray.
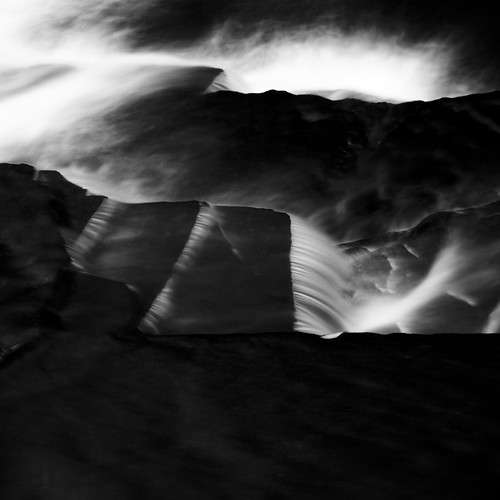
Cloudy conditions are great for getting the exposures you want, but they tend to lead to somewhat flat photographs. My main edits are locking in white balance (you want the falls to be neutral or slightly cool) and boosting contrast. I find that I prefer converting to black and white for most shots, in which case I use color filtering to darken the stream even more (a blue/green filter removes the yellow/red/brown of the rock, making it darker - see below). Note: go easy on this effect in the fall, as the leaves will also get darkened down and it can look flat and unnatural.
That's about all I got, I guess. Questions/Comments? I'd love to hear 'em.
~S
© 2009 Simon Hucko
[title of blog] on flickr


No comments:
Post a Comment