skip to main |
skip to sidebar

© 2010 Simon Hucko
The theme this week was "lines." True to form, I didn't exactly stick to the theme, but there are definitely some implied/less-obvious lines in my composition this week. When I look at the photo I find myself starting at the top with the bridge, which leads me to the stone wall. The wall leads me down to the water, which flows down toward the bottom left of the frame. These lines give the image a natural progression, which helps the viewer connect with the different details of the photo. The 25 second exposure is probably way overkill, but you can't argue with the smoothness of the water. I got up before dawn that day and hiked down into the gorge by flashlight. I was hoping that sunrise would find its way onto this scene so I could get some golden morning light, but despite facing east the gorge blocked out the sun. The lighting is a touch flat, I tried to punch it up a little in post, but there's a lot of detail in the trees and under the bridge that would get lost in more direct light. Later that day we hiked back down and the gorge was packed with people splashing through the stream and harsh overhead sunlight. If you're into shooting landscapes and naturey stuff like this, you're going to have to learn to love your pre-dawn alarm clock.
My pick this week is "Slug Trails 2" by djhucko:
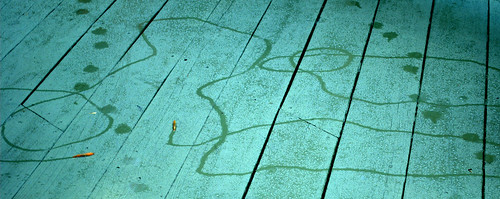
© Dan Hucko
Talk about lines! Much like last week's sunflower photo, this image gives some wonderful insight into a world I had never even really thought about. I've seen slugs oozing across a deck or sidewalk, but I never realized how lackadaisical they are in their wanderings. The paw prints add another layer of interest, and the fact that the two slugs are in the frame gives the photo a nice concrete subject to return to after roaming around the squiggles. Very nice.
Since this weekend is Labor Day, I'll be extending the deadline to Monday 9/6 at midnight. This week's theme will be "square." Square crop or square subject (or both), I leave that up to you. With the holiday this weekend, you should all have no trouble taking one photo to post, so I hope to see a lot of submissions this week!
~S
[title of blog] on flickr
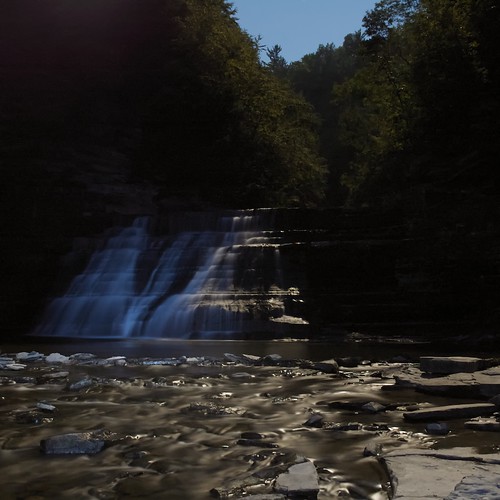
© 2010 Simon Hucko
After the sun goes down, you're probably not thinking about going out to photograph landscapes. However, the moon puts off a surprising amount of light, especially when it's close to full. You're still looking at several minute exposures, but you can get some interesting lighting (and some surprisingly blue skies) if you have a tripod and the patience to explore.
Another nice side effect of shooting at night is that it's much easier to add your own light to a scene. Something as simple as a flashlight can help you define important parts of your landscape. This technique is known as light painting. The idea is to use light selectively on portions of the image during a long exposure.
The photo above was just shy of 2 minutes at f/8, ISO 800. I used a LED flashlight to paint in the waterfall, ensuring that it would show in the photo with the relatively brighter moonlit rocks in the foreground. The high ISO and long exposure led to a bunch of noise (including some magenta fringing in one corner of the sensor). Some creative cropping, noise reduction and some selective desaturation resulted in a very usable image. If I did it again I would have opened the aperture up a stop or two and used a shorter exposure. This would have made my little flashlight effectively brighter (more on that some other time), helping the waterfall pop.
If you don't have one, I really recommend a little LED flashlight for your bag. They're cheap, bright, more or less daylight balanced (generally a little cooler), and can be used for many different things (light painting, finding your way/gear in the dark, focusing in low light when using flash, etc.)
Light painting was fun. It's probably not a technique I'll use often, but it was interesting to experiment with. What new techniques have you tried lately?
~S
[title of blog] on flickr
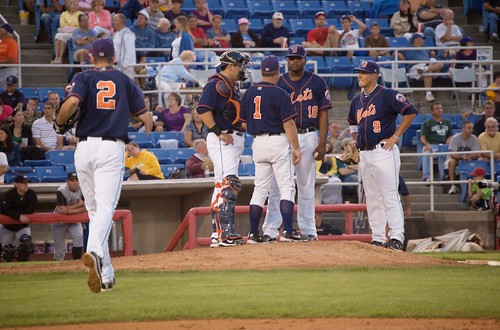
© 2010 Simon Hucko
So apparently I haven't been very good about sticking to the theme lately. I have ideas when I choose them, and often they just don't work out. I figured green would be easy with all the summer greenness, and then it rained all week. Fortunately I had a few other photographic opportunities this past week. My photo was taken at a local minor league game. If you're looking to brush up on your baseball shooting skills, this is definitely the way to go - there was maybe one official photographer there, and they didn't even look twice at my camera bag when I walked in with it. I bet if you asked nicely it'd be easy to get yourself a "press pass" to something like this, and while you may not be able to use the images for anything other than posting on Flickr, it would be great practice. Thanks to my wife for letting me borrow her 55-200.
My pick this week is "Opening up to the Possibilities" by maryshelby:
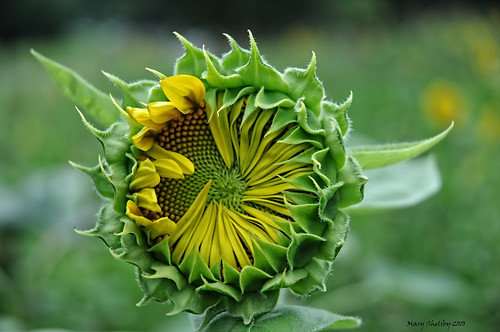
© Mary Shelby
When I think "green" I don't usually think about sunflowers, but she nailed this one. The title is perfect, and definitely sets the tone for the photo. A wonderful capture of something that happens every day but most people never see. My only suggestion would be to get up a foot or so higher so that the tree line in the background disappears and you get a nice uniform green/yellow backdrop, but that's just nitpicking on my part.
This week's theme will be lines. Find a way to work lines into your composition to lead your viewer where you want them to go. And go shoot! We keep dwindling down here, I'd really like to see some people rejoin us for the rest of the year. If you've been busy this summer, now's the time to dust off your camera and jump back in. No excuses necessary, we'd love to have you back!
~S
[title of blog] on flickr

© 2009 Simon Hucko
I read a comment in a forum somewhere in the past week that really got me thinking. Unfortunately, I have no idea where I read it so I can't give it proper credit, but it definitely inspired this post. Thanks, anonymous photographer, for your insight.
For Christmas this past year, my dad was able to grab two rolls of Kodachrome for me. I immediately stuck them in the fridge and began plotting what to do with those 72 precious frames. The Photographer (capital P) in me called out for beautifully lit, color rich photos that will fully take advantage of this legendary film. I've been hoarding the shots, and to date have only taken 9 frames or so that I felt were "worthy" of this mighty emulsion.
Then I read something that has completely changed my perspective on what to do with this film. I'm still saving it for special shots, but my definition of special has been tweaked a little. First, some background:
If you're not aware, Kodachome is slide film. Unlike regular film, which produces a negative when developed, slide film gets processed into a positive image. The beauty of this is that the image is entirely self-contained. Anyone, anywhere, any time can pick up a slide and see what was documented there, no computer or fancy equipment necessary (although a loupe is helpful). Combine that with Kodachrome's long lasting dye process, and you have an archival image that will stand the test of time.
Let me put it this way: in 100 years, someone can pull out a box of slides and see grandma and grandpa standing in front of their first house. No hard drives that can't be plugged in, no ancient image formats to decode, just a pure analog image of something that might otherwise be lost forever.
With that in mind, I've decided to re-purpose my Kodachrome into a photographic time capsule. The remaining 63 frames will be of people, places and things that are important to me. Once I get the mounted slides back from the lab, I'm going to sit and write the important who/what/when/where/why on every slide in archival ink, and store them in an appropriate container with a loupe. If I can find a nice enough container, maybe my wife will even let me keep them out on the coffee table ;) I hope to pass these slides on to my children some day, and for them to become a sort of family history from the year 2010 (a very firm deadline, since the only lab that still processes Kodachrome is shutting down the machine at the end of December). It's a somewhat weighty and ambitious plan, but I think it's a good project and a good historical use for my photography. There will be plenty of other opportunities for "pretty shots."
Unfortunately, Kodachrome is pretty much non-existent these days. You might be able to find some for ridiculous prices on ebay still, but I don't recommend it. If you're interested in a project like this, any slide film will do. Modern emulsions and processes don't have the staying power that Kodachome does, but they should last long enough for a few generations to enjoy. You don't even need a fancy camera for it - since your goal is more documentary in nature you don't have to worry about nailing exposure every time or super shallow depth of field. Find a used 35mm point n shoot if you have to and use that. Subject and composition are king, and if you concentrate on that you can't go wrong. Of course, if you have any interest in film, buying a film SLR that will take the same lenses as your DSLR isn't a bad idea... Ebay and Craigslist are great places to snap up old 35mm gear, or you can hit up a few garage/yard/estate sales for a real steal.
If you're just not into film, you can do a similar project with prints. Make sure you get archival quality prints and find a good way to store and present them that will last for a while. A lot of printers now offer special coatings that are supposed to resist fingerprints and extend the life of the image, which might be worth looking into.
So what do you think? Is this a project you're going to do? Or am I just being sentimental and a bit of a film nut? Your thoughts, questions, comments and concerns are always appreciated.
~S
[title of blog] on flickr
© 2010 Simon Hucko
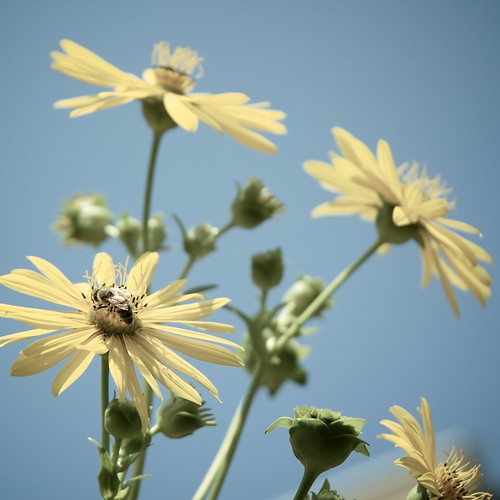
I tried out a few "circle" concepts this week, but nothing came out well. So instead I give you this shot of some summer flowers. I noticed the bees buzzing around, so I camped out by an attractive group of flowers and waited for one to land. Notice that there are three flowers in the main subject group: people tend to find photos of an odd number of things more pleasing than an even number. Don't know why, but it seems to work. I was planning on this being a square shot when I took it, although I didn't quite leave enough room for all the flowers. This is where having multiple aspect ratio guides in the viewfinder would be really handy, but I guess I'll just have to learn the hard way. I've been on a desaturation kick lately, I guess it gives things more of a "film" look which I've been obsessed with interested in as of late.
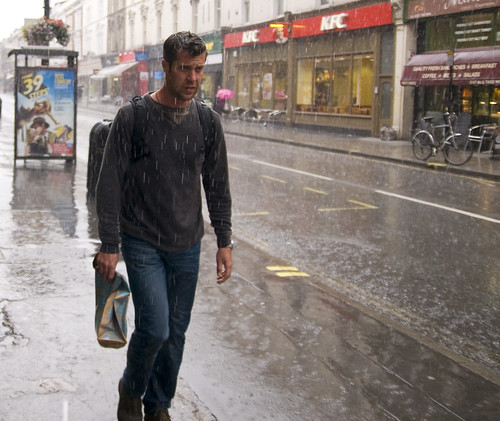
My pick this week is "summertime" by irv_b:
© irv_b
I love the story of this photo. Shooting in the rain is a big pain in the butt, but it definitely pays off if you do it right. Great street shot!
This week's theme is "green" - take that how you will. It would be nice to see a few people come back to regular posting, you know who you are. We miss you guys!
~S
[title of blog] on flickr
If you're interested in shooting some stars (or in some shooting stars), my dad left a nice bit of info in the comments from this week's wrapup:
"For all of you "star shooters" out there, tonight is the peak night for the annual Perseid meteor shower, one of the greatest shows in the night sky. As the earth travels through the debris trail of comet 109P Swift/Tuttle, you might see 60 to 75 meteor streaks per hour.
If you want to witness this magnificent spectacle, go out after midnight and find a dark hilltop. Face the north east (use that compass you keep in your photo bag) and watch the show. If you want to find the peak time to watch in your area, check out the Fluximator, an interactive tool that calculates the number of meteors you could expect to see at your location and when the best viewing will be. Check it out here
This year's display will be above average, due to more debris in the sky and the fact that the new moon will set early tonight-leaving the sky dark.
Go out and check out the show and shoot some star and meteor trails. Of course if it's cloudy, then go to bed."
Unfortunately it looks like rain all night here, so I won't be able to partake, but if your forecast is more favorable I suggest checking it out. Thanks again for the tip!
~S
[title of blog] on flickr
© 2010 Simon Hucko
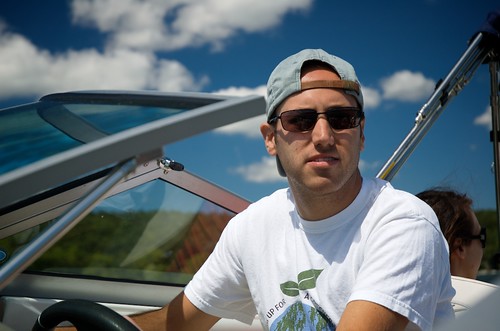
I have to admit that I pick the weekly theme based on my photography goals/plans for the week. This week I knew that I was headed up to a party at my friend's and that I'd have plenty of chances for people shots. But hey, my blog, I get to make the rules. I'm glad that people aren't feeling constrained by the themes, and from the two responses I got it seems that they're somewhat helpful, so I'll keep throwing them out there every week.
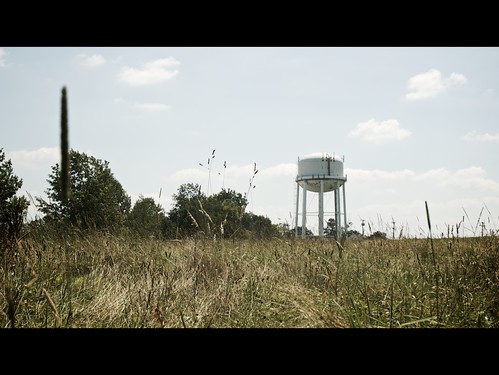
My photo this week was a grab while we were riding around the lake on the boat. I took a ton of shots off the back while people were skiing/wakeboarding/tubing, which was a blast (and a lot harder than I anticipated). I've been on a "shoot wide open" kick lately, so I slapped my polarizer on there to darken the sky, cut some glare off the water, and to knock everything down so I could use the wide aperture. "Wide open" on my zoom is f/4.5, so we're not talking super shallow depth of field, but I like the effect - just enough blur on the background to help your subjects pop while still giving some context to the shot. I may have overdone it a bit with the polarizer and the vignette, but oh well. Black sky is fun sometimes.
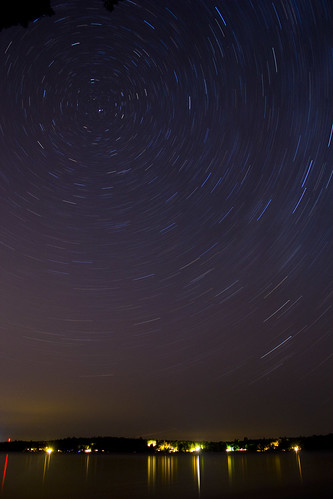
My pick this week is "Stars swirl over Beech Hill Pond" by chofler:
© chofler
I've been wanting to take a star trail shot like this for a while and never seem to make it happen. I love the placement of the north star in the frame, I think it's very well balanced. Apparently this was a bit of an accident, which is partially why I picked this photo. First, happy accidents are a big part of photography. There is certainly some luck involved with creating images, and it goes both ways (good and bad). The trick is only sharing the good ;) Second, I left a little tip as a comment on the image, but I thought I'd share it here too: go buy a cheap compass and keep it in your camera bag. Not only can this help you locate things like the north star, it's also useful in figuring out where the sun will rise and set and how it will fall on a scene at different parts of the day/year. If you have one of them smart phones it probably has an electronic compass built in, which can do the same thing. If you're lucky enough to have an Android phone, download "Google Sky Map" (link) for an augmented reality view of where the stars are. (It's also really good for showing off your sweet phone, as it has a certain "holy crap how do they do that" factor). Great shot, and thanks for the teachable moment :)
This week's theme is circles. Show me what you got.
~S
[title of blog] on flickr
© 2009 Simon Hucko
I've already said my piece about buying a camera (point n shoot or DSLR). Time to focus on lenses (pun intended, sorry).
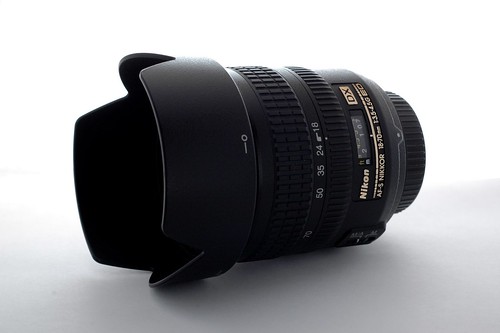
One of the main reasons to buy a DSLR is the ability to change lenses. With a compact camera, you're stuck with one lens that has to do everything you want it to. While it may be convenient to have a 20x zoom with "macro" focusing built into your camera, the quality of said lens is often rather terrible (especially out at the super-zoom range). Think "Jack of all trades, master of none." Having interchangeable lenses allows you to tailor the performance of your lens to the task at hand, resulting in much better quality. Like everything else in photography, lens design involves a series of trade-offs. I'll touch on a few of the major classes of lenses and some of the trade-offs that are made when designing and buying a lens.
Kit Zoom - These are the lenses that get bundled with consumer level DSLR's, typically 18-55mm. I also consider the 55-200mm lenses in this category. These lenses typically have mediocre optical performance coupled with cheap build quality and slow variable max apertures. Everyone starts here, but if you're serious about photography you'll quickly outgrow these lenses.
Super-zoom - Similar to the huge zoom range point n shoots, these lenses offer a one-stop solution to all of your photography needs. A common range here is 18-200mm for crop sensor cameras, or 28-300mm for full frame. Some go even more extreme, I've seen 18-270mm or 18-300mm from some of the 3rd party lens makers. Advantages: a good "travel" or "walk around" lens, it'll cover all the focal lengths you could need without having to switch lenses. This makes packing for a trip or strolling around the neighborhood easy, and you'll never be caught with the wrong lens on your camera. Disadvantages: Optical quality is often lackluster at best. Expect major distortion at both ends of the zoom range, vignetting, soft images, and slow apertures. Probably not something you're going to want to make 20x30 prints from.
Fast Prime - I've talked about these ad nauseum. I love 'em. See my first post about it here. Advantages: Relatively inexpensive, small, and light. Super fast apertures compared to zooms. Very sharp and distortion free, especially when using full frame glass on a crop sensor. Disadvantages: Price per extra stop of aperture skyrockets, primes also get more expensive the farther you get away from 50mm, optics are often somewhat soft wide open, very shallow depth of field when working wide open.
Fast, Fixed Aperture Zoom - These are the workhorses of the professional world, they typically come in 3 flavors from each manufacturer: a wide zoom (14-24mm f/2.8), a standard zoom (24-70mm f/2.8), and a telephoto zoom (70-200mm f/2.8). There's also a crop sensor equivalent of the standard zoom, usually somewhere around 17-50mm f/2.8. Advantages: Nice fast fixed aperture allowing for better working shutter speeds and more control over depth of field. Generally built like a tank, definitely designed for professional use. Optically some of the best lenses on the market. Disadvantages: Price is the major drawback here, with these lenses typically coming in around $1500-$2000, maybe even more. 3rd party manufacturers offer these lenses at lower prices, but the build quality is nowhere near as good. Weight and size are also drawbacks, as these lenses tend to be much larger than others with similar focal lengths due to the fast fixed aperture.
Macro - This is a popular specialty lens, as they're not too pricey and open up a whole new world of photography. A true macro lens will give you 1:1 or better, meaning the image on the sensor when focused in all the way will be the same size as the object in real life. Advantages: These lenses focus super close, and are designed to be super sharp when doing it. The only way to go if you're into close-up photography. Disadvantages: They're all prime lenses, meaning this is truly a specialty lens. Depending on the focal length it can also function as a portrait lens, but often they're slow to focus because they have such a huge focus range to move through. Also, they tend to have smaller maximum apertures than other primes in the same range (f/2.8-f/3.5), so it's not going to function as a "fast prime" in your kit. Finally, if you get into macro you're going to wind up with a big bulky tripod and some focusing rails to do it properly, so be prepared for the extra gear and expense. Note: Beware of zooms that promise "macro" focusing, they typically only get you 1:3 magnification or less. Sure, it's nice to have a close focusing zoom, but don't expect a true macro experience.
Super-Telephoto - If you're into wildlife photography, you can never have a lens that's too long (we're talking 400-600mm here). These lenses come in both zooms and primes, with the primes typically being faster and better quality. Advantages: There's no substitute for optical reach. If you want to photograph tiny objects far away, these are the lenses for you. They're also some of the sharpest lenses on the market. Disadvantages: Size and price. These lenses are huge, heavy, expensive, and require beefy tripods with specialized heads on them to handle the weight. Not something you're going to grab and go for a walk with, and you may need to take out a second mortgage on your house just to afford one.
Ultra-Wide - One of the initial drawbacks to crop sensor cameras was that it was hard to find a truly wide angle lens for them. This gap has been filled in the last year or so, and so there are a lot of wide angle zooms in the 10-20mm range. These lenses produce a very specific look, and definitely have some "wow" factor when used correctly. Advantages: Get some crazy perspectives with the huge field of view. Cover sweeping landscapes without the need to stitch together a panorama. Wide angle lenses also have greater depth of field, so it's easy to get more in focus. Disadvantages: Some serious perspective distortion possible, especially when shooting people: it'll probably take some work to figure out how to properly use this lens. Barrel distortion is prevalent, meaning you'll get a pseudo-fisheye look sometimes. This can be corrected in software, but is good to be aware of.
Fisheye - Definitely a specialty lens. Projects a 180 degree view onto your sensor with wildly distorted lines. Images can be "de-fished" in post, making these lenses ideal for quick and dirty panoramas (you can cover a 360 degree field of view in three shots). Advantages: Uber depth of field and field of view meaning you can pack a lot into your shot. Distortion effects can be used artistically. Disadvantages: The fisheye look can get old, quickly. This isn't a lens you'll be shooting all of your work with (hopefully), so it's up to you if you want to spend the money on a lens that will only get used occasionally.
_____________________________________________________
In the end, lens choices come down to a trade-off between zoom range, optical quality, size/weight, build quality, and price. You can often find excellent optical quality from the third party manufacturers (Sigma, Tamron, Tokina) for 1/2-1/3 the price of the Nikon/Canon equivalent. The downside there is that they typically skimp on build quality and generally have worse quality control than the major manufacturers, meaning you're more likely to get a lemon. Always do your research before buying a lens so you know what you're getting. I recommend the following sites for more information:
photozone.de has some excellent lens reviews. Unfortunately, they're a bit sparse when it comes to 3rd party lenses.
dpreview.com has only recently gotten into the lens review game, but they also do an excellent job with the limited selection available.
lensrentals.com gives some good real-world information with each lens. If they have the lens available for rent, that typically means it meets some minimum quality standard. They seem to be pretty honest with their reviews, and will note any major drawbacks to a particular lens.
amazon.com is a good place to get a general idea of what the lens is and how people feel about it. You won't get super specific lens testing (sharpness, etc), but you can get a general feel for the quality of the lens.
flickr.com is great because there's a group for just about every lens ever made. There you can read people's questions and problems with a lens and see images shot with it.
Hope that helps. Some day soon I'll write up a "which lens should I buy?" article, as the answer is a lot longer than you might think and this will serve as a nice reference for it. What's your favorite lens?
~S
[title of blog] on flickr
© 2010 Simon Hucko
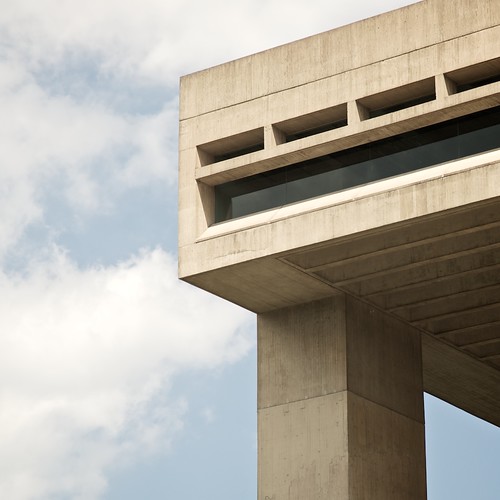
My photo this week is less about texture than I had planned, but I still think there's some interesting texture on the concrete so I guess it qualifies. I finally had a good week of photography last week, managed to get out twice and got a few photos that I'm happy with. Hopefully I can continue the trend this week, despite the scattered thunderstorms all week...
This week's pick is "hay" by irv_b:
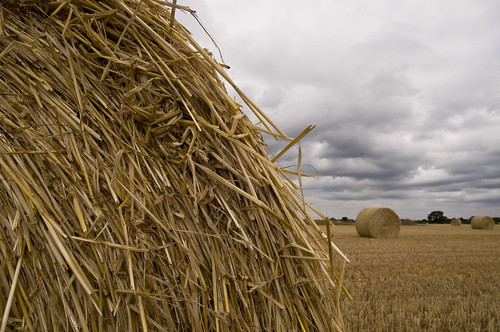
© irv_b
I asked for texture, and boy did I get it. The detail on the hay bale is great, and the sky has a wonderful stormy texture as well. I also like that the background is slightly out of focus, it puts more emphasis on the subject but still gives clear context for the shot. I think this would look great printed large and framed (although I'd probably brighten it up just a tad before printing). Nicely done.
Now that we're a few weeks into it, what do you think about the themes? Are they helping, hurting, or not very useful? We can continue like this for the rest of the year, I can drop it entirely, or we can go to something like a monthly theme/contest. Let me know what you think here in the comments or over on flickr. Thanks guys!
This week's theme will be people. Find a person or group (or crowd) of people to take a photo of. Doesn't have to be a posed portrait, candid or street-type shots are more than welcome.
~S
[title of blog] on flickr
© 2010 Simon Hucko
I finally got out for a walk or two this week with my camera, and grabbed some photos I'm happy with. I've been in a bit of a rut lately for whatever reason, so it was nice to finally get some decent shots.
I also decided to try something new when processing these photos. I've been having fun mutilating photos taken with my phone camera, and thought I'd start being more aggressive with editing photos on my computer. I wanted to go for a "summery" look, given the heat lately and the bit of haze on the days I was shooting.
The first step was to warm the photos up a bit by changing the white balance, 'cause hey, summer is warm, right? I did this in post (one of the best parts of shooting RAW), but you could even do it in camera by selecting the "cloudy" or "shade" white balance option. I then knocked the saturation down to about 70%. This gives it a slightly washed-out look, which you experience in real life on those humid hazy days. You may have to go a bit farther, my starting point is already a little muted due to the RAW processing. I bumped the contrast a bit and added sharpening as part of my normal RAW workflow. The end result has a sort of washed-out film look to it that just says "summer" to me.
In the spirit of continuing to expand my processing prowess, I plan on trying out a few more looks and posting how I did it. I'm also going to try to explain why I did it. I think the motivation behind processing is important. If you're just applying some photoshop plugin because you think it looks cool and can't relate it back to the image, it doesn't really advance your art.
So what do you think? Did I get the "summer" look right? Any other looks you've seen and want me to take on? Comment!
~S
[title of blog] on flickr
![[title of blog]](https://blogger.googleusercontent.com/img/b/R29vZ2xl/AVvXsEhJ8bvx_9_zOAREbXcrJRML7aVvJMbb90IYYYuyti384jeZHYQ9t8MK6_Kpt_1P4-pZw-QfF9kh4Sqci0vbopzLme862PPhuyPJcc7pRLUW1K1aNzts5YzuXIhgonq66MpjJCqfiWtfwUw/s1600-r/waterfall.png)


