skip to main |
skip to sidebar
© 2010 Simon Hucko
As you may or may not know, I am now posting a weekly theme/assignment to go along with this project. The theme is optional, but is supposed to help jumpstart your creativity and get you shooting. If you're struggling to get a photo one week, check out the assignment and take 15 minutes to grab a shot for it. I'll try to keep them pretty general and open so that you won't have to hunt too hard for a subject.
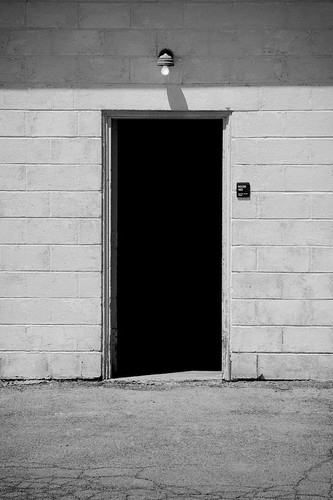
This week's theme was "doors", which is a personal favorite of mine. However, I think I'm the only one who took a door photo this week... Maybe next week's will be more popular. For my shot this week, I re-visited a photo I had taken with my phone. I like going back and improving some of my old favorites from time to time, and I couldn't resist this shot. The shadow above the door was a bit of an added bonus - I had taken the previous shot later in the day so I didn't realize it would do that. Black and white helps emphasize the shapes and textures, and also the different levels of light and shadow.
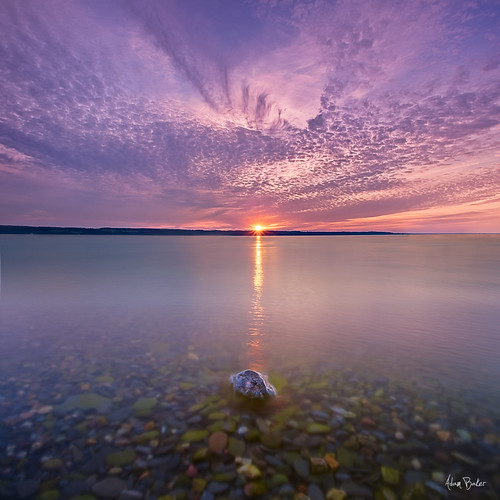
I actually have two picks this week. The first is "the longest day" by [Adam_Baker]:
© Adam Baker
I love the 3D feel of this photo, and the colors are just mind-blowing. I like the square crop, too, gives it a very balanced feeling. Finally, the composition is great, with the rock in the foreground echoing the sunburst on the horizon. And those clouds! Lots of goodness going on here.
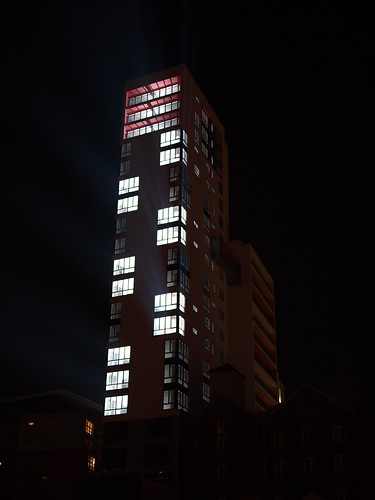
My other pick is "The Mill, Ipswich" by q-pix:
© q-pix
I picked this one because of the cool effect with the light trails coming away from the windows. I don't think I'd always want my lens giving me flare like that, but in this case it really adds a lot to the photo. edit: I've been corrected. Apparently the light trails were visible in person. Excellent capture, then :)
Ok, that's it for this week. Next week's assignment will be "Blue." Looking forward to seeing your photos.
~S
[title of blog] on flickr
With the 4th of July coming up here in the States, I thought I'd link you to my favorite fireworks tutorial:
How to Photograph Fireworks (Digital Photography School)
Short version:
- Tripod (required)
- Remote Trigger (highly recommended)
- Manual Exposure (stop freaking out. Set it to your lowest ISO, f/8-ish and 5 seconds exposure to start. Adjust exposure time and aperture as necessary)
- Manual Focus (set it to infinity or focus on a street light far away and turn off auto-focus)
- Location/Composition (include something interesting in the foreground to give context and add interest to your shot)
Can't wait to see 'em!
~S
[title of blog] on flickr
I've been thinking about what I wrote in the wrapup this week, and decided that I'll try giving out weekly assignments. These are optional, but if you're looking for some inspiration it'll help get your creative juices flowing. I'll post the next week's assignment in my weekly wrapup, as a discussion thread in the flickr group, and as part of the group name.
You can handle these assignments in two ways. They're great for a photo walk, especially if you're walking somewhere you've been before - it gives you something to focus on rather than wandering aimlessly, and can help you see interesting images that you may not have considered before. You can also use them as a little muse in the back of your mind during the week, and whenever you see a good example of it pull out whatever camera you have with you and capture the image.
This week's assignment is one of my favorites: doors. Find an interesting door and share it with us! This is a good way to work on perspective, too - try to center your camera with the door and hold everything level and perpendicular to get nice straight lines (maybe even break out the tripod). Or don't, if that's not your thing.
Go shoot!
~S
[title of blog] on flickr
© 2010 Simon Hucko
Another low turnout this week. What can I do to help you guys get out there? Would a theme or an assignment help? Monthly? Weekly? Let me know what I can do to help inspire your photography, here in the comments or over on twitter.
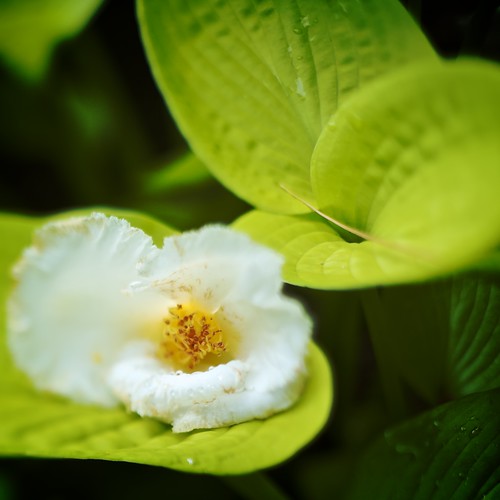
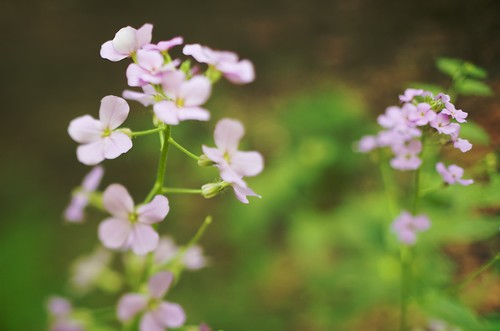
My shot this week was another experiment with freelensing. I think I could have improved on it by having the entire flower in focus (instead of letting the left side go soft), using a smaller aperture or less of a tilt. I'm still feeling out this freelensing thing, and that's part of the fun - learning by trial and error. Pixels are cheap and plentiful, and it's fun to stretch my craft a bit.
This week's pick is "Flippin Burgers" by djhucko:

© Dan Hucko
I like the effect of the plastic window in front - it softens everything in the image and gives it more of an abstract feel. The focus isn't so much on the man flipping burgers, but the experience of being at a festival at night eating street food. The exposure reinforces this, holding the lights and letting the man's face stay in shadow. I like the touch of motion blur on his tongs, too, it gives it a nice dynamic feel. The only thing I might have changed would be to crop in a bit on the right to remove the edge of the window. Great street shot.
Go shoot! Do it! Seriously, just do it! No excuses!
~S
[title of blog] on flickr
Inspired by my megapixel rant, I decided to weigh in on what I thought *was* important when buying a camera. I covered DSLRs in my last post, so now I'll tackle the world of point n shoots. Here's what I think you should look for when purchasing a new point n shoot camera:
Price. Again, you probably have a budget. The nice thing about point n shoots is that there are very few accessories that you will feel a need to buy, so you can spend most of your cash on the actual camera. I do recommend some sort of small tripod (like a Gorillapod), a simple carrying case, and an extra memory card or two, but you probably won't ever need much more than that. Also, don't be afraid to buy an older model. Point n shoots get refreshed yearly (sometimes more) with minor "upgrades," so you're really not missing that much if you go back a generation or two.
Purpose. How do you see yourself using this camera? Will it be your only camera? Or is it a smaller backup/carry around camera to go with your DSLR? Perhaps you want something more rugged and splash proof to take to the beach and not worry about? Figure out exactly how you will be using the camera and decide what features you need from there.
Size. Point n shoots range in size from super slim pocket friendly versions to something just shy of a consumer DSLR with a kit lens. If this is going to be your only camera you may want to opt for something larger, but in general I'd say go with something small enough for you to easily put it in a pocket and carry it with you. Otherwise, you're likely to leave it behind for convenience sake, and that defeats the whole purpose of having the camera. When I'm on vacation, my point n shoot lives in my front pocket (instead of the keys I usually keep there) so that I can pull it out and grab a photo any time I want.
Lens. This is an often overlooked part of a point n shoot, but the lens is critical to the quality of photos you're going to get from your little camera. There are basically two classes of point n shoot, some which sport around a 3x zoom (something like a 28-105mm equivalent), and some which proclaim ridiculous zoom ranges of 15-20x. My advice? Stick to the smaller zooms. Sure, it's convenient to zoom in on your kid's face from half a football field away, but you make a lot of compromises with that sort of lens. They're generally much slower (f/stop), especially at the long end. Superzooms are also given to large amounts of distortion, barreling at the wide end and pincushion at the tele. And really, they're just not all that sharp. There may be a "sweet spot" for the lens, but in general you're going to be looking at fuzzy images. (14 bazillion pixels not withstanding.) Look for a fast lens (f/2.8 is common on the wide end, I've even seen f/2) to help gather more light for the sensor (remember the crappy high-ISO performance). Optical image stabilization is basically a given these days, but check for it anyway. "Macro" focusing at the wide end is also a fun feature, which I think is also fairly common but I could be mistaken.
Sensor size. If possible, find out how large the sensor is. You'll be looking at between 1/4" and 2/3". In general, bigger is better, but it usually translates into a larger camera with a bigger lens (see my point about size). This is where you'll have to make a compromise, and what you choose depends on what your needs are. If you just want to document something and plan on saving the serious shooting for your DSLR, a tiny sensor is probably fine. If you're looking for something a little more high quality to show off online or even print, you probably want to suck it up and get the bigger camera.
Shutter lag. This is probably the *worst* feature of digital point n shoots: it takes an incredibly long time for the camera to take a photo once the shutter is pressed. Things have been getting better over time, but there's still a bit of a lag. Looking up shutter lag times is good, actually trying the camera is better. Also check how fast the camera can shoot (FPS). Some newer cameras have better recycle time, or can at least shoot a small burst at a decent speed. If you plan on capturing candids, this stat should be high on your list.
Video. Most point n shoots take some form of video these days. In my opinion, HD isn't really necessary for a little pocket cam, but it can't really hurt. Just know you're probably not getting true 720p resolution between the optics and the compression/upscaling. (1080p? Forget it.) I wouldn't buy one of these things to try to shoot a film on, but little documentary movies are great to have (and make fun facebook/youtube fodder). Make sure it's easy to get into and out of video mode (usually some sort of dial) so that you'll actually use it. If you have to dive through menus to turn it on, chances are you won't bother (or you'll miss the moment).
RAW. Some of the high end point n shoots will capture RAW images. RAW will give you the best dynamic range possible out of your sensor, and offer you the white balance and exposure flexibility that you get with the DSLRs. If this is going to be your only camera and you want to get the most out of it, go for it. Otherwise, it's probably not worth the hassle.
Buttons and controls. On the one hand, a point n shoot camera is beautiful in its simplicity - just point, and shoot. Buuuut if you're into photography at all, you're going to want to change certain things. Not having some control over exposure drives me crazy, and it's nice to be able to get to the other settings pretty quickly (white balance, ISO, "scene modes" - yes, I do use them sometimes). Touch screens sound cool in theory and look great in the showroom, but outside in bright sunlight (especially once they're smeared up from your fingers) you're going to have a hard time seeing what you're doing. Just skip it for now.
Memory card format. Basically, SD is the way to go. Don't buy a Sony camera that takes their memory stick unless you own other Sony devices that can share it. SD cards are inexpensive and plentiful and you have a much better chance of borrowing one if yours runs out of space or crashes at an event. (If you have other cameras that take SD cards, you may not even need to buy another one, provided you still have a backup or two for each camera.)
Other features. Ok, rather vague, but the market is so diverse it's hard for me to cover it all. There are a few cameras that will shoot time-lapse, which is very cool. Some cameras are extra rugged and may even be waterproof to 10 feet or so, perfect if you spend time at the beach (or have little kids who like to take photos). Some cameras have flip out screens, which is a handy feature for taking self-shots or shooting up high/down low. Just make sure you're not paying for features you don't really need. Often times there will be multiple versions of essentially the same camera (same lens and sensor), with the more expensive ones having additional features added or turned on in the firmware. If you don't need the features, save the bucks and get the less expensive one.
CHDK. Some of the Canon cameras are "hackable" - you can install a different firmware that will give you much more control over the camera. The beauty of this is that you can buy an older used camera and add a bunch of interesting features to it (time-lapse, manual control, RAW, live histogram, bracketing). It's rather clunky, though, and somewhat defeats the purpose of having a "point n shoot." But, if you're the kind of person who likes tinkering, it might be worth buying one of the cameras on that list so that you have the option of playing with CHDK. CHDK site here
That's all I've got. Feel free to add your own insight to the comments. Hope this helps.
~S
[title of blog] on flickr
This is a follow up to my rant about megapixels. After ragging on sensor resolution, I thought I should provide some insight into what does matter when choosing a camera. I'll split this into two posts, one for DSLR's, one for point n shoots, since they're pretty different animals.
First off, let me say that choosing a camera is a very personal decision. There is no one camera out there for everyone, as you can tell by the huge lineup of cameras available on the market. People with different styles of shooting require different things from their camera, so some of this might not apply to what you do (and I might miss some things that you think are very important). So, in no particular order, here's my take on various camera features:
Price. This is probably the most important consideration, since all the amazing features in the world won't matter if you can't afford them. Establish a budget and try to stick to it. In general, the camera manufacturers have 4 tiers of camera - entry level (around $500), consumer ($800-1100), prosumer ($1300-2500), and professional ($4k+). You can generally tell what tier a camera falls into by the price, which helps you cut through the often confusing numbering scheme. Remember that there are additional costs involved with buying a camera, especially a DSLR - accessories like memory cards, bags, tripods, lenses, filters, etc. Look for gently used or refurbished gear to save some money. Go back a generation or two of camera to get some top tier features at a middle tier price.
Ergonomics/controls. If you can, go to a store and pick up the camera you're interested in buying. How does it feel in your hand? Are the menus easy to access and intuitive? Are there a lot of dials and buttons on the body to quickly change camera settings? The important ones should be easily accessible without moving your hands from the shooting position. Size also matters. If you have big hands, a small entry-level DSLR may feel overly light and cramped to you. Go back a generation and get a bigger camera, you'll be much happier holding it in your hand and that will motivate you to shoot more. (The converse is also true, obviously).
Video. The latest batch of DSLRs can all record HD video. If video is something that interests you, it might be worth stepping down a tier so that you'll have money left over for the needed accessories (lighting, tripod/fluid head, some sort of shoulder rig, audio recording, microphones, large capacity memory cards, etc).
High ISO performance. This is especially important if you do a lot of shooting indoors (weddings, events, theater, indoor sports). An extra stop or two of usable ISO can be the difference between a sharp shot and a blurry shot, or allow you to handhold instead of lugging a tripod or monopod around with you.
Frames-per-second (FPS). If you shoot a lot of bursts (sports shooters, I'm looking at you), you'll want to consider a camera with a higher FPS and a bigger buffer for longer bursts (the two usually go hand in hand). Most consumer DSLRs shoot around 3FPS, but the pro bodies top out around 8-9FPS. Some prosumer level cameras have a frame rate boost when you add a battery grip, so make sure to check that option before buying.
Lenses. Here is where the true magic happens. It's better to skimp a bit on the body and put the money toward better glass, because the optics are what truly make your images (and the technology will last decades rather than a few years before being outdated). A fast prime or two and a fixed aperture zoom will bring that extra wow factor to your shots, and cut down on the amount of processing necessary to make your images pop. Plus, having wider apertures available gives you more creative tools (shallower depth of field). Like I said, a good lens will last you a long time, and will hold its resale value well if you ever decide to upgrade.
Exposure bracketing. If you're into HDR images, you're going to want a camera that will do exposure bracketing for you. Some cameras allow you to bracket from 3-7 shots, usually at up to 2 stop intervals. I believe that the Nikon cameras have more bracketing options than Canon at the moment, at least from the grumbling that I've read on the interwebs, so keep that in mind.
What your friends/family shoot. This may seem like a strange one, but it's important, especially when you're first starting out. If you have family or friends that own a DSLR, seriously consider sticking with the same brand they have. That way they can help you learn the layout of the camera, and you can swap lenses and other accessories.
Hope this helps somewhat. The point n shoot edition should be out soon.
~S
[title of blog] on flickr
© 2010 Simon Hucko
Only 4 entries this week... Where did everyone go? Even if you can't get out for a "serious photoshoot," try to keep a camera near at hand and capture those little everyday moments. If you're anything like me, you see photos all around you all the time. Make the extra effort to carry a camera with you and stop at least once a day when you see one of those photos. You can do it!
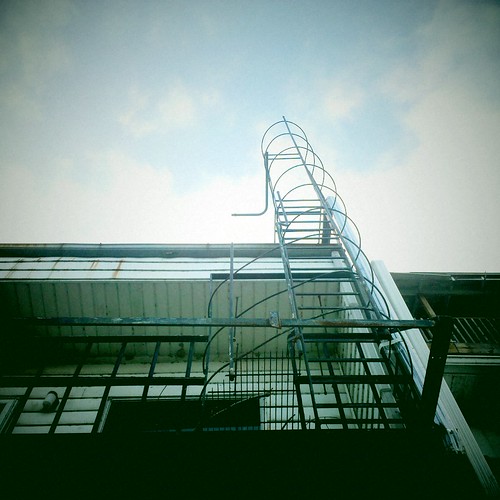
Life has been crazy busy for me lately, so I'm happy to have my camera phone to fall back on. It's very freeing to walk around with my phone armed with a slew of lomo processing filters capturing interesting sights around me. This week's photo is the result of looking up. I'm always amazed at what I see when I look up at the world above me, and the fresh perspective and subject matter usually lends itself to good photos. This week's photo also takes advantage of leading lines, since the strong lines from the building and fire escape lead you right into the middle of the photo.
My pick this week is "Yellowed" by slithy-toves:
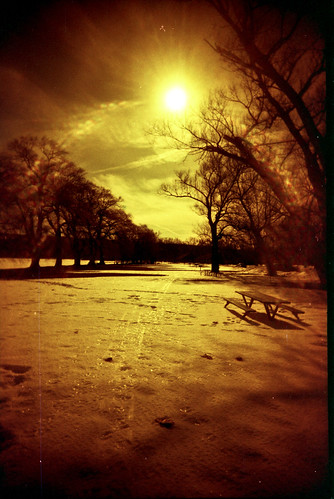
© slithy-toves
Technically it's cheating, since she didn't take the photo last week, but I'm going to let it slide. I love the result from the redscale film here - the yellow/orange/red tones are just fantastic. I like the heavy vignette and the contrasty shadows that she got here, too, and the way the trees reach in at the top and frame the sun. My absolute favorite part of the image, though, is the lighting on the picnic table. I'm not sure what it is, but it really grabs me - the perfect little detail.
That's it for this week. Go take some photos!
~S
[title of blog] on flickr
Watch out, I'm climbing up on my soap box for a bit...
Walk into any consumer electronics store (or even visit their website) and go to the camera section. Now look at the information by each camera. First on the list is the number of megapixels. Look at your camera phone or your point n shoot. I guarantee it has the number of megapixels stamped on it somewhere. Ask your (non-photographer) friend why they chose the last camera that they did, and I bet number of megapixels is near the top of the list (usually right after price). Why is this? My guess is that megapixels is a convenient number for the marketing department to hype, and more is obviously better, right? Wrong.
(Just to be sure we're all on the same page, the number of megapixels a camera has refers to its resolution - namely, how many pixels are on the camera's sensor. One megapixel = 1 million pixels. When consumer digicams were first released, they clocked in around 1MP. Now, most point n shoots are in the 12-16MP range. More on this in a minute.)
So how many megapixels do we really need? That depends on what you use them for. A surprising number of people use their camera as their main way to share photos. That means that their 14MP images are being shown off at less than 1MP. Talk about overkill. Let's say they do download them to the computer and share them on Facebook (or some other photo sharing site). Facebook recently increased the size of displayed photos to 720p on the long side. Even if you upload a square photo (720x720) for the maximum display size, you're still coming in at 518,400 - just over half a megapixel. Say you show off some vacation photos on the family's big HDTV. 1080p = 1920x1080 pixels, which comes in at 2.07 megapixels. 16:9 is a bit wide for a still camera, so let's take that to a more common 3:2 format - 1920x1280, or just shy of 2.5MP. I'll even agree to a bit of extra so that you can straighten photos or cop in a bit, so let's call it an even 3MP. What about printing, you say? The guidelines I've seen for printing suggest 100-300 dpi, depending on your printer, print size, viewing distance, etc. Taking 100 dpi as a minimum (and it makes a very acceptable print), even 8x10's only require 800 x 1,000 pixels (just shy of 1MP). 3MP is therefore plenty for any consumer camera. 6MP is enough to print 20x30 inch prints at 100 dpi, so even most professionals don't need more than that.
So what's wrong with packing in the megapixels? It can't hurt to have more room to crop in on photos, right? Like with everything else in photography, getting more resolution comes as a trade off. Despite the increase in pixels, sensors in point n shoots are still the same size (about the size of your pinkey fingernail). This means that the actual photo sites (the electronics that make up a "pixel") have to keep getting smaller. Smaller photo sites mean less light is able to enter each pixel. This cuts down on sensitivity, resulting in a lower dynamic range and more noise at higher ISO settings. Despite advances in noise reduction technology and image processing, small cameras just don't handle low light very well. Which means that anyone taking photos indoors winds up nuking the scene with the tiny built in flash, and we all know how flattering those photos are.
At the other extreme, consider the Nikon D3s, which has the best low light high ISO performance of any camera on the market at the moment. How do they do it? They spread a mere 12 megapixels over the relatively vast space of a full frame sensor. Each photo site is therefore nice and large, increasing the dynamic range and sensitivity of the camera. For reference, here's a diagram comparing the different sensor sizes. Most point n shoots have 1/3" or 1/2" chips:

So why doesn't Nikon release a 3MP point n shoot camera that takes great photos in low light without a flash? Mostly because no one would buy it, especially sitting on the shelf next to other cameras that boast 15+ megapixels. It would require re-educating consumers and taking a huge risk, and I just don't see it happening in the near future.
Here are my recommendations (for whatever they're worth) for good resolutions:
- Cell phone cameras: 1080p HD, and no more. Even that is overkill, but I think the benefit of having that image size (and more importantly, that video size) outweighs the disadvantages.
- Point n shoots - 3MP. Like I said, most people will never use more than that.
- DSLRs (crop sensor) - 6-8MP. 99% of photographers will never need more than that, especially as more and more photo consumption moves away from print media and toward the internet.
- DSLRs (full frame) - I think Nikon has this one nailed at 12MP. The high ISO performance of that camera is truly amazing, and I think it's shifting people's focus in the photography world.
So what do you think? Do megapixels matter? Are you excited about the next batch of higher resolution sensors? Or have you had it with the megapixel race, and are ready for camera manufacturers to focus on something else? I think you can guess where I stand.
edit: I wrote the bulk of this post well before the Stevenote at WWDC (the iPhone 4 announcement). Interestingly, Steve Jobs said a few words about this very topic defending why they went with a 5MP chip instead of an 8MP one which is the highest available among current smartphones. Even more interestingly, they went with a back-illuminated sensor, which sets a great precedent for the small camera market.
~S
[title of blog] on flickr

As I get more comfortable with my DROID, I'm finally starting to use it to add another layer to my social networking. One of the main reasons I was so eager to get a smartphone (with a camera and processing app) was the ability to capture little moments and share them out on location. These are the little lomo snapshots that I would never likely create with a "serious" camera and "serious" post processing, but I love the ability to share a glimpse into how I see the world (and I enjoy seeing similar photos from other photographers, most notably Chase Jarvis with his Best Camera project).
I was trying to decide how best to share out these updates, and thought I would give tumblr a try. tumblr seems to be a nice middle ground between the brevity of twitter and this blog, giving me the opportunity to post photos with a caption or little story without worrying about character limits. I've also decided I'm going to post short tips/tricks/thoughts to the account from my phone every so often, things that don't really have enough substance to be a full blog post here but that I think you guys would benefit from. My favorite feature of tumblr is that it's extremely mobile device friendly with a nice clean quick-loading interface for mobile browsers.
Check out my tumblr blog here - you can follow me if you have a tumblr account, or I think you can set it up for an RSS reader as well. Most of what goes on there will also get linked to from twitter, so if you're already following me (@simonhucko) you're all set. Also, being new to tumblr, I'm not following very many people yet. If you know of a good tumblr blog (photo-related or otherwise), please let me know via comments below or twitter so I can check them out.
~S
[title of blog] on flickr

© 2010 Simon Hucko
Another Droid shot this week. I had big plans to go to the Ithaca Festival last Friday and shoot, but instead I met up with a few people and just walked around. I did take a few shots, but nothing outstanding. It was more fun just to be there in the moment, and it's nice to take a step back from the lens from time to time and just enjoy life around you. There are a few other festivals/fairs going on this summer that I plan on shooting (might even break out a roll or two of Tri-X), so look for that.
My shot this week was part of a short walk I took focusing on doors. I've never been one for photo assignments (for whatever reason), but when I got my Droid I got invited to a weekly Android assignment group. I think these weekly assignments are perfect for the walks I take on my lunch break - by this point I've shot most everything within walking distance of my building, so having something different to focus on while I'm wandering around is a great way to spice up the usual routine. If you're in a bit of a rut or have a hard time coming up with photo ideas, I highly recommend an assignment group on flickr (just do a search for "assignment," there must be hundreds to choose from).
My pick this week is "self" by irv_b:
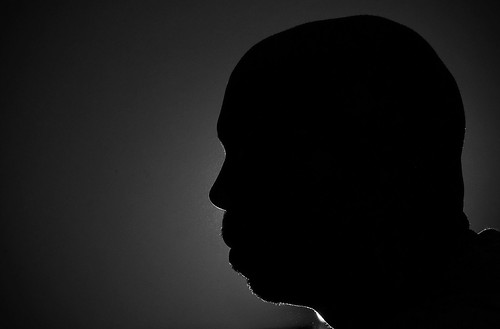
© irv_b
What a great twist on a self-portrait (it even has sort of an Alfred Hitchcock vibe to it). I like that there's just enough light on the background to give a nice crisp silhouette, but no more than necessary. I like your choice of framing, too - the negative space balances it out very well. Very mysterious shot.
That's it for this week. Keep up the great work everyone, we're almost to the half-way point!
~S
[title of blog] on flickr
© 2010 Simon Hucko
I first became aware of freelensing a few months back when photojojo published an article about it. It seemed pretty cool, and in the wake of all the tilt-shift photos online (especially the time lapse stuff) I thought I'd give it a try. Unfortunately, I just wasn't able to get images that I was happy with. Last week, photographer friend Tim Ho posted a shot that renewed my interest in freelensing. (side note: if you've never seen his work I highly recommend checking out Tim's photostream. He's got a great eye, especially for color, and is becoming quite an accomplished strobist.)
OK, back it up a bit. What is freelensing? Freelensing is the art of shooting through a lens that isn't attached to your camera. The main reasons to freelens are to create a tilt-shift look with your photos, or to get closer focusing for macro shots. The latter is the same as using an extension tube or bellows, it allows you to get closer to the subject resulting in a larger image on the sensor. The tilt-shift goodness is really what I was after, and considering a tilt-shift lens costs mega bucks, doing it for free seemed like a pretty sweet deal. After doing a little reading, I realized that my earlier failures were due entirely to user error (of course). The key to freelensing is to focus your lens to infinity and keep it *as close as possible* to the camera. In other words, put the lens on the camera like you were going to mount it, but don't twist it in to lock it. Then ever so slightly begin tilting the lens and watch the plane of focus move around. Once you get an image you're happy with, shoot, rinse, repeat.
A few caveats:
1. Your lens is not attached to your camera. This can result in damage to your lens, the mirror, or the sensor, and will probably attract a bit of dust into the camera body. Do this at your own risk.
2. If your lens has an aperture ring, you're all set. If you shoot Canon, stop your lens to the aperture you want by holding down the DOF preview button while removing your lens. If you shoot Nikon, you're going to have to physically hold open the aperture lever on the back of your lens. A small piece of folded up paper, a broken up match stick, or even blue sticky-tack can be used. Be extremely careful when messing around with your lens. Again, this isn't the safest thing in the world...
3. Exposure is going to be all manual, all the time. Your histogram is invaluable for this sort of thing. Learn to love it.
4. Getting what you want in focus is rather difficult at first. Take plenty of shots, and be patient with it. You can even mount your camera to a tripod, making it easier to manipulate the lens without throwing everything off.
5. Longer lenses work better, apparently. Don't ask me why. My 50mm worked really well for this (especially because it has an aperture ring), so that would be my recommendation.
That's about all I can think of. It's another fun little "trick" that can give you some interesting results. I highly recommend playing around with it a bit (as long as you aren't squeamish about shooting with a detached lens), see what you get. Feel free to share your results here or in the [tob] flickr group.
For more discussion on freelensing and some awesome photos, check out the freelensing group on flickr.
~S
[title of blog] on flickr

© 2010 Simon Hucko
Well, I gave myself an extra day and I *still* missed my deadline. Sorry everyone. I promise I'll get back into the groove with this whole blog thing soon.
In case you missed the review, I got a new toy last week. As such, I've been shooting an awful lot on it. (I did take the bigboy camera out and play with freelensing a bit, but that's a discussion for another day...) Camera apps for Android are still somewhat limited, but Vignette came highly recommended on the internets and I have to say, it rocks my world. All the low-fi fun you could ever want right at your fingertips. This week's photo was made using a "tobacco" gradient filter, which gives your skies a dramatic orange tint. I really like the effect combined with the water at the bottom of the frame, and I have some killer shots in mind for this effect in the future.
This week's pick is "Strike" by irv_b:
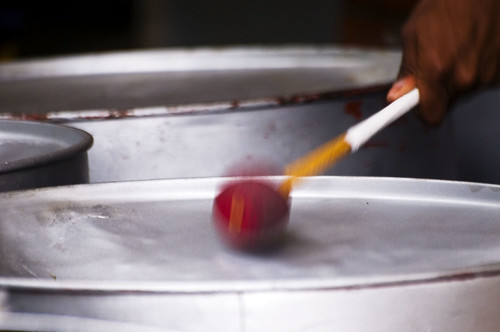
© irv_b
I'll admit, I have a bit of a thing for detail shots of hands at work. This one is very well executed, though - it definitely tells the story of what's going on. The little bit of motion blur is excellent, adds a nice dynamic feel to the photo and you can almost hear the sound of the drum. This would be perfect for some sort of promo material for the band (flyer, program, etc). Great eye and timing.
Ok, that's it for this week. I promise I'll get my act together here and start posting on time again. Keep on shooting!
~S
[title of blog] on flickr
© 2010 Simon Hucko
What? A phone review? Sorry everyone, just got a new toy and I felt like sharing my thoughts about it (especially as it applies to being a photographer). If that's not your cup of tea, feel free to move on. For the rest of you...
My wife and I finally upgraded to smartphones last week. Originally we were talking about switching to AT&T and getting iPhones, but we wound up staying with Verizon and getting matching Motorola Droids. The main reason for this decision was that they were on sale, buy one get one free. Hard to argue with a $200 savings. Another reason that we stuck with Verizon is that we didn't have to wait for our contract to expire next month to avoid paying a fee. Finally, my wife wanted a phone with a physical keyboard - she has an iPod touch and doesn't like typing on it. (I've found that I use the virtual keyboard 99% of the time, but sometimes it's nice to have physical keys to press.)
I was worried I would be unhappy with Android and wish I had held out for an iPhone, but thankfully that's not the case. It still feels a little rough around the edges (especially when it comes to app availability and quality), but the fact that Android is gaining marketshare every day means that the playing field should level out pretty quickly. The important apps are all there, including highly integrated twitter and facebook apps that can sync up with your address book. You also get the option of sharing out photos to twitter or facebook (among other sites) right from the gallery on the phone, which is nice. One thing that's seriously lacking is a good flickr app (at least, I haven't been able to find one). I had to resort to using the e-mail uploading for flickr, which isn't all that bad (especially because "e-mail" is one of the sharing options in the photo gallery), but it's certainly not ideal.
The camera on this phone seems to be pretty good. There are a few nice features missing that I would have liked to see. The most critical lapse is the lack of any kind of exposure adjustment. From what I can tell, exposure compensation is available in the API, so I'm not sure why it hasn't been implemented (maybe the camera doesn't support it?). I hope that they fix this at some point, since the auto-exposure algorithm seems to be a little aggressive and deals with high contrast scenes by blowing out highlights, which is usually the opposite of what I want. 5MP seems a bit extreme, too, I can only imagine how small the photosites are (which leads to lower dynamic range and higher noise). Low light performance is poor, as expected, but the built in LED "flash" is a nice feature. The light is very harsh and a little cool (blue), but it's better than being stuck without one. The camera does auto-focus pretty well, but you're stuck with whatever it thinks you want. A touch to focus feature would be great. The "macro" focusing gets pretty close (within 2 inches or so), which is fun to play with.
I bought Vignette (the only non-free app I have on my phone) to use instead of the stock camera app, and dang is it good - fully functional camera controls plus a ton of framing and filter options for after you take the shot. The app generates a small preview that you can try different looks on until you find the one you like, then processes and saves the full version in the background once you're done. You can even import old photos from your gallery to edit. The only drawback I've found is the inability to stack the different filters. For some reason, there is a small set of options that you can toggle on or off to "stack," but for everything else you have to process the photo with one and then re-import it and process it with another to get a stacking effect. Certainly not a deal breaker, but it would be a nice update.
Overall, I'm very happy with my new phone. The glossy screen (hard to see in direct sunlight) and limited camera controls mean that it won't be completely replacing my point n shoot, but it's nice to have a camera with me 24/7 and a way to share images with everyone instantly. If you're a photographer and haven't gotten a smart phone yet, don't feel like you have to get an iPhone. Android is very photographer friendly, and while it doesn't quite rival the iPhone, it definitely gets the job done. Look for more competitive features in future updates, too.
edit: Forgot to mention the screen. I believe it's something like 854x480, which means that widescreen 480p video will display at its native resolution (and looks really really nice). The wide aspect ratio makes viewing photos a little goofy, but it would be easy for me to upload a set to Picasa that's formatted for the screen. (Forgot to mention that, too - Piacasa integrates with your gallery so that all of your Picasa web albums are available on your phone instantly). The high gloss finish isn't ideal for bright sunlight and shows the smudges from your greasy fingers like nothing else, but I just keep a small microfiber cloth in my pocket to clean the screen and camera when necessary.
~S
[title of blog] on flickr
![[title of blog]](http://1.bp.blogspot.com/_dADuhpc-QVg/TJkTQCq15KI/AAAAAAAAKtQ/usbfWPD7pjc/S1600-R/waterfall.png)


