skip to main |
skip to sidebar
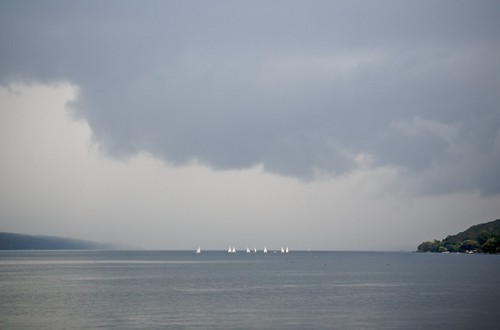
© 2009 Simon Hucko. See it larger here
You have a great weekend shooting, come home, and unload hundreds of photos onto your computer. Now what? How do you wade through everything without it becoming overwhelming?
The process that you go through from pressing the shutter to putting out a finished product is known as "workflow." Different people have different preferred workflows, and it doesn't matter so much exactly what you do. What matters is that you have a well organized, well defined process for handling images. I'm going to outline the workflow that I use and why I do it that way, but there is no right/wrong answer: the important thing is that you have an answer.
- Even before pressing the shutter, you need to decide what file type and color space (wikipedia) you want to work with. I shoot RAW files in adobeRGB, because that way I get the most data possible for editing my photos. (JPEG leads to faster processing down the line, but limits the amount of data collected)
- The next step is deciding how to import and organize your photos. I've settled on Apple's Aperture, which acts as both a photo organizer and RAW converter/editor. I use a card reader to import files into my Aperture library, where I have a folder for each month. Inside that folder I create a "Project" for each shoot, along with a few projects to cover random photos or special projects. Upon import, I generally rename the files to something meaningful and add my copyright info to the EXIF data.
- Once the photos have been imported, you should back them all up. This is an area that I'm lacking in at the moment, but something that I desperately need to start. (Yeah, go ahead, yell at me. I know it's bad. I just haven't gotten around to doing anything about it.) Once you have them backed up you can re-format your memory card and use it again.
- Time to sort. I flip through my images and delete the obviously bad ones (out of focus, blurry, severely under/over exposed, obviously boring and useless, etc). On the same pass, I'll mark photos I want to keep and edit with three stars. Photos that I want to hang onto but don't want to bother editing I'll give two stars. If I have a series of photos of the same subject, I'll generally choose the best one or two to edit and ignore the rest. Anything that doesn't make the cut to be edited I leave alone for the moment.
- I've reached the first possible stopping point here. Every time I import photos onto the computer, I try to force myself to flip through and sort them immediately. This generally cuts the numbers by 1/2 to 1/3, and makes the rest of the process less daunting. If I don't do this, it's easy to get out and shoot more photos and import them, creating a large backlog. Not good.
- OK, so things are sorted and waiting to be edited. I generally don't edit everything in one sitting, just chip away at it when I have time. Most of my edits happen entirely inside Aperture, as I usually don't step outside the realm of general darkroom type editing. I edit in the suggested order, working my way through the bricks from top to bottom (don't worry if that didn't make sense, bricks are Aperture speak for adjustment box). If I decide to do something more drastic, I edit as much as possible with Aperture before round-tripping it to the GIMP (Aperture is non-destructive, but if you have to round-trip a photo or use a plugin it will create a copy and then apply your external edits to that, which are destructive). After editing a photo, I upgrade it to 4 stars. If I really like a photo, I'll bump it to 5 stars. These are the ones I want to show off.
- After editing everything I usually make a pass back through the unrated photos from before. If I see something I want to hang on to, I'll give it 2 or 3 stars (depending on if I want to edit it). Everything else gets deleted. Yep, deleted. I'm sure I'll get some flak for that, too. At this point, you should make sure all of your changes are backed up. *slaps self on wrist*
- Time to show off! Usually, I set the filter for the project to 4 stars or greater, and upload all of these to a Facebook album (at a lower resolution, usually 640p on the long side). These are the photos I want to share with friends and family, and they're less about the art and more about the people. I then bump the filter up to 5 stars and export those to flickr (at 1024p on the long side), which I use as more of a portfolio/gallery. I've taken to uploading things to flickr at a slower pace (one or two a day) to prevent going over the 5 picture limit of people's "Your Contacts" feed. Plus, I find things get more attention when you spread them out and give people a chance to look and comment.
- How about prints? If I really like an image and want to print it, I'll export a full-res highest-quality sRGB jpeg out of Aperture and upload it to a printing site. For more casual printing and photobooks from vacations, etc I use shutterfly.com. Their print quality is pretty decent, they have great prices, and they're always running sales and specials. For more professional/archival type work I go to mpix.com. Their print quality is excellent, and they have some nice options other than traditional prints. In both cases, I don't resize my images or apply extra sharpening before sending them. These printing services have big expensive printers with excellent drivers that will resize and sharpen your images the appropriate amount, and will usually do a better job than general photo editing software.
- You'll notice that I didn't mention anything about color management. Reason being, I don't worry about it. I'm not making professional prints for paid jobs, so if the color is a little off somewhere it's not a big deal. I've never noticed an issue with prints, and most web viewers don't have calibrated monitors and color managed browsers so there's not much point in worrying about it. Color management is a whole other can of worms, and I may go into it at some point if there's any interest out there (comment and let me know).
- I also didn't mention keywording or tagging photos. Again, something I don't do. I've considered starting, but am a little daunted by having to go through all of my old shots. Some day, perhaps. My advice - before you start keywording things, take some time to decide on a system and stick with it. You'll be glad you did later.
Sorry for the long post, but I thought this might be helpful. Do you have a workflow? How does it differ? What are the challenges you have with organizing and processing your photos? Any tips or tricks, or things I missed? I'd be interested to hear.
~S
[title of blog] on flickr
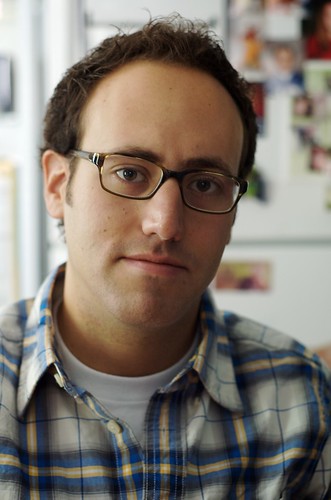
© 2009 Simon Hucko
This weekend my friend Matt (pictured above) came down to visit. He just picked up a brand new Nikon 35mm f/1.8 prime lens last week, and has been shooting with it ever since (I expect there will be plenty of new shots with it on his photostream soon). Inspired by his new purchase, I decided to shoot with my 50mm all weekend.
There are plenty of advantages to shooting with a prime lens. They're generally faster (larger maximum aperture), smaller, lighter, and sharper than a zoom lens in the equivalent price range. They also lock you into one focal length, which forces you to "zoom with your feet" to get the composition you want. While this may sound like a bad thing, it is a great learning tool and really makes you think about composition and perspective when you're shooting. There were times this weekend when I thought about switching back to my zoom, but I stuck with the 50 and forced myself to get creative to get the images that I wanted (or to find new shots that were more practical).
A fast prime will change the way you think about photography, and add a lot of creative possibilities to your kit. To anyone with a DSLR, I highly recommend picking up a 50mm f/1.8 (available for any system, usually around $100) or the new Nikon 35mm f/1.8 (around $200 retail). I don't usually talk gear here, but a fast prime really is a worthy investment, and lets you take shots that you just can't get with a kit zoom (nice blurred backgrounds, low light no flash photos, etc).
_________________________________________________________
Note to Nikon DSLR users: If you shoot with an entry level Nikon DSLR (D40/60/3000/5000), the Nikon 50mm f/1.8 will not auto-focus on your camera. I strongly recommend spending the extra for the 35mm f/1.8, both for the auto-focus and for the wider field of view (better for shooting indoors).
~S
[title of blog] on flickr

In case you haven't heard the news, flickr introduced a new feature today. Flickr Galleries allow you to "curate" your own gallery, compiling up to 18 images from other flickr users, displaying them in the order you want, and adding commentary to each image. Note that you cannot put your own photos into your galleries, they must come from other flickr users.
I think there are some interesting possibilities here, and am brainstorming ways to use this new feature. What are your thoughts/ideas?
edit: check out some examples here
~S
[title of blog] on flickr
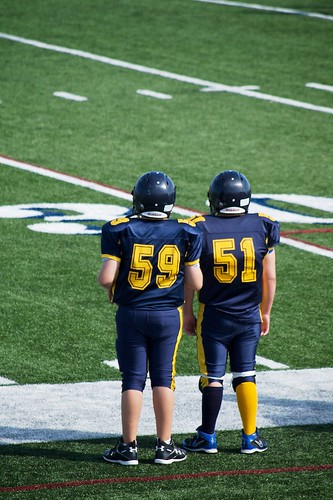
© 2009 Simon Hucko
Today we're going to talk about breaking another "rule" of composition. Generally, the best photographs are the ones in which the subject fills the frame. Sometimes, however, you can make a stronger impact by isolating your subject in part of the frame. In the picture above, taken at a modified football game, the subject (the two boys) only fills about 1/4 of the frame. Even still, I think there's something very moving about this image.
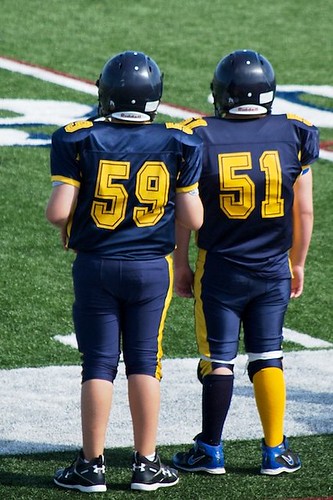
Here's the same image with a much tighter crop. While this is a more rule-friendly framing, I think that the photo loses a lot of its impact.
Which do you like better? Why? (Or do you dislike them both?)
_____________________________________
Format change: You've probably noticed I haven't been publishing nearly as often as I used to. For several reasons, I am backing off to one post a week. This is partially because I don't have as much time anymore to write posts, but it's also to give people an opportunity to read and comment on my blog posts, and hopefully to improve the quality of each post. I may still post links and other things during the week, but the meat of this blog will now be published on Monday mornings.
~S
[title of blog] on flickr
© 2009 Simon Hucko
Ever take a shot, looked at the LCD review, and thought "good enough, I'll fix it in post." Sure you have. We all have. It's so easy to tweak an image to where you want it, why not fix everything in Photoshop?
Photographers who learned to shoot on film complain that digital has made people lazy. While I'm all about the power and flexibility of shooting digital, I do think that they have a point. If you're constantly having to adjust your exposure or composition (either by extensive cropping or by cloning out distracting backgrounds), it's time to slow down, get back to basics, and pay more attention while you're shooting. Sure, these are easy fixes, but they also degrade the quality of your image, and often the time you spend tweaking each image is much longer than the time it would have taken to get it right in the first place.
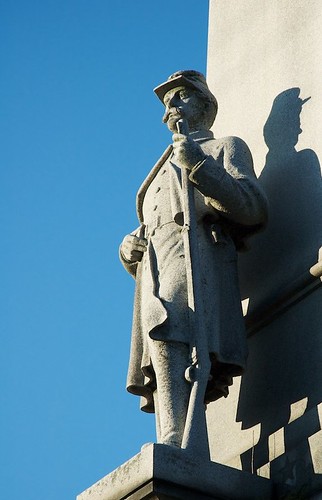
That having been said, sometimes you have no choice. Take today's image. See the original below:

There was no physical way I could frame this shot without that distracting flagpole sneaking into the frame. Rather than give up and not take the shot, I thought "I'll fix it in post" and fired away. A little bit of cloning and I got a very nice shot of a statue against the clear blue sky. I also cropped it in a bit to remove some distracting parts of the statue. This should have been done in camera, but lens wasn't long enough.
What are your thoughts? When (if ever) is counting on fixing things in post ok?
~S
[title of blog] on flickr

© 2009 Simon Hucko. See the details here
Want to make some awesome panoramas without spending any money? Then you need hugin. Hugin is an open source photo stitching software that packs a lot of punch. Not only will it align images, it will correct for exposure and white balance differences between images and blend them together seamlessly. You can also use Hugin to correct perspective, align HDRs, and lots of other things I haven't explored or don't understand.
Panorama tips:
- A tripod is helpful, but not necessary. The panorama above was done handheld. Just try to rotate around the camera axis instead of turning your body. Also, avoid any details in the close foreground, as these can get pretty distorted and choppy.
- Make sure you overlap each image by about 1/3 on each side. The more overlap, the easier it will be to align images and preserve details. I ran into problems with my panorama because I didn't have enough overlap, and had to spend a lot of time fixing the alignment manually.
- For the most detail, shoot horizontal panoramas in a vertical (portrait) orientation, and vice versa.
- Shoot in full manual. Lock your exposure, white balance and focus before you shoot your series. This will make editing and stitching much easier and faster. Hugin can compensate for these differences, but it has to work harder and might not produce as good results.
- If you're shooting a lot in the same area, find a way to indicate to yourself that you're starting a pano. Shoot your hand (or some other marker) before and after your series of photos so that you don't have to spend time figuring it out on your computer. It may seem obvious at the time, but when you get back and find 400 pictures of the sunset and have to resort to exif data to figure out where to start and end your pano, you'll be kicking yourself.
That's all I got. As always, questions, comments, critiques, concerns, stories, observations, and whatever else are appreciated and encouraged.
~S
[title of blog] on flickr
![[title of blog]](https://blogger.googleusercontent.com/img/b/R29vZ2xl/AVvXsEhJ8bvx_9_zOAREbXcrJRML7aVvJMbb90IYYYuyti384jeZHYQ9t8MK6_Kpt_1P4-pZw-QfF9kh4Sqci0vbopzLme862PPhuyPJcc7pRLUW1K1aNzts5YzuXIhgonq66MpjJCqfiWtfwUw/s1600-r/waterfall.png)


