skip to main |
skip to sidebar

© 2010 Simon Hucko
I don't have anything fresh for the blog this week, so it's time for a few winter/holiday related links! (Sort of like the dreaded clip-show on TV, only hopefully a little more rewarding.)
- The thermometer is plunging, and you might be worried about taking your camera out in the cold. Don't be.
- Around here, cold weather means snow. Learn how to keep it from fooling your camera meter.
- Shh! Here's the secret to shooting Christmas lights.
- Getting together with friends and/or family? Here's a few tips for capturing the event.
- Finally, if you're lucky enough to be getting away on a vacation, I have some thoughts on managing your vacation photos.
Enjoy!
~S
[title of blog] on flickr
© 2010 Simon Hucko
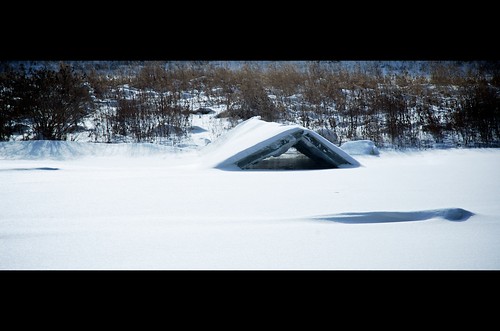
Shooting in the snow can be very rewarding, but also very frustrating. I've already talked a bit about how the cold affects your camera (Cold weather? No problem!), but I didn't go into how snow can affect your exposure.
The main issue when shooting in snow is that your meter is going to get confused. (See here for more on how your meter works.) Because of how they're designed, camera meters tend to underexpose snowy scenes. They see all of the white, and try to normalize the scene to 18% gray. This is especially true on overcast days when the dynamic range of the scene is relatively small. If you look at the histogram of a shot taken on a day like this, you'll see a big peak in the middle, and your photo will be gray and muddy. An easy fix is to adjust your exposure compensation up a stop or so. On a sunny day the dynamic range will be larger, but your meter will expose differently depending on how much snow is in the frame (more snow will result in underexposure). This drives me nuts, and I usually switch over to manual exposure at this point. You can also ride your exposure compensation, but expect to do a lot of fiddling.
No matter what method you choose, learn to love your histogram. A quick glance will tell you exactly where your exposure lies, and what you need to do to get the exposure you want. Generally, you want the rightmost peak of the histogram to just touch the right edge. If you're shooting RAW, you may even want to blow out the highlights just a touch, as you'll be able to get them back in post. If you're still not using your histogram when you shoot, you're missing out on one of the best tools that digital photography has to offer, and I highly suggest you turn it on. It might seem like kind of a nerdy intimidating thing, but it's an extremely simple visual representation of your exposure, and a lot more accurate than trying to judge from your uncalibrated high contrast LCD (that will look different depending on what lighting conditions you're in). For a basic explanation of what a histogram is and how to use it, see here (luminous-landscape.com) - check out the "high key" example near the bottom to see what I meant by low dynamic range snow shots.
Finally, when you get to editing your snow photos, don't be afraid to boost brightness/exposure after the fact if you didn't quite get there in camera. You may also want to pull the mid tones and shadows up if you're shooting on a sunny day and exposed to hold some texture in the snow. If your photos are a little flat (overcast day), add some contrast back in to give them some punch. Consider some black and white conversions (snow looks great in black and white).
Hope this was helpful. As always, any comments or questions are welcome :)
~S
[title of blog] on flickr
© 2009 Simon Hucko
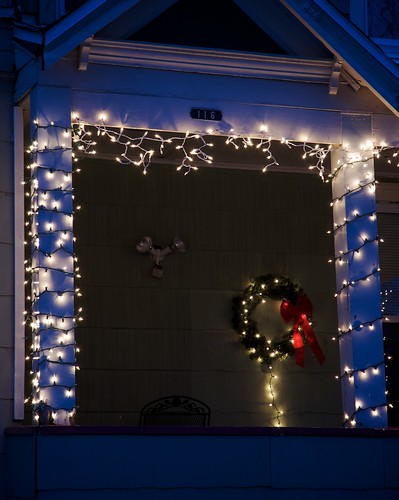
With the holiday season upon us, homes, stores, and even entire towns/cities are getting dressed up with lights. However, if you've gone and tried to take pictures of the lights before, you've probably been disappointed with how they turned out - bright blown out lights on an almost black background, possibly with some snow in the foreground if your flash fired.
Well, I'll let you in on the secret to getting good photos of Christmas (or any other) lights - don't wait until it's dark! It seems a bit counter-intuitive, why would you want to photograph lights when it's still light out? The key here is balance. Unlike your eyes/brain, your camera can only make sense out of a relatively narrow range of light. In order to get the most out of a photo, you want to make sure that every detail in that image falls within that range. Otherwise you end up with something like this:
[[Ok, so I wasn't able to do this properly, and don't have a "bad example" shot for you. But I trust you know what I'm talking about...]]
Blown out lights, dark black everything else. Not very pretty. Here's what you need to know:
- Get there early. Scout out a location, and get there around sunset. Make sure the lights will be on this early (if you know the people who own them or if they're yours, it shouldn't be too hard getting them to flip the switch a little early one night).
- Plop down your tripod and frame your shot. Try to get some sky in you photo for maximal effect. See if you can include some sort of reflection (ice, shop window, whatever) or other point of interest (wintry goodness, cars rolling down the street, etc). Not required of course, but could be cool.
- Set your white balance to tungsten... probably. Christmas lights (the old kind) will balance out perfectly to this and it'll give you a nice rich blue sky. The new LED lights could be more blue, so be aware of that. You may want to keep your white balance at daylight in that situation.
- Shoot and chimp! I know, we usually don't encourage this sort of behavior around here, but this is really the only way to go. When you first start off it will probably be too light out, and the lights will look pretty dull compared with the sky. As the light fades, however, you'll come to that magic point where everything starts to balance and the lights really start to pop against their surroundings. This is when you want to start shooting seriously, especially if you have moving elements in your frame to worry about (cars, people, and whatnot). Pretty soon, you'll notice your sky fade away and your photos start returning to the ugly blackness of before. That's it, show's over, time to go home and have some whiskey hot chocolate.
That's all, folks. No fancy settings or gear required, just get out there at the right time of day and shoot away. So now not only will your Christmas decorations be better than your neighbor's, but your photos of them will be, too :)
~S
[title of blog] on flickr
© 2009 Simon Hucko
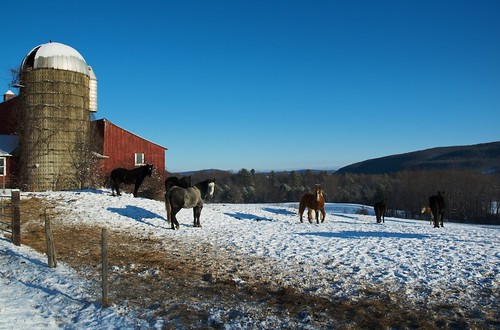
Winter officially begins on Monday, but it's already been pretty wintry around here for the past few weeks. So what do you do when the snow starts falling and the thermometer plummets below freezing? Why, take your camera out and keep shooting, of course! Snow and cold weather are actually very minor inconveniences for your camera, even if they may be less than minor inconveniences to you. Here's a few tips to get you through the winter weather:
- Slow temperature changes are better. Warm air contains a lot more moisture than cold air, so any sudden change will cause condensation. This is especially problematic when bringing cold gear back into a warm building. If you just carry your camera in, it'll probably fog up pretty quickly. This won't necessarily harm it, but it does make it useless for a while. There's also a chance of condensation on the sensor, which could require a sensor cleaning. The solution? Keep your camera closed up in the bag and allow it to come up to temperature slowly. If you're in a hurry or are more paranoid, you can also zip your camera and lens up into a large plastic bag before bringing it in. This way, any condensation will happen on the bag and not on your camera. Once your camera has come to room temp, it's good to go again.
- Batteries don't like the cold. The chemical reaction going on inside your battery slows way down when the temperature drops, which can have a very severe effect on battery life. The good news is that this effect is only temporary, and your batteries will "come back to life" if you warm them up again. The solution here is to carry at least one spare battery somewhere close to your body (inside pocket somewhere) and swap it out when the cold one in your camera starts calling it quits. By putting the cold battery in your pocket, it will be ready to go again when the fresher battery starts to fatigue. Swap out and repeat. You can keep going like this for a long time.
- Falling snow likes to hang onto your camera and lens. No trickery here, just keep a microfiber cloth with you and use it to gently wipe off your gear when it starts getting covered. Be careful when wiping off glass not to smear the water around or fog things up with your warm hands - a brush or blower might be best if you've given your camera time to cool down so that the snow doesn't melt, it just falls off like dust. Try to keep your lens pointing away from the falling snow if possible to minimize the problem. Make sure you do a final wipe-down before shoving your gear back in the bag and bringing it inside to keep the snow from melting all over everything. You might want to keep your lens caps off for a bit too until everything is nice and dry.
- Fingerless or thin cotton gloves might be a good investment. Your nice warm goretex gloves with the down insulation are going to give you zero control over your camera, and it gets pretty annoying having to pull them off every time you want to change a setting or even press the shutter. Thin or fingerless gloves aren't as warm, but can save you from having to remove them every time you take a photo. Mittens are definitely out, for obvious reasons ;) (edit: Unless they're the convertible fingerless kind. Thanks for the tip, Adam!)
That's it for this installment of winter shooting tips. I'll definitely do another one at some point about exposing for snow. I also have a post coming on shooting Christmas lights (I promise!) - that should be done for Monday.
_____________________________________________
If you haven't done so yet, go check out the [tob] 52 weeks group. The more people that join and participate, the more fun this will be for everyone! Remember, it's only one photo a week. You can do it!
~S
[title of blog] on flickr
![[title of blog]](https://blogger.googleusercontent.com/img/b/R29vZ2xl/AVvXsEhJ8bvx_9_zOAREbXcrJRML7aVvJMbb90IYYYuyti384jeZHYQ9t8MK6_Kpt_1P4-pZw-QfF9kh4Sqci0vbopzLme862PPhuyPJcc7pRLUW1K1aNzts5YzuXIhgonq66MpjJCqfiWtfwUw/s1600-r/waterfall.png)


