![[title of blog]](https://blogger.googleusercontent.com/img/b/R29vZ2xl/AVvXsEhJ8bvx_9_zOAREbXcrJRML7aVvJMbb90IYYYuyti384jeZHYQ9t8MK6_Kpt_1P4-pZw-QfF9kh4Sqci0vbopzLme862PPhuyPJcc7pRLUW1K1aNzts5YzuXIhgonq66MpjJCqfiWtfwUw/s1600-r/waterfall.png)
© 2010 Simon Hucko. All rights reserved. Please DO NOT use without permission.
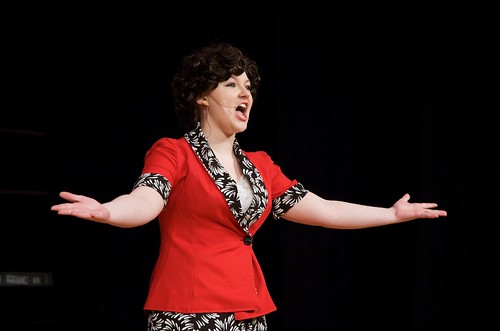
Shooting a live performance probably isn't something you do very often, but since I've spent the past week in a theater shooting play rehearsals (and have nothing else prepared for this week) I'm going to talk a bit about photographing the stage. Everything I say here will be in the context of theater, but it applies equally well to concerts or other live events with lighting.
First thing: NO FLASH. Turn it off. Just don't do it. Yes, it's dark, and yes, your camera will be unhappy, but not only is flash extremely distracting to the performers and the audience, it will ruin whatever mood the lighting designer was trying to create. This applies double to your built in flash, especially if you're shooting from more than 10 feet away from the stage - at that point all you're doing is draining your battery and annoying a lot of people. This is a personal pet peeve of mine, and I can't stress enough how rude and worthless a flash is in these situations. Along the same lines, turn off any beeps or other sounds that your camera makes, and turn off the auto-focus assist light if possible. Your goal is to not exist as far as the performers and audience are concerned.
The next step is to know the rules. You can't just buy a ticket and show up with pro camera gear to shoot away. Most concerts are OK with you bringing in a camera, but there could be restrictions on lens length (no joke) or "professional looking equipment" (make sure you remove your lens hood, take the battery grip off your camera, and don't look too good at what you do). Most theaters I've been to expressly forbid "flash photography," but don't mention photography in general. I think you could probably get away with shooting some from your seat, but you'll also probably annoy the people around you. The best thing to do in any situation is to contact the people in charge to see what their policy is about photography.
My situation was somewhat unique. My wife is a music teacher, and is choreographing and costuming the high school musical in her district. As such, I was granted an all access pass to rehearsals. I'll talk more about this next time, but having access from the back of the house to right in front of the stage (and possibly even on the stage) without worrying about an audience makes this job much easier. If you don't have a connection like this but are still interested in doing some stage photography, don't be afraid to contact your local high school and see if they'll let you come in and take some shots at a rehearsal or two. This is a great way to get access and experience, and most schools would probably be happy to let you in.
From a technical standpoint, it's time to brush up on your manual exposure. All of the darkness is going to confuse the heck out of your meter, leading to overexposure, hugely blown highlights and longer shutter speeds that could introduce camera shake. As it is, shutter speeds will be an issue. You'll want to boost your ISO as high as practical and get your hands on fast glass (f/2.8 or brighter) if possible. If you don't have a 70-200mm f/2.8 zoom (as I don't), that fast prime is going to be your best friend. In this case, something a little longer like a 50mm (with the crop) or 85mm will be better. You're going to have to constantly adjust exposure every time the lighting changes, so get ready to use your histogram to the max. (I have a histogram post in the works, probably won't get to it this week but hopefully the next week. Keep an eye out.) Once the lighting changes, eyeball how far off you are from the last scene, adjust, snap a test shot, check the histogram, and fix exposure if necessary. This sounds a little intimidating at first, but with some practice you'll get the hang of it and be able to guess pretty accurately how much things have changed. You can also try spot metering off of people, but I prefer the other technique.
Accurate exposure is critical when using a higher ISO. For one thing, the dynamic range captured by your sensor decreases at higher ISO's. This means you have less latitude to play with when processing. For another, noise starts to become a problem with higher ISO's. Noise gets much more noticeable when you start boosting exposure after the fact. Even if you're very careful about exposure, some amount of noise reduction is a good idea when processing your photos.
This turned out to be a pretty long post (apparently I have a lot to say on the subject), so I'm going to split it here. Today's focused on the technical side of things. Part 2 will focus more on the practical, and how I go about getting the shots I want.
~S
[title of blog] on flickr


Hehe, I like that you can give the perspective of someone from both sides of the camera (both performer and photog).
ReplyDelete