skip to main |
skip to sidebar

© 2010 Simon Hucko
My photo this week was an image I found as part of my normal routine. It has sort of a "still life" feel to it, although I didn't position anything myself. This is probably my favorite thing about phone photography, the ability to capture an interesting image in the everyday. People see the world around them differently, and I'm always intrigued by these little slices of vision. As I've said all along here, camera phones are just fine for your weekly photo. What matters is the image and the vision behind it, not the gear you use to take it.
My pick this week is "Stifling Love" by slithy-toves:
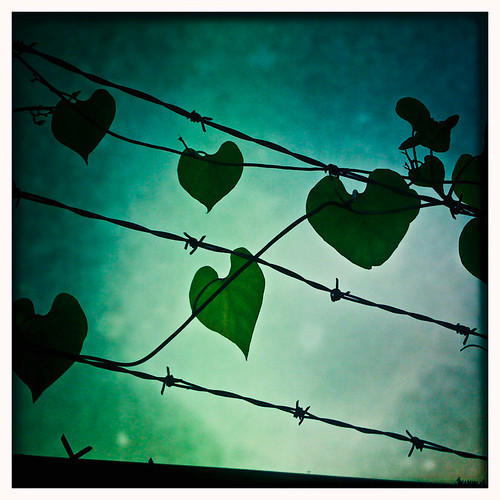
I really like the juxtaposition of the soft heart-shaped leaves and the barbed wire - great find! I also like the lines here, and the way the one vine cuts across the wires. Very interesting and thought-provoking photo, thanks Stacey!
This week's theme will be "change." For those of you in northern climates, Fall is definitely on its way in, and leaves are starting to give up their green and show their true colors, so to speak. Don't feel limited to leaves, though, there are a lot of different ways to express "change" in a photo. Happy hunting!
~S
[title of blog] on flickr
© 2009 Simon Hucko
Pop quiz time. Hope you all play along...
Where's your camera? You should know this without having to think about it, and ideally it should be close by. Go grab it, I'll wait.
Got your camera? Ok, without looking at it, turn it on. (We're going to do a lot of this "without looking" stuff, no cheating!) Before you look, what are the camera settings right now? (Shooting mode, focus mode, set aperture/ISO/shutter speed, image size and quality, etc.) Check to see how you did - at this point the camera should be on and at the settings you thought it was at.
Now to play a bit. Put the camera in an appropriate shooting mode for where you are right now (you can look for this one). Bring the camera up to your eye, frame an image, and fire off a shot. Now, without taking your eye away from the viewfinder, increase the exposure by 2 stops however you want and take another photo. Bring the exposure back to normal and adjust the ISO down a stop (if you're at the lowest setting, put it up a stop), take another photo. Zoom your lens to its widest setting, then all the way to the telephoto end. (Prime? attaboy.) Set the white balance to fluorescent. Switch to manual focus, find a new subject, focus on it and take a photo. Turn the flash on, take a shot. Change the flash exposure compensation down one stop, take another shot. Bring up one of the images on your review screen. View the histogram for that image. Change it so that it displays blown highlights (blinkies). Find the EXIF data and see what shutter speed the photo was taken at. Delete the image. Format your card (only if you don't have anything valuable on there!) Bring your camera back to its normal settings, shut it off, and put it away.
How did it go? Could you do everything without hunting for the controls? Even if you have to menu dive for some things, do you know how to quickly access those menus and make the necessary changes? If you can't easily make these adjustments while shooting, you need to spend more time with your camera. There's nothing worse than missing "the shot" because you were fiddling around with the gear. Spend an hour or two some day walking around your house shooting, adjusting these things as you go. If you have to hunt for a setting, spend some time changing it back and forth to commit it to memory. The less you have to look at your camera, the better.
So how about it? I'm interested to hear how you did. I'll be honest, I had to glance down at my camera for ISO and white balance. Something for me to work on.
~S
[title of blog] on flickr
© 2010 Simon Hucko
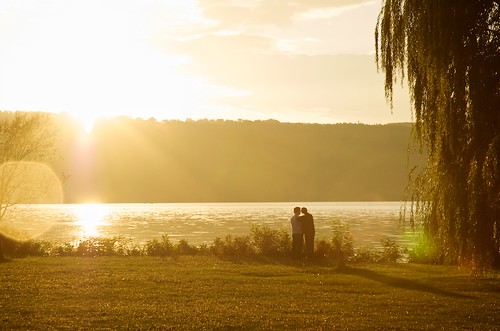
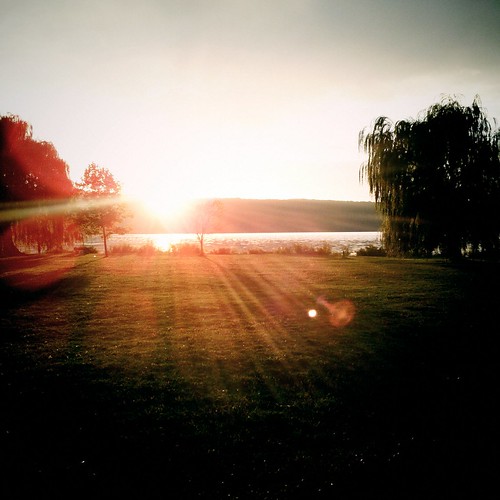
I'll admit, I cheated again. I already had this shot in the can when I picked the theme for the week, complete with all it's delicious flare. Last Monday was an awesome evening weather-wise. We had bands of showers rolling through, and the sun kept poking out in between, leading to many a double-rainbow around town. More importantly, when the sun started going down, we had the most beautiful golden hour light I've ever seen. This shot was a bit of a grab shot on the way back to the car - I saw the couple standing by the lake back-lit by the sun and thought it would make a nice image. Luckily for me she leaned in to him right as I picked up my camera, allowing me to capture this great moment. I fired off a few frames, dropped my bag back in the car, and turned around to get their e-mail to send them a shot but they were already gone. Life waits for no one, I suppose... Sure, it has a trendy "engagement session" feel to it, but it totally does the evening justice light-wise.
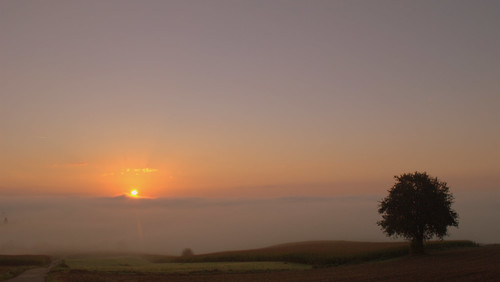
My pick this week is "Gauangelloch" by djhucko:
© Dan Hucko
No flare here, but a beautiful sunrise capture. I like the framing he chose, putting the fog line on the lower third instead of the visible horizon. This puts the rising sun right at the classical "rule of thirds" placement for the subject, and it gets balanced out nicely by the tree in the lower right. I think this would make a very nice print, too. Excellent capture.
This week's theme is Camera Phone shots. The beautiful thing about your camera phone is that it's always with you. Find a little slice of your world to share with us this week, giving some insight into how you see things around you. Don't worry about resolution or fancy camera apps, a straight up camera phone shot is fine (and you can always pull it into your photo software and tweak it a bit there.) Looking forward to seeing what you guys post!
~S
[title of blog] on flickr
© 2010 Simon Hucko
Practice makes perfect, and photography is no exception to that rule. One of the best things about the digital photography era is the ability to shoot a nearly unlimited number of photos without worrying about additional cost. Now anyone can burn through 100+ frames experimenting with lighting or a new technique or a different subject, whereas the expense associated with such an exercise 10 years ago limited things like that to film school and driven amateurs with a large slush fund. Not only can you shoot as much as you want, there's no delay between pressing the shutter and seeing the image. No waiting to finish off the roll and sending it off for processing (or spending a few hours in the darkroom yourself developing and printing) to find out that you missed the focus or exposure on an otherwise great shot. This, along with the ease of sharing and getting feedback on your work, makes digital photography an incredible learning tool.
It also makes you sloppy.
It doesn't matter if you get it right the first time. Or the second. Or even the tenth. Just keep plugging away until you get something good enough to rescue in your software editing package of choice. Who cares, it's all free, right? Not exactly. What about the time you spend taking multiple photos of one thing until you get it right? How about the time spent in post processing fixing stuff that you could have gotten in camera. And then there's storage, if you're one of those digital pack rats who can't delete a photo you're going to be snapping up hard drives and bogging down your computer with giant photo libraries.
But there's another hidden cost in there - you stop learning your craft. Why spend time on making the perfect exposure when you can correct for it with a slider in post? If you miss on composition a little you can always crop down on the image. (Hey, 12 million pixels have got to be good for something, right?) Horizon a little crooked? No biggie, just straighten it as you go. And sure, these are just little fixes that take almost no time at your computer, but they add up (especially when you're doing them for those 327 frames you snapped on burst mode). On top of that, you're losing resolution and image quality along the way. It's nice to have these tools available, but you shouldn't be relying on them for every shot.
I think this is why so many photographers who started on digital are "discovering" film (myself included). Suddenly every shutter press costs something (from a few cents to a few dollars depending on the film, format and processing). There's no image review with histogram on the back of the camera, so you have to get exposure right the first time. If you take a shot and then walk a few feet and discover a better angle, you've wasted that first shot. You're stuck with whatever ISO film you have loaded in your camera, so you have to make sure you bring the right stuff for the type of shooting you'll be doing. Every film has its own look, too (especially color film), so that needs to be factored in to your final result. The net effect of this is that shooting film is much more patient and deliberate than shooting digital. That clunk of the shutter is like an emphatic period at the end of a long sentence: film choice, composition, lighting, metering, aperture and shutter speed, focus, timing, shutter. Unless your budget allows for unlimited shots, you'll quickly become more selective about what and how you shoot.
What's my point? If you've never done so, shoot some film. Find an old 35mm film camera on ebay or craigslist for cheap (bonus points if it's all manual) with a 50mm lens. Buy a roll or two of film from somewhere that still carries it (CVS around here happens to have a surprisingly decent supply and they still process in-house). Find a way to meter if your camera doesn't - you can use your DSLR for this, or even sunny 16 (ie the force), and make every single one of those 24/36 frames count. Get some 4x6 proofs printed and see how you did. Scan them and share them here or on Flickr. I bet you'll be back for more. Not only that, but it will change the way you look at digital photography - you will simultaneously be incredibly grateful for the ease and speed, and learn to slow down a little and make your images count more.
Note: Getting addicted to film is a dangerous game. You start with a bargain 35mm camera, and before you know it you're processing large format sheet film in your makeshift darkroom in the basement. Don't say I didn't warn you...
~S
[title of blog] on flickr
© 2010 Simon Hucko
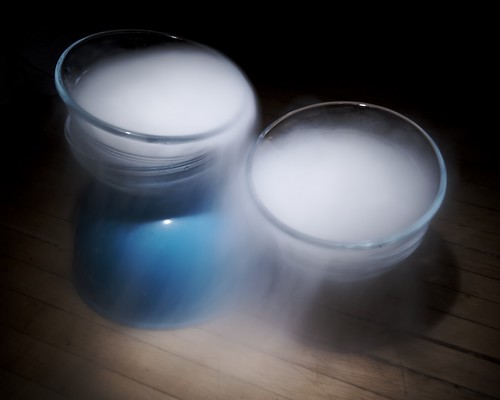
My photo this week is a little experiment that I did with some dry ice. It's not a very interesting photo, more of a proof of concept, and I was hoping for something better to share for the week but it didn't work out that way. There are a lot of photos of dry ice on Flickr (mostly as a bubbly smoky liquid in a glass of some sort), but I wanted a different effect. I figured if a long exposure can be used to smooth out moving water, it should have a similar effect on dry ice fog. And it did. 4 second exposure lit by my trusty LED flashlight, which I think is getting close to deserving its own post. Maybe I'll do a "what's in your bag?" thing sometime soon.
This week's pick is "Big Skies over Mendon" by maryshelby:
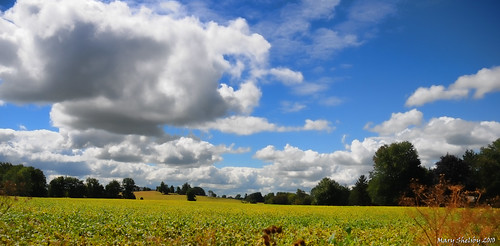
© Mary Shelby
Big skies indeed. The wide angle really helps capture the big fluffy clouds and gives the photo a nice sense of depth. I like the little red bush (?) in the foreground, too, it adds a nice layer of interest to the photo.
This week's theme is "flare" - point your camera at a light source and let it go wild. An open aperture will give you large blobs of flare across your photo, stopping down reduces these and gives you a starburst effect around the light source(s). Try both and see what you like best.
~S
[title of blog] on flickr

© 2010 Simon Hucko
I've mentioned aspect ratio in passing several times here, but I thought I'd dedicate a post to it, especially since it's something I've been working on lately.
The aspect ratio of an image is the proportion of the photo's dimensions (ie how wide it is compared with how tall). Common aspect ratios for photography are 3:2 (4x6 prints), 4:3, 5:4 (8x10 prints), 1:1 (square), and increasingly 16:9 (widescreen HD). Technically you can crop a digital image to any aspect ratio that you want, but it's much easier to print or display your photos if you stick to the normal formats.
So why so many formats? Why don't we all shoot the same thing? It would make printing and photo site design much easier, as you wouldn't have to worry about differently sized photos popping up. There are two answers to this question, a technical one and a creative one.
The technical answer has to do with legacy film formats. 35mm film has a 3:2 aspect ratio, which is why most DSLR cameras are 3:2 as well. Common medium format aspect ratios were 6x4.5 (4:3), 6x6, 6x7 and 6x9. Large format (sheet film) comes in 4x5, 5x7, 8x10, and 11x14. I'm assuming this is where those standard print sizes stem from, as 35mm never really translates well to any of them... 4:3 and 16:9 are also display formats (normal and wide screen TV), so they make sense for digital photo viewing as well. (I'm guessing this is why just about every point n shoot camera is 4:3.)
The creative reason (which may have driven the technical development mentioned above) is that every format has a slightly different feel to it. Square format photos have a very static well defined feel to them. As you deviate from square, photos start to feel wider or taller, imparting somewhat of a dynamic feel even before considering the subject. As an example, I took to photos of essentially the same subject last weekend. The first is a square shot -
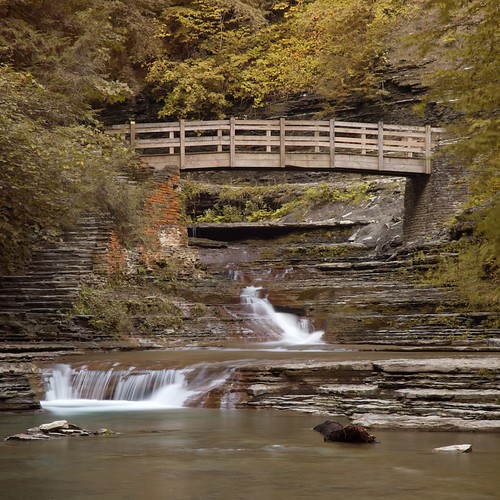
© 2010 Simon Hucko
Despite the movement in the water it's a pretty static and calm shot. Compare that with the same scene framed in 2:1 -
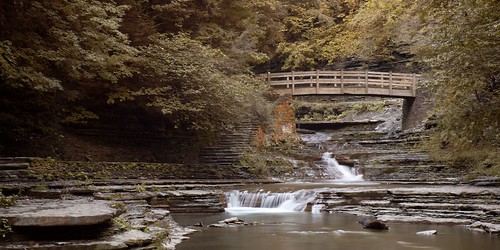
© 2010 Simon Hucko - click to see it large
Note that the vertical captured is about the same for the two (from just above the bridge to the bottom of the second little waterfall). This time, however, we're capturing a larger part of the scene. The bridge goes from being a static and self contained subject to part of a sweeping image. (Note also that I bucked those formats I talked about and went with 2:1. If I were to print this at some point I'd have to get it printed in a less wide format like 3:2 and trim it down, then custom mat and frame it. A bit of work, but worth it for wider stuff like this.)
So how do you decide what format to use? Well, that's up to you. As I already mentioned, more square formats tend to feel more static and complete, where wider (or taller) formats can give the feeling of movement. Sometimes the subject dictates what format to use, where the interesting compositional elements are contained in a certain layout and you crop out the rest. Sometimes you have more freedom to choose a format, in which case it's worth experimenting with a few options and seeing what you like.
Often times when I approach a subject I'll have some idea of what I want the final format to be. Certain scenes just look square to me, and certain ones benefit from a bit of extra width. I then compose my shot with the crop in mind, making sure I fit all the elements into the space that I'll wind up using.
If you approach a scene and aren't sure what format you want, my advice is to compose a little loosely so that you'll have more options while editing. Make sure all of the key elements of a scene are in your photo, and then back up or zoom out a little to leave yourself a cushion for cropping. There's nothing worse than going for a square crop and coming up just short of including the entire subject (trust me, I've been there, and 4x5 just isn't the same...)
The right crop can elevate a good photo to greatness. So much of photography is eliminating objects from the frame and only including the ones that add to your story. I strongly suggest familiarizing yourself with the effects of different aspect ratios on your photography. If you have a photo with a good subject that still feels a little unfocused to you, try cropping out different parts of the image and see if you can increase its impact.
I've been getting more and more into square format lately, as a stroll through my photostream will quickly show. I still shoot a lot in 3:2 (the native ratio for my camera) since that's what I compose in. I also like the super wide 16:9 (or 2:1) for certain scenes. I've been on the lookout for vertical 1:2 images as well, but those are hard to come by (if you want a challenge, spend a day shooting for that crop).
What's your favorite aspect ratio?
~S
[title of blog] on flickr
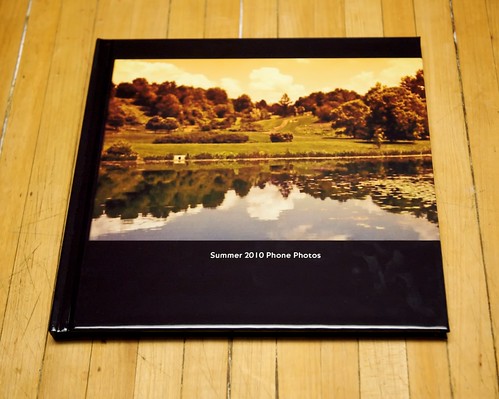
A quick plug for Shutterfly. If you're not a member, I encourage you to go sign up for an account. I believe you get something like 50 4x6" prints just for joining.
The reason that I'm mentioning it here is that they have sales on their photobooks every few months. Occasionally, they'll even give one away for free. They were running a free book promotion at the end of the summer, so I threw together a small collection of phone photos and had it printed up for less than $9 after tax and shipping. Their print quality isn't great by any means, but it's plenty good enough for personal stuff. My wife and I have replaced doing photo albums with ordering these books: every time a sale comes around we'll pull photos from recent events and order one. Sure, it's probably cheaper to keep albums of 4x6 prints, but the space saving and convenience is worth the extra cost (and in the long run I think that extra cost is very minimal once you consider album and print cost and the time it takes to put all the photos in the sleeves). It's nice to be able to design layouts and add text, too, although I went for full bleed with these photos to be artsy (or something like that).
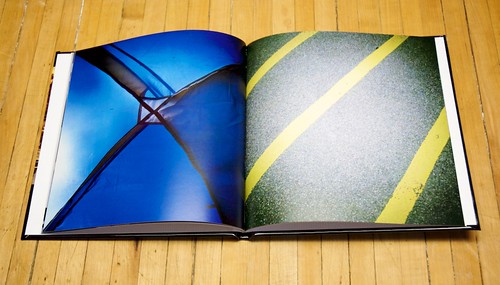
If you've never printed a photo book, I suggest giving it a try. It's pretty cool to get a hard copy of your work that you can pass around to friends and family.
Note: I'm not affiliated with Shutterfly in any way, other than being a customer. I'm certainly not making any money off of this post.
~S
[title of blog] on flickr
![[title of blog]](https://blogger.googleusercontent.com/img/b/R29vZ2xl/AVvXsEhJ8bvx_9_zOAREbXcrJRML7aVvJMbb90IYYYuyti384jeZHYQ9t8MK6_Kpt_1P4-pZw-QfF9kh4Sqci0vbopzLme862PPhuyPJcc7pRLUW1K1aNzts5YzuXIhgonq66MpjJCqfiWtfwUw/s1600-r/waterfall.png)


