skip to main |
skip to sidebar
© 2010 Simon Hucko
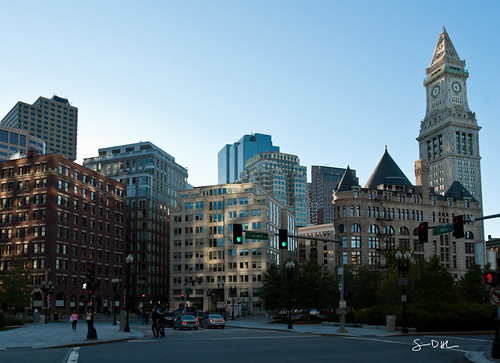
I realize that's a pretty strange title for a post on a photography blog, but sometimes it's good to just put your camera away. I took a trip to Boston with my wife last weekend to visit her sister and see the sites (and most importantly, eat the seafood). I of course brought my camera, and it came with me everywhere we went, but it spent most of the time safely tucked away in my camera bag. That's not to say that I couldn't access it quickly if I wanted to - it takes a matter of seconds for me to get the camera out and ready to shoot - but by not having it hanging around my shoulder or in my hands I didn't feel the compulsive need to take a photo of every semi-interesting thing that passed by. The net result was a great in-the-moment weekend and a high keeper ratio (I don't remember the exact numbers, but I think I shot around 75 frames, 29 of which will make their way to facebook). Most of the deleted shots were part of the short bursts I was shooting in the science museum to battle camera shake and subject movement ('twas dark in there).
The moral of the story is that you don't need to spend every minute of a vacation or event with a camera glued to your face. I'm not saying that you shouldn't bring a camera, but consider keeping it put away and only pulling it out for photo-worthy moments. Sure, you might miss a few quick grab shots, but the payoff is not having to go through your photos after the fact to find out if you had a good time or not.
~S
[title of blog] on flickr
© 2010 Simon Hucko
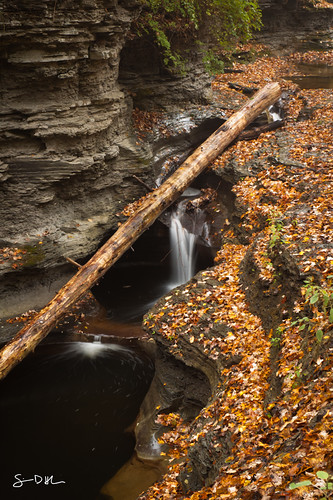
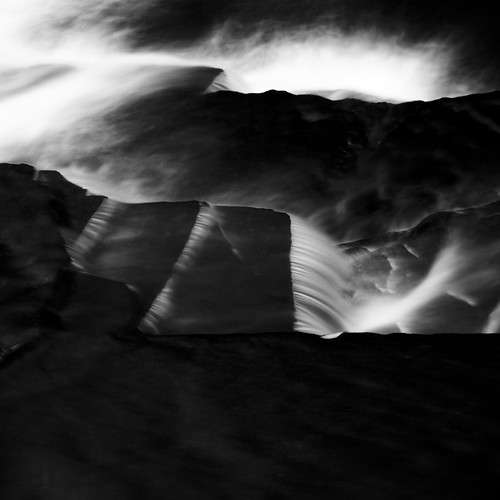
It's the most wonderful time of year if you're a nature photographer. Everyone loves fall foliage, and with plenty of overcast rainy days I've been chomping at the bit to get out and shoot some waterfalls. We're still a little off-peak here, but it's coming on fast and strong, and the next couple weeks are going to be amazing. I'm also hoping for a few clear fall days so that I can capture some leafy landscapes at golden hour. Nothing says autumn like a crisp blue sky. A polarizer is super helpful for knocking down the sky a bit and cutting reflections on the leaves, leaving you with a nicely saturated scene.
My photo this week was the product of a rainy expedition last Monday. This was the only photo I ended up keeping in color, the rest were better served in black and white (mostly due to the green leaves farther down the creek). The giant log is smack in the middle of the best series of falls on the stream and has been cursed many times over by local photographers. I decided to use it as part of my composition, and from this angle it makes a nice leading line up the stream.
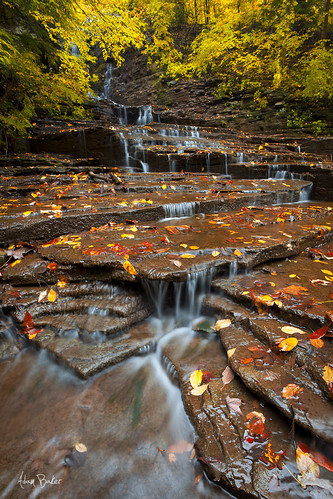
This week's pick is "Autumn Trickle" by [Adam_Baker]:
© Adam Baker
Adam wound up shooting the same stream this week, but he headed up the other way and captured a part I haven't seen yet. I really like the series of little cascades, so this is on my list of places to check out and photograph before winter. The title says it all - the water was pretty low last week, so a lot of the falls on this stream were at the trickle stage. Given the hurricane and other rain we've had since, I'm guessing things are back to normal, so this particular shot no longer exists. Waterfalls can change daily, so it's fun to go back to a spot several times a year and see the changes. Nice shot, Adam.
(Adam is currently out on an epic fall photo trip through the Adirondacks and parts of New Hampshire, so now would be a good time to start following him on flickr so that you can enjoy all the autumny goodness when he gets back.)
This week's theme is "exploration." Show me what you got!
~S
[title of blog] on flickr
© 2010 Simon Hucko
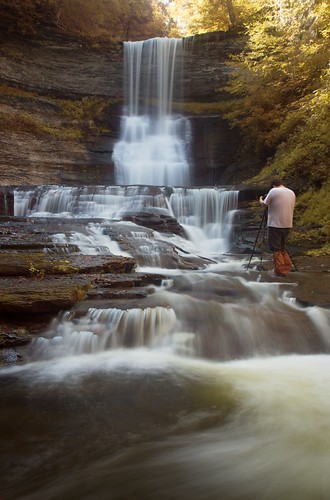
It looks like waterfalls are becoming my favorite subject to shoot. Photographing waterfalls is a very zen-like "back to nature" experience for me, and it touches on a lot of the reasons I enjoy photography. True, long exposure waterfall shots are nothing super new or creative, but when done right there's still a bit of magic to the cottony plumes of spray. (For what it's worth, my only photo ever to make explore on flickr is a waterfall shot.) My goal this fall is to capture the falls and foliage around here, so I thought I'd talk a bit about the process.
The first task is finding the falls to shoot. There are literally hundreds of waterfalls in upstate NY, so that's not too difficult here, but you may not be so lucky. This is where the flickr map can come in handy - you can search by keyword or tag in a specific location. Find your home town, zoom out to an acceptable driving radius, and search for waterfall. If nothing comes up, you still might be in luck (not everyone geotags their photos). Try google or ask some local photographers (especially landscape shooters) if they know of any.
The next consideration is flow. Different times of the year mean different flow rates over the falls. Creeks are usually at their highest after the spring thaw, and at their lowest around late summer/early fall (especially after a long dry spell). Waterfalls can look very different under these different flow conditions, from a roaring cascade to a quiet trickle. The ideal time for photos is usually somewhere in the middle, but the best practice is probably to visit the falls several times through the year. The same waterfall may take on a completely different character but still be highly photogenic, so there's no hard and fast rule here, just something to be aware of. Don't forget about winter - iced over falls and snow can make for some stunning shots.
Weather is also an important factor to good waterfall photos. Heavily overcast or even slightly rainy days are the best times to go shoot. Waterfalls are typically found in a gorge in shadow, but the trees and sky above the falls are often lit by the sun. If you go shoot on a sunny day, you'll have a lot of dynamic range to contend with, and you'll have to do some wizardry (ND grad or HDR) to even things out. Dark cloudy days also help to extend your exposure times, making it easier to get the silky smooth shots you're after. And, as a bonus, cloudy rainy days tend to discourage hikers so you won't have to contend with people walking into your shots. (Although that's not always a bad thing, right Adam?) Your camera is more weatherproof than you might imagine, just keep wiping it dry as water collects on it with a towel or microfiber cloth. Try to avoid getting water on your lens or filters, though, as it's very hard to get them dry again in the field and image quality will suffer because of it. I find that a lens hood is an excellent rain blocker, just make sure your lens is horizontal or pointing downward at all times.
Now for the actual photography part. The one absolutely essential piece of kit is a sturdy tripod. For a nice blur of the water you're looking at exposures in the seconds range, so you're going to need something rock solid to keep the rest of the scene sharp. If you can swing it, a nice carbon fiber tripod is probably the best for hiking in and out, but it's better to buy an old heavy monstrosity than a cheap aluminum tripod from a big box store. (It's not ideal for hiking, but a sore shoulder is better than soft photos.) E-bay and craigslist are good resources for this sort of thing. Consider putting a "want to buy" ad on your local craigslist, you never know what photographers have lying around that they'd be willing to part with on the cheap. Make sure whatever you buy is durable enough to get banged around a bit, and sturdy enough to be set up in moving water without worry of it washing away down the stream. More on that in a bit.
Another essential bit of gear is a polarizing filter. Water and wet leaves are very reflective, and it's nice to be able to cut those reflections to boost colors in your photo. This also produces an interesting effect where the falls drop into the stream and quickly disappear. A polarizer also serves as a roughly 2 stop ND filter, which can be enough on a cloudy day to get the exposures you're after without stacking filters.
An ND filter is probably a good thing to have as well, especially if you're caught out shooting on a less than ideal (ie sunny) day. I have a 3 stop ND that I stack on my polarizer. This leads to a bit of vignetting at wide angles, so I prefer not to use the ND filter if I don't have to, but it's better than nothing.
I generally find a wide to normal zoom lens to be the best for this sort of work. Access to the falls varies based on where you go, so while an ultra-wide can produce some interesting photos you can't always get that close. Filter vignetting is also an issue the wider you get, so that can be a bit of a limiting factor. I aim for exposures in the several seconds range (2-8ish), so the lowest ISO setting and a stopped down aperture (f/11-f/22, depending on conditions) are a must. Use your histogram or blinkies so that you're not blowing out the falls, you'll be sorry later if you do. With these multi-second exposures I haven't noticed a difference between using a remote release and just pressing the shutter, so I've given to working without a remote (it's just easier). This will vary based on how stable your tripod is and your shutter squeezing technique, so you may opt for a remote if you're not getting the sharpness you think you should be.
Waterfalls tend to lend themselves to vertical compositions, so that's how I shoot most of the time. Keep an eye out for horizontal shots, though, they're certainly out there. Often the best vantage point is in the middle of the creek, so don't be afraid to get wet. (I've been seriously considering purchasing a pair of hip waders for this type of work.) I recommend planting your tripod without the camera on it first to test depth/stability. Look for interesting foreground elements like rocks or leaves or smaller cascades to add depth to your shot. This is where that wide angle lens will shine. Also be on the look out for motion in the stream - over several seconds the bubbles or leaves may travel in an interesting pattern that you can use to add interest to your shot. Watch out for spray from the falls: like I said before, it's very difficult to get a lens properly dry and clean again when you're standing in the middle of a creek. If it does get wet, the best thing to do is walk away for a bit, wipe it with a microfiber cloth, let it dry, then clean it with some lens tissue or a lenspen to get any stream gunk off. If you really want the shot, keep your lens covered with a cloth until right before you make your exposure to help minimize spray.
Cloudy conditions are great for getting the exposures you want, but they tend to lead to somewhat flat photographs. My main edits are locking in white balance (you want the falls to be neutral or slightly cool) and boosting contrast. I find that I prefer converting to black and white for most shots, in which case I use color filtering to darken the stream even more (a blue/green filter removes the yellow/red/brown of the rock, making it darker - see below). Note: go easy on this effect in the fall, as the leaves will also get darkened down and it can look flat and unnatural.
That's about all I got, I guess. Questions/Comments? I'd love to hear 'em.
~S
© 2009 Simon Hucko
[title of blog] on flickr
© 2010 Simon Hucko
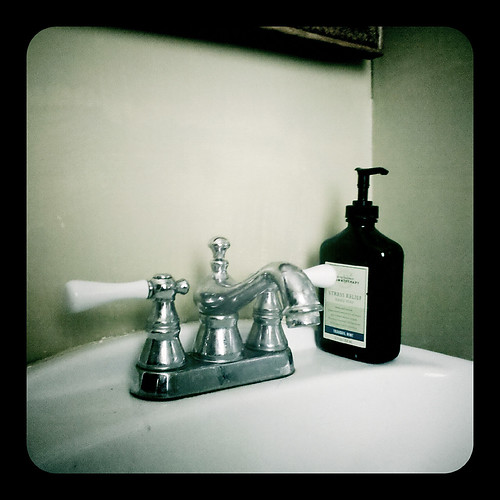
My photo this week was an image I found as part of my normal routine. It has sort of a "still life" feel to it, although I didn't position anything myself. This is probably my favorite thing about phone photography, the ability to capture an interesting image in the everyday. People see the world around them differently, and I'm always intrigued by these little slices of vision. As I've said all along here, camera phones are just fine for your weekly photo. What matters is the image and the vision behind it, not the gear you use to take it.
My pick this week is "Stifling Love" by slithy-toves:
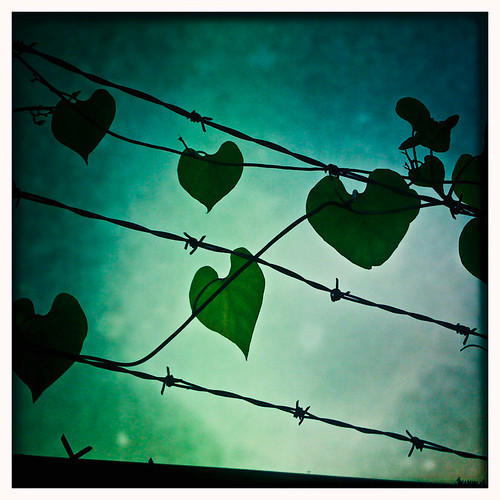
I really like the juxtaposition of the soft heart-shaped leaves and the barbed wire - great find! I also like the lines here, and the way the one vine cuts across the wires. Very interesting and thought-provoking photo, thanks Stacey!
This week's theme will be "change." For those of you in northern climates, Fall is definitely on its way in, and leaves are starting to give up their green and show their true colors, so to speak. Don't feel limited to leaves, though, there are a lot of different ways to express "change" in a photo. Happy hunting!
~S
[title of blog] on flickr
© 2009 Simon Hucko
Pop quiz time. Hope you all play along...
Where's your camera? You should know this without having to think about it, and ideally it should be close by. Go grab it, I'll wait.
Got your camera? Ok, without looking at it, turn it on. (We're going to do a lot of this "without looking" stuff, no cheating!) Before you look, what are the camera settings right now? (Shooting mode, focus mode, set aperture/ISO/shutter speed, image size and quality, etc.) Check to see how you did - at this point the camera should be on and at the settings you thought it was at.
Now to play a bit. Put the camera in an appropriate shooting mode for where you are right now (you can look for this one). Bring the camera up to your eye, frame an image, and fire off a shot. Now, without taking your eye away from the viewfinder, increase the exposure by 2 stops however you want and take another photo. Bring the exposure back to normal and adjust the ISO down a stop (if you're at the lowest setting, put it up a stop), take another photo. Zoom your lens to its widest setting, then all the way to the telephoto end. (Prime? attaboy.) Set the white balance to fluorescent. Switch to manual focus, find a new subject, focus on it and take a photo. Turn the flash on, take a shot. Change the flash exposure compensation down one stop, take another shot. Bring up one of the images on your review screen. View the histogram for that image. Change it so that it displays blown highlights (blinkies). Find the EXIF data and see what shutter speed the photo was taken at. Delete the image. Format your card (only if you don't have anything valuable on there!) Bring your camera back to its normal settings, shut it off, and put it away.
How did it go? Could you do everything without hunting for the controls? Even if you have to menu dive for some things, do you know how to quickly access those menus and make the necessary changes? If you can't easily make these adjustments while shooting, you need to spend more time with your camera. There's nothing worse than missing "the shot" because you were fiddling around with the gear. Spend an hour or two some day walking around your house shooting, adjusting these things as you go. If you have to hunt for a setting, spend some time changing it back and forth to commit it to memory. The less you have to look at your camera, the better.
So how about it? I'm interested to hear how you did. I'll be honest, I had to glance down at my camera for ISO and white balance. Something for me to work on.
~S
[title of blog] on flickr
© 2010 Simon Hucko
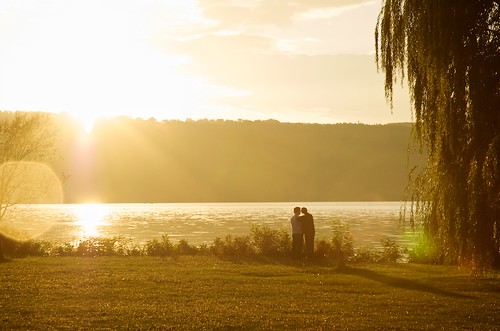
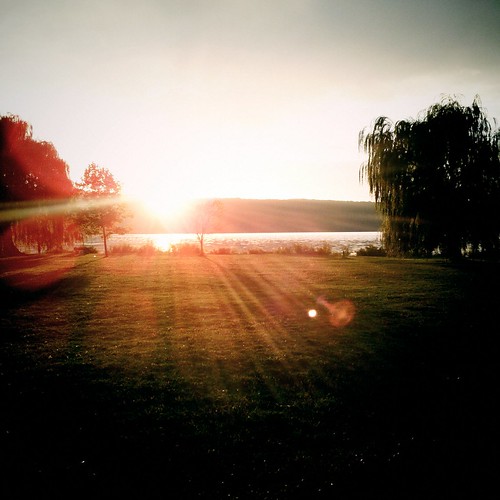
I'll admit, I cheated again. I already had this shot in the can when I picked the theme for the week, complete with all it's delicious flare. Last Monday was an awesome evening weather-wise. We had bands of showers rolling through, and the sun kept poking out in between, leading to many a double-rainbow around town. More importantly, when the sun started going down, we had the most beautiful golden hour light I've ever seen. This shot was a bit of a grab shot on the way back to the car - I saw the couple standing by the lake back-lit by the sun and thought it would make a nice image. Luckily for me she leaned in to him right as I picked up my camera, allowing me to capture this great moment. I fired off a few frames, dropped my bag back in the car, and turned around to get their e-mail to send them a shot but they were already gone. Life waits for no one, I suppose... Sure, it has a trendy "engagement session" feel to it, but it totally does the evening justice light-wise.
My pick this week is "Gauangelloch" by djhucko:
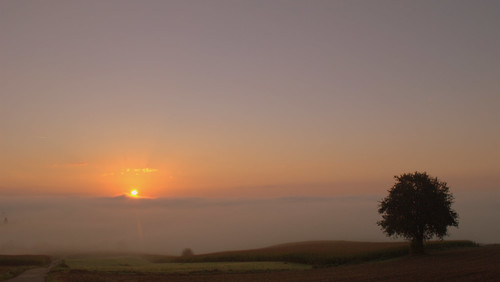
© Dan Hucko
No flare here, but a beautiful sunrise capture. I like the framing he chose, putting the fog line on the lower third instead of the visible horizon. This puts the rising sun right at the classical "rule of thirds" placement for the subject, and it gets balanced out nicely by the tree in the lower right. I think this would make a very nice print, too. Excellent capture.
This week's theme is Camera Phone shots. The beautiful thing about your camera phone is that it's always with you. Find a little slice of your world to share with us this week, giving some insight into how you see things around you. Don't worry about resolution or fancy camera apps, a straight up camera phone shot is fine (and you can always pull it into your photo software and tweak it a bit there.) Looking forward to seeing what you guys post!
~S
[title of blog] on flickr
© 2010 Simon Hucko
Practice makes perfect, and photography is no exception to that rule. One of the best things about the digital photography era is the ability to shoot a nearly unlimited number of photos without worrying about additional cost. Now anyone can burn through 100+ frames experimenting with lighting or a new technique or a different subject, whereas the expense associated with such an exercise 10 years ago limited things like that to film school and driven amateurs with a large slush fund. Not only can you shoot as much as you want, there's no delay between pressing the shutter and seeing the image. No waiting to finish off the roll and sending it off for processing (or spending a few hours in the darkroom yourself developing and printing) to find out that you missed the focus or exposure on an otherwise great shot. This, along with the ease of sharing and getting feedback on your work, makes digital photography an incredible learning tool.
It also makes you sloppy.
It doesn't matter if you get it right the first time. Or the second. Or even the tenth. Just keep plugging away until you get something good enough to rescue in your software editing package of choice. Who cares, it's all free, right? Not exactly. What about the time you spend taking multiple photos of one thing until you get it right? How about the time spent in post processing fixing stuff that you could have gotten in camera. And then there's storage, if you're one of those digital pack rats who can't delete a photo you're going to be snapping up hard drives and bogging down your computer with giant photo libraries.
But there's another hidden cost in there - you stop learning your craft. Why spend time on making the perfect exposure when you can correct for it with a slider in post? If you miss on composition a little you can always crop down on the image. (Hey, 12 million pixels have got to be good for something, right?) Horizon a little crooked? No biggie, just straighten it as you go. And sure, these are just little fixes that take almost no time at your computer, but they add up (especially when you're doing them for those 327 frames you snapped on burst mode). On top of that, you're losing resolution and image quality along the way. It's nice to have these tools available, but you shouldn't be relying on them for every shot.
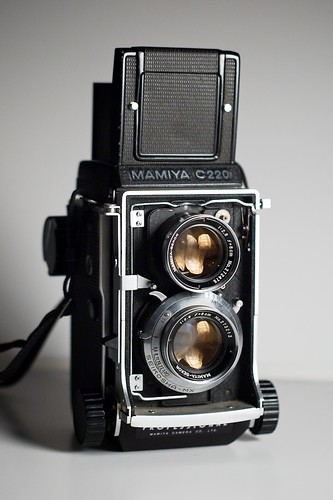
I think this is why so many photographers who started on digital are "discovering" film (myself included). Suddenly every shutter press costs something (from a few cents to a few dollars depending on the film, format and processing). There's no image review with histogram on the back of the camera, so you have to get exposure right the first time. If you take a shot and then walk a few feet and discover a better angle, you've wasted that first shot. You're stuck with whatever ISO film you have loaded in your camera, so you have to make sure you bring the right stuff for the type of shooting you'll be doing. Every film has its own look, too (especially color film), so that needs to be factored in to your final result. The net effect of this is that shooting film is much more patient and deliberate than shooting digital. That clunk of the shutter is like an emphatic period at the end of a long sentence: film choice, composition, lighting, metering, aperture and shutter speed, focus, timing, shutter. Unless your budget allows for unlimited shots, you'll quickly become more selective about what and how you shoot.
What's my point? If you've never done so, shoot some film. Find an old 35mm film camera on ebay or craigslist for cheap (bonus points if it's all manual) with a 50mm lens. Buy a roll or two of film from somewhere that still carries it (CVS around here happens to have a surprisingly decent supply and they still process in-house). Find a way to meter if your camera doesn't - you can use your DSLR for this, or even sunny 16 (ie the force), and make every single one of those 24/36 frames count. Get some 4x6 proofs printed and see how you did. Scan them and share them here or on Flickr. I bet you'll be back for more. Not only that, but it will change the way you look at digital photography - you will simultaneously be incredibly grateful for the ease and speed, and learn to slow down a little and make your images count more.
Note: Getting addicted to film is a dangerous game. You start with a bargain 35mm camera, and before you know it you're processing large format sheet film in your makeshift darkroom in the basement. Don't say I didn't warn you...
~S
[title of blog] on flickr
![[title of blog]](https://blogger.googleusercontent.com/img/b/R29vZ2xl/AVvXsEhJ8bvx_9_zOAREbXcrJRML7aVvJMbb90IYYYuyti384jeZHYQ9t8MK6_Kpt_1P4-pZw-QfF9kh4Sqci0vbopzLme862PPhuyPJcc7pRLUW1K1aNzts5YzuXIhgonq66MpjJCqfiWtfwUw/s1600-r/waterfall.png)


