my flickr photostream

Tuesday, March 30, 2010

52 weeks: Week 12 wrapup

Blacklight Boogie
© 2010 Simon Hucko

So despite the later deadline and the reminder I posted, we only got half the usual number of entries this week. If you didn't get one up this week, make it a goal to shoot something (anything, with any camera, at any point) and get it up for next week. Even if you're not feeling very inspired, the act of pulling out your camera and saying "I'm going to take a photo" can help get the juices flowing. Try to find a new perspective on the things you see every day - your kitchen, your desk at work, your morning commute, your camera, whatever. Don't be locked into the mindset of "I need a sunny day to shoot outside," there are still plenty of opportunities out there even on a gray and rainy day. Given the right location, you can make some great minimalist images with all the gray, and the soft diffused light of an overcast sky is perfect for portraits. Also, Easter is coming up this weekend, which means family gathering and lots of bright colored eggs and candy. You should be able to find a subject (either live or delicious) somewhere in that mix.

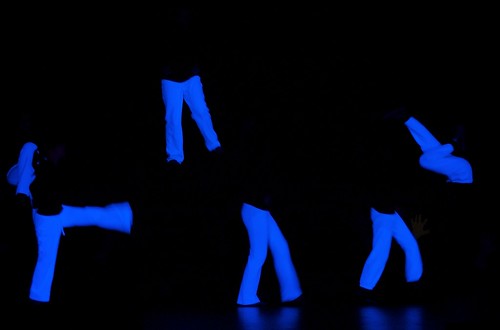
My photo this week comes from another stage shoot. This number was lit entirely with black lights, which was a really cool effect. There were a few other people taking photos at this rehearsal, all with flash. As you can probably guess, a flash kills the black light effect. Yet another reason not to use one when shooting the stage. (The lighting designer was there that night and was rather put off that people were using flash. I showed him this shot and he smiled.)

This week's winner is "prancing antelope" by D. Travis North:

Prancing Antelope
© D. Travis North

I love the dynamic feel of this photo. Using a faster shutter speed to freeze all of the water gives it a great texture, and the composition and direction of the spray make me feel like the antelope is about to spring right through the frame. I like the somewhat abstract metalwork, too. Interesting fountain, and very well captured.

Get those cameras out and get shooting!

~S

[title of blog] on flickr

Monday, March 29, 2010

Video?


© 2010 Simon Hucko

If you've been paying attention you'll have noticed that video is starting to creep its way into this blog. If you follow me on twitter, I'm sure you noticed the videos I posted and some video related links in my feed. So what's the deal?

Long story short, I had the opportunity to do some taping at an event a little while back, and there's talk about me becoming the "videographer" for similar events in the future (I'm being vague on purpose because this isn't anywhere near a done deal and I don't want to cause problems). Considering I have no background in video, I realized that if I was going to do this I'd have to get up to speed pretty quickly. I tend to be one of those "read/watch everything you can before attempting something" kinda guys, so I dove into the wonderful world wide web and started searching for anything and everything about learning to shoot video. Online video resources are nowhere near as prevalent and complete as online photography resources, but I think that's changing more and more as video gains popularity. Here's a few things I learned along the way:

- Video gear is expensive. If you think buying stuff for your camera was ridiculous, just you wait. It's also big and heavy and bulky, and was not designed with consumer comfort in mind. This is changing a bit as companies are starting to cater to the hybrid/crossover crowd (such as Redrock Micro and Zacuto, among others), but it's still not cheap.

- Stable shooting is king. The reason video gear is so bulky and expensive is that it's rock solid to shoot from. Nothing screams "amateur video" like shaky camera work, and these products help you get that nice smooth look that your video needs. Yes, I said "needs." If you expect to do anything more with your video than show it to grandma, this is the number one requirement.

- Audio is king. I know, I said stable shooting was king, and it is. But clear audio is just as important, if not more. Nothing makes people stop watching your video faster than bad audio. If you're going to include ambient sounds or people talking in your video, you need to learn to use a separate audio recorder and microphones that will allow you to set levels. Get a good windscreen for your mics and use it.

- HDSLRs (also called HD DSLRs, hybrid DSLRs, video DSLRs, etc.) are amazing. The quality of footage from one rivals professional video cameras that cost way more. Ergonomically, they're not designed well for shooting video, but there are plenty of solutions out there for beefing them up to behave like a serious video camera. What this means is that you can now get a video setup for around $5000 (HDSLR, a few manual focus primes, tripod with fluid head, rails system, some sort of steady/glide cam) and produce video that looks like it could have come from a $50,000 setup. However, they have lots of limitations too. They're designed for shooting video in short bursts, and aren't well suited for recording long takes (like shooting a concert or something). They also don't support audio well, so separate audio recording is basically a requirement. Finally, the CMOS sensors use a rolling shutter that can cause issues with movement (both camera movement and subject movement).

- Video is experiencing a boom like photography did 5 years ago. Like I just said, the barrier of entry to shooting professional quality video is now a lot lower. There is also an ever increasing demand for web content, especially with new devices like the iPad on the market. Every new DSLR being announced also shoots video. News agencies and magazines like National Geographic are no longer sending separate crews out for photography and videography - they're expecting one person/crew to produce both. Photography isn't dead, but if you want to be marketable as a professional event photographer in 5 years you're going to have to shoot some video as well (or have someone on your team who can). I'm not saying this to scare anyone, but if you're still ignoring the whole "video" thing it's time to do some learning.

- There is a lot of crossover between shooting stills and shooting video. Basic things like exposure and composition are the same (except that you're stuck in a horizontal 16:9 ratio most of the time). You're still trying to tell a story with your imagery, but now instead of capturing a "decisive moment" you have to let the story unfold over time. You don't have to write a script or anything, there are many amazing videos out there that just capture small vignettes and string them together in a meaningful way. This is a great style for photographers moving over to video, and can be extremely effective when done right.

- There is a lot to learn when moving to video. Audio is probably the most different, because you don't even have to think about it when taking stills. Effectively recording video so that you have good starting material for your edit can take some getting used to as well. People tend to cut too early or not start rolling soon enough and miss some natural buildup/release in a shot. This makes your edit look a little choppy and forced. (Once you edit your first video you'll see what I mean, and your next time out with the camera will be a lot better.) Then there's things like frame rates, compression, codecs, and all the other stuff that you have to figure out (check out this article from lensrentals.com about compression).

So there's a quick overview on my thoughts about video. This is still primarily a photography blog, but I'll probably put up more and more video related posts as time goes on. The stop-motion video I posted above was my impatience for having a video camera getting the best of me. I decided to shoot with my DSLR in burst mode like it was a video camera, playing with focus pulls and camera movement. I was pleasantly surprised with the results, and will definitely make more of these in the future (hopefully better exposed and with more planning on what shots I want). I stole the idea from someone else, so feel free to do the same and play around with this on your own. I edited mine together with iMovie, but there are plenty of programs out there to do this (search for stop-motion or time lapse software).

Before I throw out some links, I'm going to make a prediction: It's only a matter of time before Canon or Panasonic (or possibly Nikon, but I doubt it given that they don't make camcorders) is going to take their HDSLR chip and lens mount and put it in a more video-friendly body. That might be the day I switch systems away from Nikon. Just sayin'...

edit: Did I call it or what? 2 weeks later, Panasonic announces plans for a micro 4/3 mount camcorder, slated for late 2010. Press release here.

Video links:

Vimeo - Flickr's video cousin. Really nice video sharing site, complete with groups and forums.

Take Zer0 - A blog/vlog started by a pair of film students. I think they have their own studio now. Go back to the beginning for the "how to" kinda stuff, and see how they apply it in their shorts. (short movies, not short pants)

A list of music resources - Sure, you can use stuff illegally from iTunes, but there's a lot of good free (as in beer) music out there ready and waiting for you to download and add to your videos. Make sure you follow the guidelines for attribution (we all want credit for our work, right?).

The $14 steadycam - nice steady shots on a budget. Requires a trip to the hardware store and some tools/knowhow, but the results look great.

Questions? Thoughts? Comments? I'd love to hear 'em.

~S

[title of blog] on flickr

Tuesday, March 23, 2010

52 weeks: Week 11 wrapup

Happy St Patrick's Day
© 2010 Simon Hucko

I think that extending the deadline until Sunday evening was the right decision. I'm also going to post a reminder to the group on Thursday or Friday to give you a little nudge before the weekend. If you don't get on flickr that often, you can add the group's discussion feed to your RSS reader (go to the group page and look for the link there). I'll delete the old thread and create a new one every week, so it should update for you.

My photo this week was a little different for me. It's not often that I "create" photos, I usually work with "found" images (even if I choose the right place and time to find them). This was something I threw together last Tuesday night in about an hour. I probably could have improved on it with more time, but it was a fun exercise in lighting and creating a shot. I like doing studio work from time to time because it gives me the chance to pre-visualize an image and do everything I need to create it while taking away all the variables that you get with "real life" situations. I recommend playing with some mini studio work like this sometime. You don't need much - a few desk lamps or work lamps will do the job, just make sure you have a tripod and/or a fast lens to deal with the lower light levels. Printer paper makes an excellent diffuser, and can also serve as a background in a pinch.

Congrats to djhucko for this week's winner "Trout Dreams - 12"

Trout Dreams - 12
© Dan Hucko

I really like the balance between the fish and its shadow. Despite shooting through water, the trout is remarkably clear and sharp. Something about this photo feels very calm and peaceful, and I think it would make a nice print.

Keep up the great work everyone!

~S

[title of blog] on flickr

Monday, March 22, 2010

Focus then Recompose and the AF-ON button

Jungle Giraffe
© 2010 Simon Hucko

Today I'm going to talk a bit about how I go about taking photos. This article mainly applies to the DSLR users out there, so sorry to the point n shoot peeps. Before you leave, I will say that I'm a big fan of pre-focusing on the subject and then recomposing the photo. I talked about this a bit in my article about fighting shutter lag, which is worth another read.

To those of you with the big bulky black boxes slung around your neck, I'll share a technique I got hooked on last fall. By default, your camera is set up to look at all of the available focus points, pick the one that it thinks is the subject, lock focus with a half-press of the shutter, and then once focus is confirmed it will trip the shutter on a full press. This method works most of the time, but you're going to run into plenty of cases where it will drive you bonkers. Take my photo today - if I had let the camera do all the focusing automatically, it probably would have grabbed onto one of the leaves in the foreground, and I would have ended up with a nice out of focus giraffe. I long ago turned off all the fancy focus features and use just the center focus point - I choose what I want to be in focus, lock focus, and then adjust the photo for the framing I want. This technique (called focus then recompose) is nothing new, and I would guess is what most of you already use.

The juicy little tidbit I want to share with you today is the AF-ON button. "Huh? I don't have an AF-ON button on my camera." Well, no, unless you own a pro or prosumer camera (D# or D### series for you Nikon shooters), you don't. But you do have a little button on the back marked "AE-L/AF-L," and you probably never use it. (For the Canon users out there, I'm not sure exactly what the buttons are and where they're located, but I'm sure it's something similar.) Lucky for you, that button can be re-mapped to AF-ON through the custom settings menu. Check your manual to see how this is done for your camera.

Why would you want to do this? There are a few reasons. The one that did it for me was not having to hold the half-press on the shutter to keep the focus lock. I would focus then recompose and wait for the right moment, all the while holding that half-press. If I slipped a little bit, the camera would unlock and then re-focus, screwing everything up and causing me to have to start over. Even if it worked, sitting there holding a half-press can get uncomfortable after a few seconds, and I have better things to worry about. Another huge benefit is that you can set your focus mode to AF-C (continuous servo mode), which means that your shutter will never wait for focus confirmation to fire. I've had a few situations where I had the shot framed and in focus, but the shutter just wouldn't trip because the camera thought I screwed up. There is nothing more frustrating than mashing your finger down on the shutter release and having nothing happen. Another great thing about this is that you can use the AF-C to track your subjects right up to when you fire the shutter. No more switching back and forth between focus modes, you get all of the benefits of both without any of the drawbacks. The final big advantage for me is that I can shoot a series of shots without having to re-focus every time. If I'm working on a subject a set distance away, I can focus once and work on different framing, adjust exposure, or capture different moments, all without having to re-focus every time I half-press the shutter.

This may sound a little strange, and I was skeptical at first too. It'll even feel a little weird the first time out, and you'll miss a lot of shots because you'll forget to focus (don't try this for the first time at an important event or paid gig). However, you'll get used to it pretty quickly, and if you're a focus-then-recompose type shooter you're going to love it.

~S

[title of blog] on flickr

Tuesday, March 16, 2010

DIY StringPod


I've read before about people using a stringpod (monopod made of string) to help stabilize their photos. I never really thought much of the idea, because I'm not sure how much stabilization you actually get (it can't be more than a stop, if even that much). However, now that I'm starting to play around with video a bit, I thought it would be worth a try. (When it comes to video, every bit of added stabilization helps) Here's how to make your own:


What you'll need: the shortest 1/4" bolt you can find (mine is 1/2"), a washer (I used a 2" washer for mine, more on why in a minute), and about 6' of a thin string/twine/rope/whatever. I picked all of these up at the hardware store for $3, but the actual cost is probably closer to $1 because there was plenty of twine leftover. Also, you'll need a pair of scissors to cut the twine. Tie one end of the twine around the washer. Set it on the floor, and measure out the twine so that the end comes up to around your chin (where the bottom of the camera will be when you shoot). Cut the twine, and tie the other end around the head of the bolt. Make sure this knot is tight enough so that it won't slip off the bolt when not in use. (Note that you can store the twine wrapped around the washer.) To use, screw the bolt into the bottom of your camera like so:


Drop the washer on the floor, step on it, and pull up on the string to apply tension. This is partially why I chose a larger washer - it provides a bigger platform to stand on, ensuring it won't slip around. It also makes a handy way to store the string, because you can just wrap it right up. This tension will help keep your hands from bouncing around while you shoot, which is what provides the stability. I did a quick video test comparing some zoomed footage shot handheld and with the stringpod:

DIY StringPod Test from Simon Hucko on Vimeo.


It doesn't make a huge difference, but I think there's some improvement. I also think that with a little practice I'll get better at cutting down on the "wiggle" you see at the end of the video (caused by the camera twisting around the string). Add in my trusty gorilla pod, and I have a nice little video kit that will fit in a jacket pocket, or can live in my camera/computer bag:


~S

[title of blog] on flickr

Monday, March 15, 2010

52 weeks: Week 10 wrapup

View from the 5th floor
© 2010 Simon Hucko

10 weeks down! Given the amount of photos that trickled in during the day yesterday, I changed my mind on a weekly deadline. The new deadline will be Sunday at 12pm EDT. Wrapup posts will now be up on Tuesday, with my weekly ramblings switched to Monday. Hopefully this will work out better for everyone.

My photo this week is an exercise in dynamic range. It may look a little dark to you here, I suggest viewing it larger to really appreciate all the foreground detail. I did take a bracketed shot, I think this would benefit from that by brightening things up just a touch without losing the detail out the window. I pushed things a little with the RAW, but I couldn't go much farther without it getting noisy. I do like the feeling imparted with this shot, I think it's calming and pretty accurately reflects the experience of being there. This shot would be made better by having a person sitting on the couch, but I didn't have any willing subjects with me. Maybe next time.

Congratulations to irv_b for this week's winner "misery"

misery
© irv_b

Take a few minutes to really look at this photo. From irv_b's description: "...I saw this shot which I hope expresses the divide but common feeling." I think this is exactly what this photo is about. An interesting social commentary, and a very gritty street photo. Great work.

That's it for this week. I hope you all find some time to take a photo or two. Even if you can't get out for a proper photoshoot, carry a small camera around with you (point n shoot, iPhone, whatever) and document something interesting that you see during the day. Not only will this remove any excuses you have about taking photos, it should help you get your creative juices flowing and produce some interesting photos. Looking forward to seeing your submissions.

~S

[title of blog] on flickr

Tuesday, March 9, 2010

LensBaby

Bird Baby
© 2010 Simon Hucko

I know I promised a histogram post this week, and I'll get there, I promise. (possibly even later this week) I just didn't have the time to get everything together.

I know I don't usually write posts about gear, either, but I had the opportunity to use a truly fantastic little bit of kit. I went for a photowalk with Adam and Stacey (two other Ithaca photographers) on Saturday. Stacey was kind enough to lend me a lensbaby to play with (I think it was the older lensbaby 2.0). Oh man, are they fun. The lens is designed to give you a "sweet spot" that's in focus, leaving the rest of the image with a crazy blur (almost like a zoom blur). This really makes your subject pop, and gives you a whole new perspective on the world around you.

Piggy Back Ride
© 2010 Simon Hucko

Given more time with a lens like this, I think I would have been better able to take advantage of the effects it gives. Check out Stacey's huge lensbaby set for an idea of the amazing range of creative possibilities.

If you're ever looking for a creative pick-me-up, I highly recommend borrowing/renting/buying one of these and playing with it for a while. I'm totally addicted, and have added one to my photo gear wishlist.

One caveat - the lens doesn't talk to the camera at all, so you're on your own for exposure unless you use an old film body with stop down metering. No problem, though, just use the histogram as your meter. Yes, I'll write that post. I promise. Seriously.

~S

[title of blog] on flickr