skip to main |
skip to sidebar
© 2009 Simon Hucko
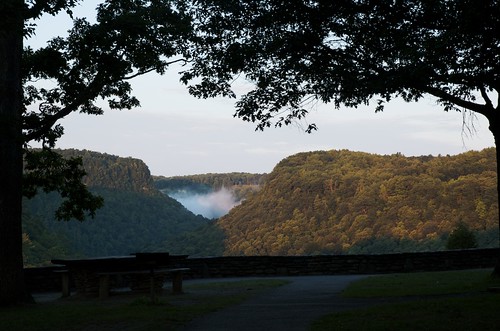
Well, I did it. Woke up before 6am on Saturday and ventured out to take some photos with my dad. I was hoping to capture the waterfalls there at sunrise, but apparently the light doesn't make its way down into the gorge until much later in the morning. While we were on our way to the falls, I saw the vista above and pulled the car right over. Great golden light, the mist rising in the valley, I couldn't pass it up. I think I even said "ooooo" as I hit the breaks. Later that morning I headed back out to go to the waterfalls and walk around/shoot a little. On my way, I stopped at the same place and took the following picture:

Oops! Thanks for the heads up about the busted photo. Should be fixed now
Not exactly the same framing, and not as extensively edited, but I think it gets the point across pretty well. The rich golden light is gone. The mist has evaporated. The sky is blown out. The foreground trees are no longer in silhouette. What was a unique landscape photograph became a run of the mill snapshot that every single visitor to the park has taken. The difference? 4 hours. The first photo was taken at 6:23am (sunrise was at 6:11am that day). The second was taken at 10:28am.
The lesson? If you want unique pictures, you're going to have to work for it. Timing is everything, and knowing when your subject will look its best can make or break a photograph. Do some research and scout out photo opportunities before hand so you know how to get the best shot possible.
~S
[title of blog] on flickr
© 2009 Simon Hucko
Want to take your photography to the next level? Start shooting during "the golden hour" - the hour after sunrise or before sunset when the sun is still very low in the sky. The low position of the sun does several things. First, it changes the angle of light from overhead to being more direct, eliminating problematic shadows (raccoon eyes, for example). It also provides a lot of textural definition to a scene, especially when you shoot with the sun coming in 90* from where you are, and can help make a landscape more dynamic and interesting.
The most notable effect (and the namesake for "the golden hour") is the dramatic change in the quality of light. Since the light passes through more of the atmosphere to reach you, it becomes more diffuse. It also becomes less blue, giving things a pleasing warm (or golden) tone.
Finally, the diffuse light isn't as bright, which compresses the tonal range of a scene and helps prevent blown highlights and muddy shadows in your images.
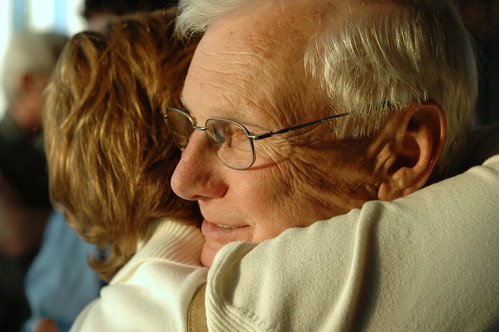
Golden hour light is generally preferred for photographing landscapes, as it reduces the dynamic range and provides some nice illumination on the scene. This is the main reason why a professional image of a landscape/waterfall/vista/city skyline/etc looks so much better than your photo taken at high noon. It also is great light for people/portrait photography, and you can take some amazing natural light portraits armed with only your camera and some type of reflector or fill card.
I'm going camping this weekend at Letchworth Park (Mount Morris, NY), which is home to several waterfalls and a giant dam. Unfortunately for me, all of them face east, so I'm going to try to wake up before dawn so I can capture them in that early golden hour light. I'll report back next week on whether or not I actually get up that early...
~S
[title of blog] on flickr

© 2009 Simon Hucko
With the progression of photo editing software, it has never been easier to add some creative processing to your images. Black and white, sepia toning, cross-processing, de-saturation, over-saturation, selective color, vignetting, color balance shifts - the list goes on and on. When used correctly, these techniques can bring a whole new feeling to an image.
The image above was taken in Times Square on Sunday. The color shot had some neon on the left that distracted from the main subject. By converting to black and white, I eliminated that distraction and put the focus back onto the man with the bicycle. It also makes the image feel older, creating the feeling (to me at least) that it's the city that's out of place, not the man with the bike. That bit of creative processing turned a good shot into a great one.
© 2009 Simon Hucko
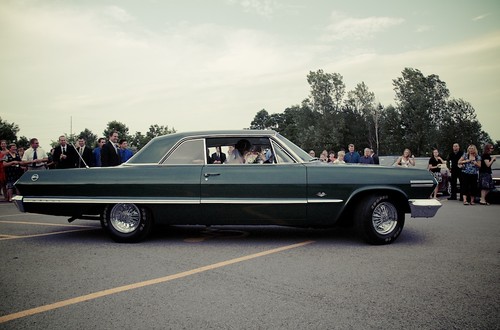
This shot benefited from some cross-processing. Cross-processing is a technique that used to be applied to film and gave it that washed out warm look that many of us associate with old color photographs (more to come on this, I promise). I wanted to create that feeling with this image to compliment the awesome vintage car they were leaving in. Here's the same image without the cross-processing applied:

Nice, but to me it doesn't have the same visual and emotional impact as the processed image.
It's easy to get caught up in digital processing and apply crazy creative effects to every photo you take. The key to making an impact with your processing is to have some motivation behind it. Why are you choosing to process your image that way? What effect does it have, both visually and emotionally? How does it help tell the story you want? Just like focal length, framing, composition, lighting and timing, processing is another important step in the creative process. Don't throw away the work you put into making a good photograph by applying unnecessary effects in post.
________________________________
[[Warning - shameless self promotion]]
I really like today's first image (view it larger here), and am considering making a print edition available. Is there any interest for that? Haven't figured out the specifics yet, but it would be a larger format limited edition signed print, possibly matted. Thoughts?
~S
[title of blog] on flickr

© 2009 Simon Hucko
My wife and I took her cousin to NYC on Sunday to see a show and do some shopping/walking around. I brought my camera, both to document the day and to try my hand at some street photography.
Unfortunately, we were greeted by rain, leading up to a pretty big storm around lunch time. I could have given up and put my camera away, but I kept it out and kept shooting. I had an umbrella with me (a must have accessory for every photographer), so I carried my camera close to my chest and did a lot of one handed shooting.
Shooting in the rain is a very easy way to up the interest factor for your images. For one thing, every picture automatically has a story to tell ("it was raining and..."). For another, people generally don't hang out in the rain and observe what's going on, so your photos will provide a unique look at the world. Rain also lends itself to reflections, which can turn an ordinary street scene into a whirl of color and light. The photo above was taken in Times Square during the height of the storm. The wet pavement reflected all of the lights, adding a lot of color and interest to the scene.
© 2009 Simon Hucko
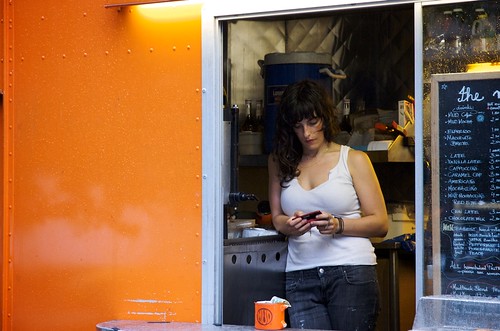
An example in the "it was raining and..." category: it was raining and this woman was waiting for things to clear up and her customers to return.
Bad weather is a drag, especially if you're travelling and can't just come back when the weather is how you like it. However, if you make the most of it, bad weather can lead to some very interesting and unique photographs.
Photo set from the day here
~S
[title of blog] on flickr
© 2009 Simon Hucko
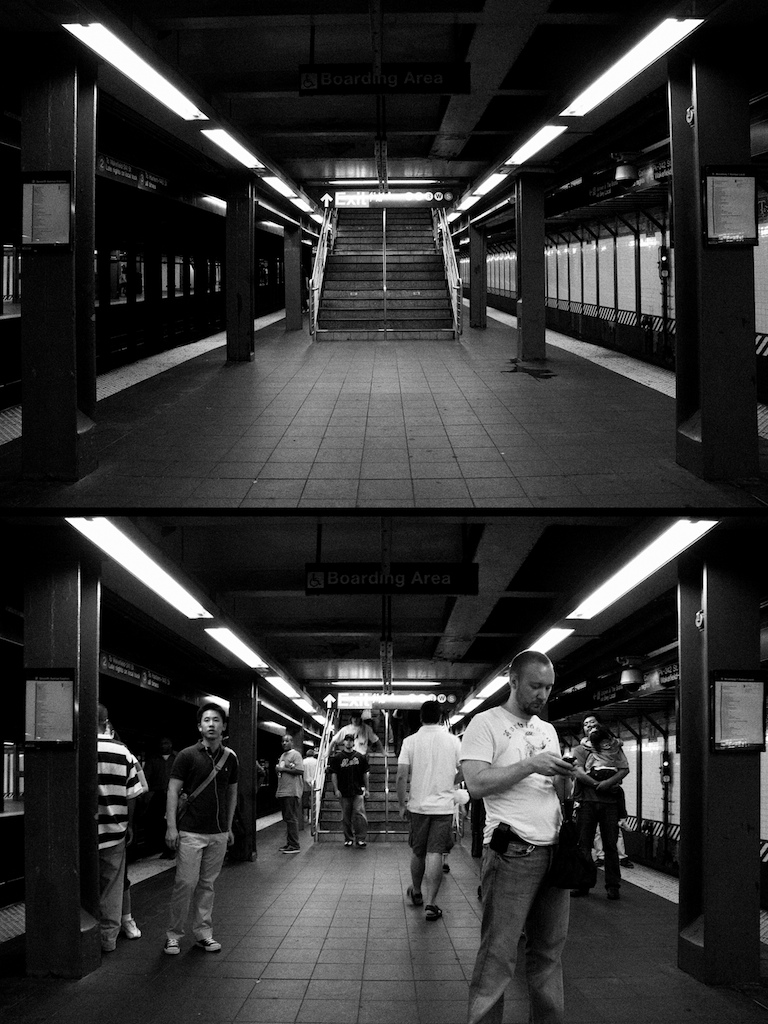
Looking for a creative way to tell a story with your photography? Cheat with multiple photos in one! Diptychs (two photos) or triptychs (three photos) can act like short stories, conveying some meaning in multiple images that isn't present in an individual photo. My photo above plays with time, showing an empty subway platform become filled with people waiting for a train. There are many other ways to take advantage of displaying multiple photos together.
Diptychs/Triptychs can be a good way to get yourself to think about story telling through photography. Next time you're shooting, keep an eye out for opportunities to create one, and share it in the [tob] flickr group.
~S
[title of blog] on flickr
© 2009 Simon Hucko
I know I've drooled over RAW before, but I found a nice concrete example of why I'm never going back to JPEG while I was editing photos from this weekend.
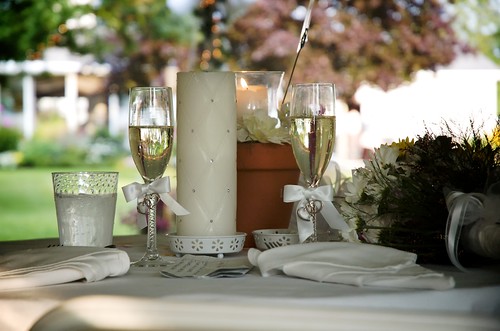
I like today's shot. Nice color, pleasing bokeh, captures the feeling of sitting at the head table at a wedding. Out of the camera, it looked like this (straight RAW conversion):

© 2009 Simon Hucko
Underexposed, muddy, color is off - not such a nice shot. But, because I was shooting in RAW, I had some wiggle room and was able to save it. I set the white balance from one of the napkins, boosted the exposure, tweaked the levels to add some contrast, applied some noise reduction and sharpening, and added a little vignetting. Only a minute's worth of work, but it made a huge difference in the final product.
I try not to rely on this, but it certainly can help save a shot you like that's a little off.
__________________________________________________
Tip of the day: find something neutral in a picture to help set the white balance. Weddings are especially good for this because of all the white. (Just make sure that it's really white and not ivory/cream/champagne/whatever, or you'll have an unhappy bride on your hands)
~S
[title of blog] on flickr
© 2009 Simon Hucko
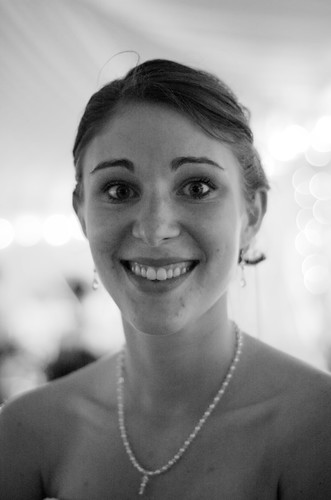
While editing photos from this weekend I came across a portrait I had taken of the bride. I was shooting available light in the reception tent at dusk, and so all I had to work with was a little bit of sunlight and the christmas lights and candles that had been lit. Even at ISO 800 f/1.8 1/40th (the limit for my setup, as it doesn't handle high ISO very well) things were dark and underexposed. I tried pushing the exposure, but couldn't get it very far before it got too noisy for comfort. See the original color image below:

© 2009 Simon Hucko
I decided to try converting to black and white. People tend to be more tolerant of noise when the image is black and white, probably something to do with the notion of grainy black and white film. After conversion I was able to boost the levels a little and with some noise reduction got a usable portrait. It probably wouldn't make a huge print, but it's good enough for screen viewing, and if you really wanted you could squeeze an 8x10 out of it.
Converting to black and white is also a good way to overcome color casts and fringing/chromatic aberration that you can't easily correct in post. So remember, when all else fails, try black and white.
~S
[title of blog] on flickr
![[title of blog]](https://blogger.googleusercontent.com/img/b/R29vZ2xl/AVvXsEhJ8bvx_9_zOAREbXcrJRML7aVvJMbb90IYYYuyti384jeZHYQ9t8MK6_Kpt_1P4-pZw-QfF9kh4Sqci0vbopzLme862PPhuyPJcc7pRLUW1K1aNzts5YzuXIhgonq66MpjJCqfiWtfwUw/s1600-r/waterfall.png)


