skip to main |
skip to sidebar
© 2009 Simon Hucko
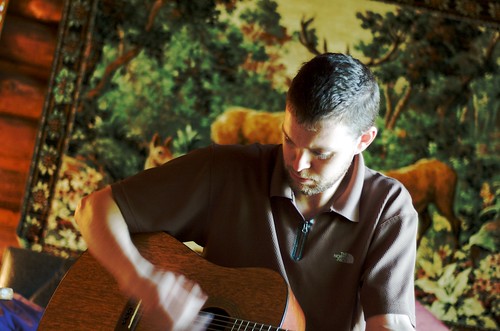
Ever take a great picture of someone, only to realize later that there's a telephone pole coming out of their head? Things that we hardly notice in the moment can be distracting or even comical, and can ruin an otherwise great image.
The solution? Take a second before you snap the shutter to look around the entire frame of the photo. Make sure there are no distracting elements in the background, or other things that will detract from your image (this includes people or objects between you and the subject). If you see something, try to adjust your composition to eliminate the unwanted element. A wider aperture (lower f number) can help by shortening the depth of field and adding blur to the background. A tighter crop can help as well, removing everything except for your subject and a little bit of background around them.
For the picture above, I chose to have the antlers coming out of his head to add some humor to the image. It was an artistic decision, and not an unfortunate (or fortunate) accident.
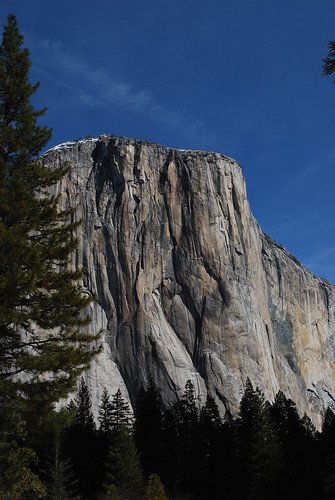
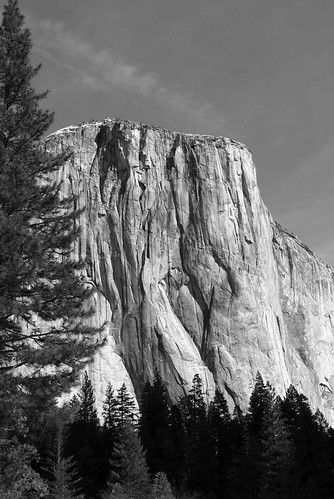
Sometimes things slip in at the edge of the frame, and you can't even see them because your viewfinder doesn't cover 100% of the image (true for all optical viewfinders). In that case, it's time to crop down a little in post.
© 2009 Simon Hucko
Here's one that I took in Yosemite, and blew right through when editing. I should have cropped out the little bit of tree on the right of the frame, which I did when I converted it to black and white recently:
© 2009 Simon Hucko
So remember, you are in control of your image. Take a second and check your entire frame, making sure you are only capturing what you want. You can save yourself a lot of aggravation (and humiliation) down the line.
Full set from last weekend here
~S
© 2009 Simon Hucko
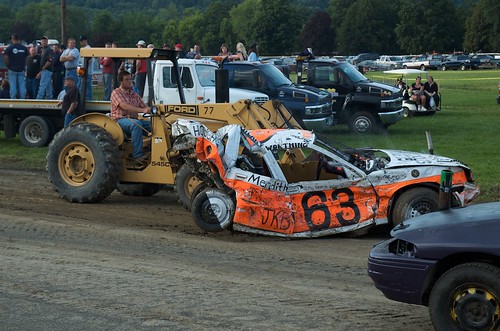
Last night I had the chance to grab my camera and hang out at the Tioga county fair, which is being held right down the street from where we live. The main event of the evening was the demolition derby. While that's not my usual scene, I had fun watching and taking pictures. I was too cheap to pay the $3 to get into the stands, so I found a spot on the fence next to the pit (arena? track? whatever they call it) and watched from there. I think it actually worked out better, since I was near the entrance/exit and got to see all of the cars passing by (either on their own, or aided by the various cleanup equipment):
© 2009 Simon Hucko
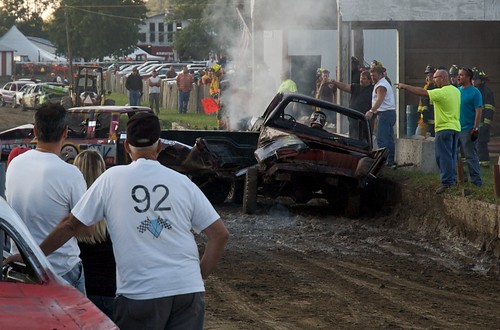
I missed most of the car crunching action, but I don't think it translates very well to still images anyway. It was more fun to watch the people and try to capture the event that way. Like when someone did something they shouldn't have an the officials got rather upset:
© 2009 Simon Hucko
Of course, what would a fair be without food? A lot of food vendors were set up, with some really really good smelling wares. My favorite was the Italian sausage sign (complete with American flag):

© 2009 Simon Hucko
Probably framed that one a little too tight, but I had my 50mm on at that point and it was hard to get back far enough.
My final adventure of the evening was watching Brian, the chainsaw carving guy (from Masters of the Chainsaw) turn a log into a bear. He was inside a netted off area to prevent debris from flying all over. Shooting through a fence/net like that is sort of lame, but I grabbed a few shots anyway. He saw me taking pictures, and when he stopped to switch chainsaws (he had like 7 of them lined up) he asked if I was shooting for the paper. "Nope, just for myself, but I'd be happy to send them to you if you give me an e-mail address." Well, he did, and then he asked if I wanted to come inside the net and shoot. Heck yes I would. I spent probably 10 minutes firing away inside the fence, got covered in bits of wood, and got some great shots:

© 2009 Simon Hucko

© 2009 Simon Hucko

© 2009 Simon Hucko
It was a cool opportunity, and I would say I had more fun than I had anticipated. I wussed out and didn't photograph any of the people at the fair (there were some great moments like a little kid sitting in his mom's lap doing one of those squirtgun races), so maybe I'll go back this weekend and try to overcome my fear of getting in trouble...
Full set from last night here
~S
© 2009 Simon Hucko
I talked the other day about how your camera meters a scene. In there I mentioned that your meter assumes that every scene is 18% gray, which is an average for a "normal" scene. If you just go with the meter, you're going to end up with pictures that look dull and gray. This is a mistake that all new photographers make (including myself), and a quick stroll through Flickr will show you plenty of examples.
To prove my point, I grabbed a quick flower shot. The first picture was taken using matrix metering with no exposure compensation. The second was taken at EV +1. These are straight conversions from Aperture, with only the standard RAW developing (no exposure or levels adjustments):


As good as the camera's meter is, it got confused by all of the white, and thought the scene was brighter than it really was. By setting the exposure compensation to +1, I counteracted this and got a correctly exposed picture. This was an extreme example where I knew the meter would get it wrong, but there are many times when walking around that the meter will expose under where it should be because of a bright patch in the scene. It's not the meter's fault, that's what it was designed to do. You just have to realize what's going on and make the necessary adjustments, either in camera or in post. (But that's lazy. Do it in camera.)
Just for kicks, I did a quick edit on the second photo:

I did a custom white balance on the petals to make them truly white, boosted the saturation, adjusted the levels until I got the brightness and contrast that I wanted, did some noise reduction and edge sharpening, and then added some vignetting. You can see that it ended up even brighter than the "properly exposed" shot above. I considered it properly exposed because it held the highlight detail (texture on the flower petals). I pulled the middle tones up to give it more overall brightness without losing the detail on the flowers. If I had exposed for where I wanted the leaves to be, the flowers would have blown out and lost all detail.
Look through your photos and see if you can find ones that are underexposed. Try to figure out why your meter did what it did. Pull them into your image editing software and see if you can get a better result with a little tweaking. And remember - friends don't let friends post underexposed photos to the internet.
~S
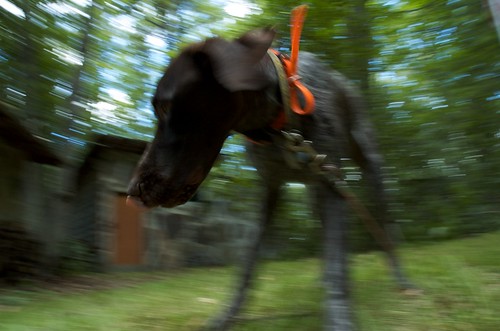
© 2009 Simon Hucko
Looking for a way to spice up your action shots? Try adding some motion using a pan-blur technique. The picture above is of our friends' hyper one-year old puppy, Mea. She was at the cabin with us this weekend, and ran around the entire time. I was taking pictures of her, and she was moving around so quickly that I ended up getting a few blurry shots. It was a happy accident, and I thought I'd try to emphasize her playfulness using a pan-blur technique. I set my lens to wide angle, held it low at her eye level, and tried to keep it in constant motion with her head while I released the shutter. There were a lot of unusable shots, but I was rewarded with the shot above, which I think really captures her spirit and my experience with her over the weekend
Below is a more typical example of a pan-blur shot I took at the Tour of California race in February of this year. Sports shooters use this technique a lot to show subject motion and to help isolate the subject from the background. Again, this turned out to be one of the few usable shots I got (shooting bikers flying by at 30mph is hard), but it's one of my favorites from the race.

© 2009 Simon Hucko
To summarize: set your camera to a long-ish shutter speed (1/100 is a good starting place). Follow your subject in the viewfinder (pan). While you're moving, press the shutter keeping the motion of the camera locked with the subject. Repeat. That last step is important - you're going to miss a lot of these, especially when you first start. The more you shoot, the higher your chances of success. Also, as you practice, you'll get better at keeping the camera motion steady while you release the shutter.
Give it a try next time you're shooting something that moves (kids, animals, cars, sports, bikes, marbles, whatever).
~S
© 2009 Simon Hucko
Most cameras today come with the option of using one of three metering modes: a matrix (Nikon) or evaluative (Canon) mode, a center-weighted mode, and a spot metering mode. For this discussion I'm going to refer to matrix metering instead of evaluative since I shoot Nikon, but the principle is the same for all systems.
Spot metering is the simplest. Your camera meters from a very small spot, generally centered in the selected focus point, and sets exposure for that spot to come out at 18% luminance. 18% luminance is also called "middle gray," and is the standard for metering dating back to the advent of the zone system. This mode works well if you are metering off of a gray card, but if you're metering on anything else you're going to have to really understand tonal relationships (ie zone system) to get good, consistent results. Too much work, in my opinion, so I never use spot metering while I'm shooting.
Center-weighted metering is a little more complicated. In this mode, the meter looks at the entire scene, but gives 75% weight to a small circle in the middle when calculating exposure. It's similar to spot metering, in that the camera exposes mainly for the center target, but it's a little more forgiving and makes some attempt to avoid over- or under-exposure of the rest of the scene. I like to use this mode when shooting people indoors with my 50mm. I set up my camera to lock the exposure on the half-press of the shutter. When I go to take a picture, I put the middle AF area on the person's eye and focus/lock exposure, then re-compose the shot and take the picture. This way I get a nice consistent exposure on people's faces, independent of whatever's going on in the background.
Matrix metering is partially responsible for the high cost of your camera. The meter looks at the entire scene, and then a computer analyzes the tonal range, contrast, location of bright and dark spots, etc. It then decides on what type of scene you are metering and sets the proper exposure. Most of the time, it does a darn good job. I use this for my walk around shooting and rarely have to fiddle with exposure compensation. From what I've read, the Nikon metering system is designed to preserve highlight detail if possible, whereas Canon is less conservative and can lead to blown highlights if you're not careful. There are merits to both approaches, but that's a post for another day.
Knowing how your meter works and how it responds to different situations can help you get more consistent results from your camera, and save you a lot of time and frustration in the field and in post. As always, the best way to learn is to practice.
________________________________________________
Thanks to my friend Matt for the suggestion for today's post. If you have any questions or anything you'd like covered, feel free to ask (in comments or by e-mail or on twitter or whatever) and I'll see what I can do.
~S

© 2009 Simon Hucko
With 4th of July coming this weekend here in the states and many other festivals around the world during the summer, I thought I'd share a link about shooting fireworks:
How to photograph fireworks (Digital-photography-school.com)
There are many such tutorials online, just google "photographing fireworks" ("shooting fireworks" gives quite a different list of how-to's). Feel free to share your experiences/results in the comments below! I've never photographed fireworks (obviously, since I have a picture of playing frisbee above instead of an awesome fireworks shot), so I'm looking forward to giving it a try :)
~S
© 2009 Simon Hucko
Today's link is to PixSylated blog's "Lessons I Didn't Learn In Photo School" series. LIDLIPS is a weekly installment on the blog from photographer/blogger Syl Arena. As the name suggests, Syl shares lessons learned from personal experiences in the business, and offers nice insight into the mind of a working photographer. I suggest you check it out, and add his blog to your RSS reader (feed here)
~S
![[title of blog]](https://blogger.googleusercontent.com/img/b/R29vZ2xl/AVvXsEhJ8bvx_9_zOAREbXcrJRML7aVvJMbb90IYYYuyti384jeZHYQ9t8MK6_Kpt_1P4-pZw-QfF9kh4Sqci0vbopzLme862PPhuyPJcc7pRLUW1K1aNzts5YzuXIhgonq66MpjJCqfiWtfwUw/s1600-r/waterfall.png)


