skip to main |
skip to sidebar
© 2009 Simon Hucko
We've all been there - you see a moment you want to capture, grab your camera, jam your finger down on the shutter button, and then wait an eternity for the picture to actually be taken. By that time you've missed the decisive moment (wikipedia), and are left cursing your camera. This is especially common with digital point n shoots, which are notoriously slow to focus, but even fancy DSLR's have some amount of focus and shutter lag.
How do you overcome this? Learn to anticipate and pre-focus.
Anticipating a great photograph is not always easy (or possible), but there are plenty of circumstances where you know what's coming. The kiss at a wedding. Your 5 year old niece blowing out candles on her birthday cake. A batter swinging at a pitch. By knowing what's coming, you can have your camera out and ready to go.
That brings us to the next step: pre-focus. Focus on your subject by half-pressing the shutter and make sure you frame the shot how you want it (keeping in mind that there may be some subject movement or additional elements added before the decisive moment).
Now when the moment happens you'll be all set to capture it, and don't have to wait for the camera to figure everything out. All cameras will still have some small amount of shutter lag, so you will still have to compensate by shooting a little bit earlier than the moment you want to capture. This requires some timing and practice, but the nice thing is that it's consistent so once you've got it down you'll be able to get it right just about every time.
~S
[title of blog] on flickr
© 2009 Simon Hucko
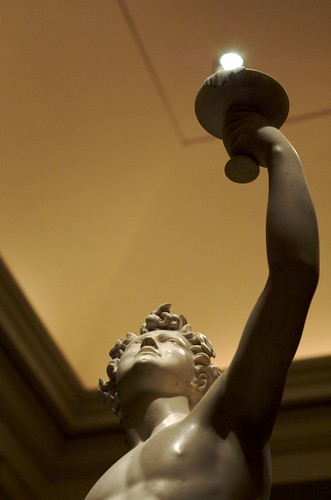
One of the unique (and sometimes frustrating) things about photography is that it forces the viewer to adopt a static perspective on a scene. Since photographs are two-dimensional, you can use this to your advantage when looking for creative photographs. I'm sure you've all seen photos where people in the foreground seem to be interacting with the background - holding up the leaning tower of Pisa, for instance. This technique is known as "forced perspective."
Aside from creating comic mementos of your vacation, forcing perspective can add interesting elements to your photographs. Take today's photo. I saw the sculpture, and noticed the recessed ceiling lights above it. Immediately I thought of trying to "light" his torch, and started squatting down and finding a perspective that would allow me to get that shot. I'm sure I looked pretty silly doing it, but you can't argue with the results. As an added bonus, the perspective matches the statue (looking up at the torch), so it lends itself well to this subject.
Remember that perspective is a very powerful part of composition. Try viewing your subject from several different angles (low, high, straight on, from an angle, sideways, from behind) and see which offers the most interesting image. That makes an interesting exercise, as well - take a picture of a subject from every angle you can imagine and compare them all afterward. How does your perception of a subject change based on perspective?
~S
[title of blog] on flickr
© 2009 Simon Hucko
Basic "rules" of composition stipulate that you should not place your subject at the center of the frame. The oft-touted rule of thirds (wikipedia.org) is commonly used by photographers to frame/crop their images, and a lot of cameras even include an optional rule of thirds guide in the viewfinder/preview window. Generally the idea is to keep the main subject out of the center of the frame, which results in a more natural, dynamic image.
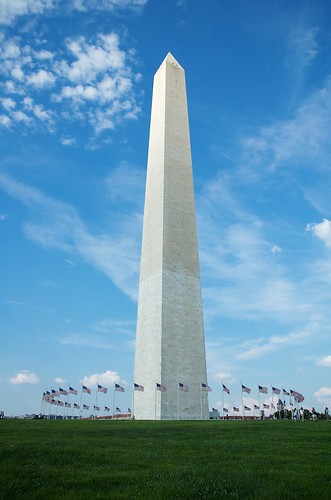
However, there are times when a centered composition can be used very effectively. This is especially true when the subject displays a lot of symmetry, showcased by today's photo of the Washington Monument. The monument, the ring of flags, and the expanse of grass in front all create a very centered and symmetrical feeling. The wisps of clouds in the sky help add a little interest and drama, but the photo would have been fine without them.
© 2009 Simon Hucko
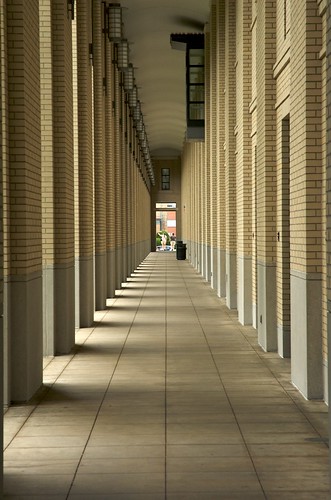
Another example showing a lot of symmetry and a centered "subject." Note that this technique works very well with architecture, since most buildings are designed to be symmetrical, but you can use it with other subjects as well.
Thoughts? Feelings? Comments? Questions? Critiques? Stories? Other symmetry pictures? Please share!
~S
[title of blog] on flickr
© 2009 Simon Hucko
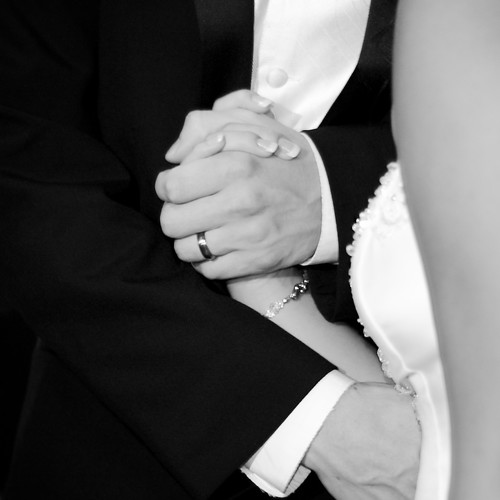
Quick tip today - always look for a detail shot, something that helps tell the story of the event you're shooting. This is especially great if you're planning on doing some sort of book or other multiple photo layout from the event.
Take today's photo - the connection between bride and groom. Not something you'd get a large framed print of, but it was a great addition to the photo book my wife made of the wedding.
Here's another example from when I was taking photos before a school play:

© 2009 Simon Hucko
Again, not something you would probably print on its own, but it was a nice addition to the set of people getting ready and added to the overall story.
Keep an eye out for the detail shots. You'll be glad you did
~S
[title of blog] on flickr
© 2009 Simon Hucko - view it large here
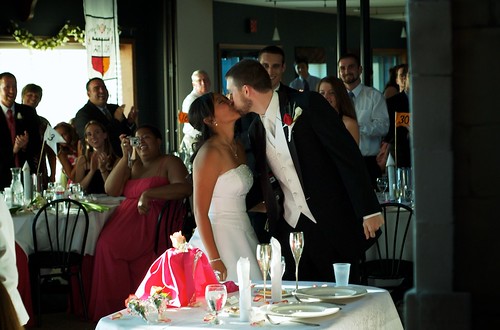
Internet photo-sharing sites have made people's photography incredibly accessible. You upload a photo, and anyone in the world with an internet connection has the chance to view and comment on it. While this is great for getting exposure and sharing photos with friends and family, it does come with a few downsides.
One of the biggest downsides (in my mind) is that the sites force your photos into small sizes. The normal view for a photo on flickr is 500p on the long edge (which is the same size I use here on the blog). And that's if someone has clicked through to your photo page. In other parts of the site your photos are relegated to even smaller sizes, and at times arbitrarily cropped into a tiny square thumbnail. The problem? Not all photos read well that small.
Take today's photo. Even at 500p, the background looks cluttered and busy. I had someone suggest that I add some blur to the background to help take away the distraction from the couple. I don't disagree with that, and a shallower depth of field or some photoshop would help isolate the main subject.
But, do me a favor and view that photo larger. Take a minute to look at the background, and everything that's going on there. What looks like a random bunch of heads at 500p suddenly becomes a wealth of expression and celebration of the couple's kiss. It's even better at the original image size, which I don't have posted. All of the action in the background adds to the story of the photo, and gives it more depth than just a nice picture of a bride and groom kissing.
The moral of this story is, find a way to view your photos larger. Find sites that will let you display your work at a larger resolution. Alert people to the fact that your image will probably look better larger and ask them to click through. Also, larger format prints are an awesome (albeit slightly expensive) way to look at your work, and I highly recommend taking a few of your hero shots and getting them printed up at 8x10 or larger. There is something truly satisfying about holding a print of your work in your hands and taking in every detail.
__________________________________
NOTE: I'm not trying to call out the person who made that comment, or say that they were wrong. You can definitely make the point that the background is too busy. It's all subjective, and there is no right or wrong. I love getting comments and criticism (yes, criticism) on my work, and being able to discuss it with people beyond "great shot!" "thanks." So thank you for the inspiration.
Feel free to write your thoughts/feelings on it as a comment here or on the flickr page
~S
[title of blog] on flickr
© 2009 Simon Hucko - view large on black here
Shooting through a crowd of people is hard, and usually doesn't produce very good results. I find I do a lot of cropping in situations like that, and the subject is typically framed by the back of two heads which can be distracting.
The solution? Start shooting without looking through the viewfinder. If you're using a point n shoot or one of the fancy new DSLRs, you've got it made - just make sure the preview is on and raise your camera up. Those of us without live preview have it a little harder - you have to shoot blind and hope you get something usable.
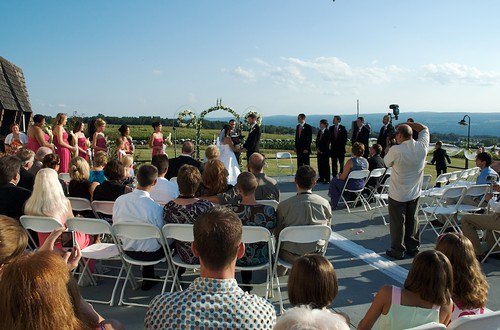
I've been working on this technique lately for a few reasons. The main one is to get above a crowd of people and get a shot of what I want. Today's picture is a perfect example. Everyone was sitting at the ceremony (including me) and I reached up and fired off a few frames. The resulting image looks like I was standing in the middle of the crowd, but this way I didn't make anyone mad (I hope). The key to this is to shoot pretty wide so you can straighten/crop later. A fast shutter speed helps too, since you won't be able to support your camera as well with one arm straight up in the air.
Another reason to work on no-look shooting is to avoid the "camera reaction" from people. Candids are very hard to get, and there are really only two ways to capture a candid moment. The way I usually do it is to have my camera out and up to my face long enough that people stop caring and go about what they were doing. But if you want to grab a quick moment that may not return, you're going to have to shoot people without them knowing. Aiming from your chest and firing off a few shots can return great results. I recommend sharing your pictures with the people afterward, but that's a moral issue and I won't go into that here.
You can also use this technique to get a unique perspective on your photos. Yesterday's post is an example of this - I held the camera low to get a shot from the dog's level. Sure, I could have sprawled out on the dock, but it's faster and easier to be able to do it without looking.
A little practice with no-look shooting can pay dividends down the line. Give it a try next time you're out shooting - it's a great way to add new a perspective to your images.
~S
[title of blog] on flickr

© 2009 Simon Hucko
Today's photo breaks a few photography "rules" - the horizon is crooked, I chopped off half of the person, the subjects of the photo are way underexposed, and the white balance is very cool (blue) compared to what it should be. Personally, I love it. It was an interesting combination of artistic intent and chance.
I was shooting mid-morning into the sun at the end of a dock, so I knew the subjects would be back-lit. I even took it a little farther by bumping up the black point in post. I wanted blue sky and silhouettes - sometimes detail on the subjects can be distracting and take away from the story of the photo (in this case, the interaction between dog and owner). I also cooled down the white balance a little to bring out the blue in the lake and sky. All of this I had more or less decided on before hand.
The crazy tilt and framing was basically an accident. Mea (the dog) came running by and I held my camera low and wide and fired away. I thought about straightening it up in post, but a. it would have cropped part of the dog and even more of the person and b. I liked the dynamic feel imparted by the lines leading up and right into the frame (which was the same way Mea was running).
It was an interesting weekend of photography - I did a lot of no-look shooting (something I've been working on), shot with the pop-up flash on my camera (horror of horrors, but I had no choice), played with different crop ratios when editing, grabbed a bunch of shots for a pano that I still have to stitch together, and even took some video with my point n shoot which I'm going to play around with editing this week (more to come on that later).
How was your weekend? Any interesting stories or photos? Feel free to share here or in our flickr group
~S
[title of blog] on flickr
![[title of blog]](https://blogger.googleusercontent.com/img/b/R29vZ2xl/AVvXsEhJ8bvx_9_zOAREbXcrJRML7aVvJMbb90IYYYuyti384jeZHYQ9t8MK6_Kpt_1P4-pZw-QfF9kh4Sqci0vbopzLme862PPhuyPJcc7pRLUW1K1aNzts5YzuXIhgonq66MpjJCqfiWtfwUw/s1600-r/waterfall.png)


